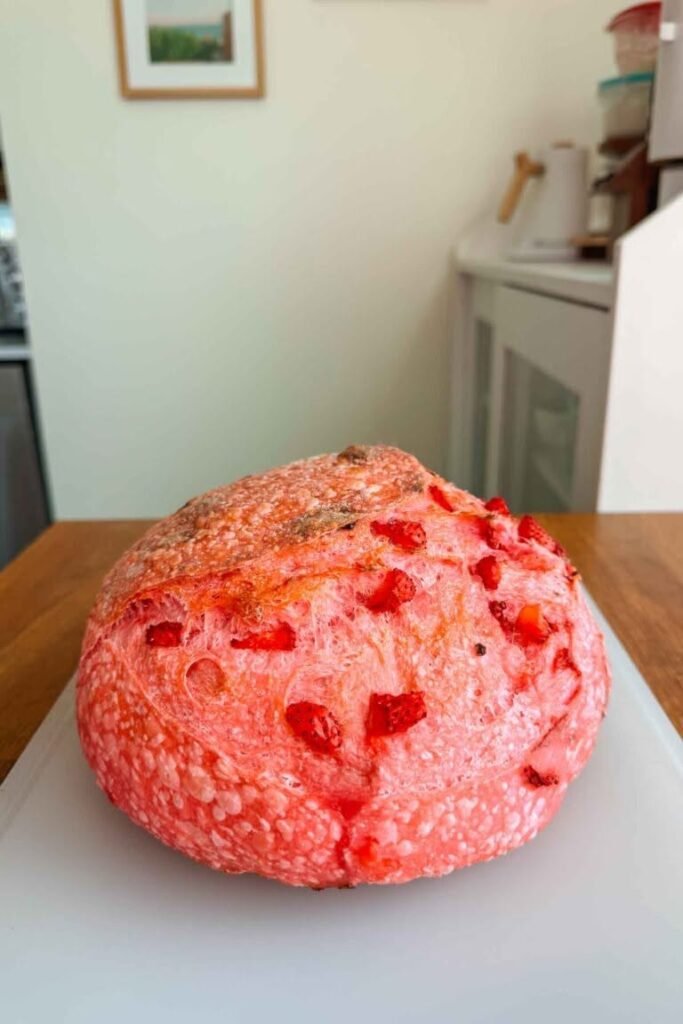

If you love homemade sourdough bread and fresh strawberries, this Strawberry Sourdough Bread is a delicious recipe to add to your baking collection. It combines the gentle tang of naturally fermented dough with the sweet, fruity flavor of strawberries to create a beautiful loaf that is perfect for breakfast, brunch, or an afternoon treat.
This homemade bread has a soft, tender crumb, a lightly golden crust, and little pockets of strawberry flavor throughout. A touch of honey and vanilla adds sweetness, while the sourdough starter brings its familiar depth of flavor. Every slice is wonderful toasted with butter, served with cream cheese, or enjoyed on its own.
Unlike traditional sourdough loaves, this fruity version is slightly sweet and makes a lovely alternative to ordinary sandwich bread. It is especially enjoyable during strawberry season, although frozen strawberries can also be used with a few simple adjustments.
The recipe takes patience because sourdough needs time to ferment, but the preparation itself is straightforward. Mix the dough, allow it to rest, add the strawberries carefully, complete the fermentation, and bake until the loaf is golden and fragrant.
Whether you are an experienced sourdough baker or trying a fruity sourdough recipe for the first time, this Strawberry Sourdough Bread is a wonderful way to enjoy seasonal fruit in homemade bread.
Why You Will Love This Strawberry Sourdough Bread
There are many reasons to make this sweet and fruity sourdough loaf.
- Fresh strawberry flavor: Chopped strawberries add natural fruity sweetness and colorful pockets throughout the bread.
- Naturally fermented: Active sourdough starter gives the loaf its characteristic flavor and helps it rise.
- Soft and tender texture: Milk, butter, and honey create a softer crumb than a traditional lean sourdough loaf.
- Perfect for breakfast: Enjoy slices with butter, cream cheese, jam, or your favorite breakfast spread.
- A beautiful homemade loaf: The strawberry pieces create attractive pops of color when the bread is sliced.
- Customizable sweetness: Adjust the honey or sugar to suit your taste.
- Great for strawberry season: It is a delicious way to use fresh strawberries when they are plentiful.
- Freezer friendly: Slice the cooled loaf and freeze portions for convenient breakfasts and snacks.
What Makes Strawberry Sourdough Bread Special?
Strawberry Sourdough Bread combines two wonderful baking ingredients: sourdough starter and strawberries.
A traditional sourdough loaf is usually made with flour, water, salt, and active starter. This version includes milk, butter, honey, and vanilla to create a softer, slightly sweet dough that complements the fruit.
Strawberries contain a significant amount of water, so they need to be prepared carefully before being added. Excess moisture can make the dough sticky and difficult to shape. Cutting the berries into small pieces and patting them dry helps control the amount of extra liquid.
The strawberries are folded into the dough after it has developed some strength. This helps distribute the fruit while reducing the chance of crushing it completely.
As the bread bakes, the strawberries soften and create juicy fruit pockets. The result is a loaf with a pleasant balance of mild sourdough flavor and sweet strawberry taste.
Ingredients You Will Need
This recipe makes one medium homemade loaf.
For the Sourdough Dough
500g bread flour: Bread flour provides the gluten structure needed for a strong, well-risen loaf. It also helps the dough hold the strawberry pieces without becoming too weak.
100g active sourdough starter: Use a bubbly, recently fed starter that has risen well after feeding. Active starter is important for developing a good rise and balanced sourdough flavor.
200g whole milk: Milk adds moisture and richness, helping create a softer crumb. Use room-temperature milk for easier mixing.
50g honey: Honey gives the dough gentle sweetness and works beautifully with strawberries. You can use granulated sugar instead if preferred.
50g softened unsalted butter: Butter contributes tenderness and a richer flavor. Make sure it is softened rather than melted.
8g salt: Salt balances the sweetness and improves the overall flavor of the bread.
1 teaspoon vanilla extract: Vanilla enhances the strawberry flavor and gives the loaf a pleasant aroma.
For the Strawberry Filling
150g fresh strawberries: Choose ripe, firm strawberries with a sweet aroma. Wash, remove the green tops, and cut them into small pieces.
1 tablespoon flour: A light coating of flour helps absorb some surface moisture and makes the berries easier to fold into the dough.
Optional 1 tablespoon sugar: Add a little sugar if your strawberries are not very sweet or if you prefer a sweeter loaf.
Optional Topping
- 1 tablespoon milk for brushing
- 1 tablespoon coarse sugar for a lightly sweet crust
- A few thin strawberry slices for decoration, if desired
Avoid adding too many fresh strawberry slices to the outside of the loaf because exposed fruit can release moisture and brown quickly.
Equipment Needed
Before starting, gather these kitchen tools:
- Large mixing bowl
- Digital kitchen scale
- Measuring spoons
- Dough scraper
- Small knife and cutting board
- Clean kitchen towel
- Proofing basket or loaf pan
- Parchment paper
- Baking sheet or Dutch oven
- Cooling rack
A digital kitchen scale is particularly useful for sourdough baking because accurate measurements help keep the dough consistent.
How to Make Strawberry Sourdough Bread
Follow these steps to prepare your fruity homemade loaf. Fermentation times are approximate because sourdough activity changes with starter strength and room temperature.
Step 1: Prepare Your Sourdough Starter
Feed your sourdough starter approximately 4–6 hours before mixing the dough, depending on its usual activity.
Allow it to become bubbly, active, and noticeably risen. A healthy starter should have visible bubbles and a pleasant fermented aroma.
For the best results, use the starter when it is near its peak activity. If your starter is weak or has not risen properly after feeding, the dough may take much longer to ferment.
Step 2: Prepare the Strawberries
Wash the strawberries under cool running water and remove their green tops.
Pat them completely dry using a clean kitchen towel or paper towels. Cut the berries into small pieces, approximately ¼ inch in size.
Place the chopped strawberries on a paper towel for a few minutes to absorb any remaining surface moisture.
Transfer them to a small bowl and gently toss with one tablespoon of flour. If you prefer a sweeter loaf, add the optional tablespoon of sugar.
Set aside while preparing the dough.
Important: Do not mash the strawberries. Keeping the pieces relatively small and intact helps prevent too much fruit juice from entering the dough.
Step 3: Mix the Milk and Sourdough Starter
Pour 200g of room-temperature milk into a large mixing bowl.
Add 100g of active sourdough starter and stir until the starter is mostly dispersed throughout the milk.
Add 50g of honey and one teaspoon of vanilla extract. Mix again until combined.
The mixture may look slightly uneven, but that is perfectly normal.
Step 4: Add the Bread Flour
Add 500g of bread flour to the bowl.
Mix with a wooden spoon or your hands until the flour is fully moistened and a rough dough forms.
At this stage, the dough may look shaggy and feel slightly sticky. Do not add extra flour immediately. Allowing the dough to rest helps the flour absorb the liquid and makes it easier to handle.
Cover the bowl and let the dough rest for approximately 30 minutes.
Step 5: Add the Salt and Butter
After the resting period, add 8g of salt and 50g of softened butter.
Use your hands to work the ingredients into the dough. Squeeze and fold gently until the butter is incorporated.
The dough may initially feel slippery because of the butter. Continue working it gently until it becomes more uniform.
Avoid adding melted butter because it can make the dough feel greasy and more difficult to handle.
Step 6: Develop the Dough Structure
Cover the bowl and let the dough rest for approximately 30 minutes.
Next, perform a series of stretch-and-folds.
Wet your hands lightly to prevent sticking. Lift one side of the dough, stretch it upward without tearing it, and fold it toward the center.
Turn the bowl and repeat the movement on the other sides until all four sides have been folded.
Cover the dough and let it rest for another 30 minutes.
Repeat this process two or three times, allowing the dough to rest between each round.
With each set of folds, the dough should become smoother, stronger, and more elastic.
Step 7: Add the Strawberries
Once the dough has developed some strength, gently add the prepared strawberries.
Place the dough on a lightly dampened or clean work surface and stretch it carefully into a rough rectangle.
Scatter the strawberry pieces over the surface, leaving a small border around the edges.
Fold the dough over the strawberries, then fold the remaining sides toward the center.
Continue with gentle folds until the fruit is distributed throughout the dough.
Some strawberry pieces may break or release a little juice. That is normal. Avoid excessive kneading because it can crush the berries and make the dough wetter.
If the dough becomes sticky, use a dough scraper and lightly wet hands rather than adding large amounts of flour.
Step 8: Complete Bulk Fermentation
Transfer the dough back into the mixing bowl and cover it.
Allow it to ferment at room temperature until it becomes noticeably puffier and lighter.
This stage may take approximately 3–5 additional hours, depending on your kitchen temperature and starter strength.
Look for these signs:
- The dough has increased in volume.
- Small bubbles are visible around the sides.
- The dough feels lighter and more elastic.
- The surface appears smoother and slightly rounded.
- The dough moves gently when the bowl is shaken.
Strawberries add moisture and weight, so the dough may not rise as dramatically as a plain sourdough loaf. Watch its overall development rather than expecting it to double exactly.
Step 9: Shape the Dough
Lightly flour your work surface.
Carefully transfer the fermented dough onto it, trying not to squeeze out too much of the air.
For a round loaf, gently fold the edges toward the center and turn the dough over. Use your hands to create a little surface tension without crushing the fruit.
For a sandwich-style loaf, shape the dough into a rectangle and roll it gently into a log.
Because strawberries can make the dough softer, work patiently and avoid using too much extra flour.
Step 10: Prepare for the Final Proof
Place the shaped dough into a floured proofing basket or a parchment-lined loaf pan.
If using a proofing basket, position the dough seam-side up. If using a loaf pan, place it seam-side down.
Cover the dough to prevent the surface from drying.
You can allow it to proof at room temperature until it becomes slightly puffy, or refrigerate it overnight for a slower final proof.
If refrigerating overnight, keep the dough well covered. The cold temperature slows fermentation and can make the dough easier to handle before baking.
Step 11: Preheat the Oven
For a Dutch oven loaf, place the Dutch oven inside the oven and preheat to 450°F (230°C).
Allow the baking vessel to heat thoroughly.
If using a loaf pan, preheat the oven to 375°F (190°C). A loaf pan does not need to be preheated.
Keep the dough covered while the oven reaches the correct temperature.
Step 12: Score and Prepare the Loaf
If baking in a Dutch oven, carefully turn the chilled dough onto parchment paper.
Use a sharp bread blade or lame to make one confident cut across the top. Scoring helps control how the loaf expands in the oven.
If baking in a loaf pan, check that the dough has risen appropriately. You can leave it unscored or make a shallow cut along the top.
Brush the surface lightly with milk if desired. A little coarse sugar can also be sprinkled over the top for a sweeter finish.
Step 13: Bake the Strawberry Sourdough Bread
For a Dutch oven loaf:
- Bake covered for approximately 25 minutes at 450°F (230°C).
- Carefully remove the lid.
- Continue baking uncovered for another 15–20 minutes, until the crust is golden brown.
For a loaf-pan version:
- Bake at 375°F (190°C) for approximately 40–50 minutes.
- Check that the center is fully baked before removing it from the oven.
Because fruit adds moisture, baking times can vary. If you have an instant-read thermometer, check the center of the loaf. A temperature around 200–205°F (93–96°C) is a useful indication that the bread is baked through.
If the top browns too quickly, loosely cover it with foil during the final part of baking.
Step 14: Cool Before Slicing
Remove the bread from the Dutch oven or loaf pan.
Transfer it to a wire cooling rack and allow it to cool completely.
This step is especially important for fruit-filled sourdough. Strawberries release moisture during baking, and the crumb needs time to finish setting.
Cutting the loaf while it is still hot may cause the interior to appear gummy or compressed.
Once completely cool, slice with a sharp bread knife and enjoy.
Helpful Tips for the Best Results
Use firm, ripe strawberries. Very soft or overripe berries contain more juice and can make the dough difficult to handle.
Dry the strawberries thoroughly. Excess water on the fruit can affect the dough’s consistency.
Cut the fruit into small pieces. Smaller pieces distribute more evenly and make shaping easier.
Use an active starter. A strong starter supports reliable fermentation and a better rise.
Add fruit after the dough develops strength. This helps prevent the strawberries from being crushed during early mixing.
Do not add too much extra flour. A little flour on your hands and work surface is useful, but too much can make the loaf dense.
Watch fermentation carefully. Temperature and starter activity matter more than an exact number of hours.
Bake until the center is done. The fruit adds moisture, so make sure the loaf is fully baked before cooling.
Cool completely. This helps the crumb set and makes cleaner slices.
Fresh or Frozen Strawberries: Which Should You Use?
Fresh strawberries are an excellent choice when they are in season. They provide a bright flavor and are easy to prepare when firm and ripe.
Frozen strawberries can also be used, but they need extra care. Thaw them completely in the refrigerator, drain away excess liquid, and pat them dry before cutting or adding them to the dough.
Frozen berries may become softer after thawing, so fold them in gently. Avoid adding the liquid released during thawing because it can make the dough excessively wet.
For the best texture, use firm fresh berries whenever possible.
Delicious Variations to Try
Strawberry White Chocolate Sourdough Bread
Add 50–75g of white chocolate chips when folding in the strawberries. The creamy sweetness of white chocolate pairs beautifully with the fruity flavor.
Keep the chocolate pieces small and distribute them gently.
Strawberry Lemon Sourdough Bread
Add one teaspoon of finely grated lemon zest to the dough. Lemon gives the loaf a fresh aroma and balances the sweetness of the strawberries.
Avoid adding too much lemon juice because additional liquid can change the dough consistency.
Strawberry Cinnamon Sourdough Bread
Add ½ teaspoon of ground cinnamon to the flour before mixing. Cinnamon creates a warm flavor that works wonderfully with strawberries.
You can also sprinkle a little cinnamon sugar over the loaf before baking.
Strawberry Cream Cheese Bread
Serve slices with cream cheese, or spread a thin layer of softened cream cheese over each slice.
For a more dessert-like variation, enjoy the bread toasted with a sweetened cream cheese spread.
Strawberry Honey Bread
Replace the optional sugar in the strawberry mixture with a little extra honey in the dough. Keep the total liquid and sweetness balanced rather than adding too much honey.
What to Serve with Strawberry Sourdough Bread
This fruity loaf is delicious in many different ways.
- Butter: Spread softened butter over a warm slice for a simple breakfast.
- Cream cheese: The mild tang of cream cheese complements the strawberries.
- Greek yogurt: Serve toasted slices alongside a bowl of thick Greek yogurt.
- Honey: Drizzle a small amount over the bread for extra sweetness.
- Strawberry jam: Enhance the fruit flavor with homemade or store-bought jam.
- French toast: Use slightly firm slices to prepare a special strawberry French toast breakfast.
- Breakfast platter: Pair with fresh fruit, yogurt, and eggs for a satisfying brunch.
- Dessert toast: Add cream cheese, sliced strawberries, and a little honey.
Storage and Freezing Instructions
Because this bread contains fresh fruit, proper storage is important.
Room temperature: Once completely cooled, store the bread in an airtight container or bread bag. For best quality, enjoy it within 1–2 days.
Refrigerator: If your kitchen is warm or humid, refrigerate the loaf in a sealed container. Refrigeration can change the texture and make bread stale more quickly, so slicing and freezing is often a better option for longer storage.
Freezing: Slice the cooled loaf and place parchment paper between slices if needed. Store in a freezer-safe bag or container for up to 2 months for best quality.
Reheating: Toast frozen slices directly in a toaster or allow them to thaw before warming. A little butter or cream cheese makes an excellent topping.
Discard the bread if you notice mold or an unusual smell. Do not rely on reheating to make spoiled bread safe.
Common Mistakes to Avoid
Adding Wet Strawberries
Wet berries can release extra liquid into the dough, making it sticky and difficult to shape. Always pat them dry before use.
Using an Inactive Starter
An inactive starter may struggle to raise the enriched dough. Make sure it is bubbly and active before mixing.
Adding Strawberries Too Early
Mixing the fruit into the dough before it develops strength can crush the berries and interfere with gluten development. Add them after the first rounds of folds.
Overloading the Dough with Fruit
Adding too many strawberries can make the loaf heavy and wet. The recommended 150g provides fruity flavor without overwhelming the dough.
Slicing the Bread While Hot
Hot fruit-filled bread may look gummy inside because the crumb has not finished setting. Let it cool completely before slicing.
Frequently Asked Questions
Can I use sourdough discard instead of active starter?
This recipe is designed for active sourdough starter because it provides the natural leavening needed to raise the dough. Unfed discard may not produce the same rise. If you want to use discard, you would need a separately tested recipe that includes another leavening method.
Can I make Strawberry Sourdough Bread without milk?
Yes. You can replace the milk with water, but the bread will have a less rich flavor and a slightly different texture. The dough may also feel different during mixing.
Can I use frozen strawberries?
Yes. Thaw them completely, drain the liquid, and pat them dry before adding them to the dough. Fold them in gently because thawed strawberries are often softer than fresh ones.
Why is my strawberry sourdough dough sticky?
Strawberries contain water, and the dough may become softer after the fruit is added. Dry the berries thoroughly and use a dough scraper or lightly wet hands to handle the dough. Avoid adding large amounts of flour.
How do I know when the bread is fully baked?
The loaf should have a golden crust and feel firm. An instant-read thermometer inserted into the center can help; a reading around 200–205°F (93–96°C) is a useful guide.
Can I prepare the dough overnight?
Yes. After shaping, cover the dough and refrigerate it for an overnight final proof. Check that it has not overproofed before baking.
Is Strawberry Sourdough Bread sweet?
It is mildly sweet rather than cake-like. Honey and strawberries provide sweetness, while the sourdough starter gives the loaf a gentle tang. You can adjust the honey slightly to suit your taste.
Final Thoughts
Strawberry Sourdough Bread is a lovely homemade loaf that brings together the flavor of naturally fermented bread and the sweetness of fresh fruit. With a soft, tender crumb, golden crust, and juicy strawberry pieces, it is a delicious choice for breakfast, brunch, or an afternoon snack.
The recipe takes time, but the process is manageable when you work through each stage patiently. Use an active starter, dry the strawberries thoroughly, fold the fruit into developed dough, and allow fermentation to progress naturally.
Enjoy a slice with butter, cream cheese, honey, or yogurt, or turn it into a special French toast breakfast. Once you have tried this fruity sourdough loaf, it may become one of your favorite ways to use fresh strawberries in homemade baking.
Recipe Card: Strawberry Sourdough Bread
Prep Time: 30 minutes
Rest and Folding Time: Approximately 2 hours
Bulk Fermentation: Approximately 3–5 additional hours
Final Proof: 1–2 hours at room temperature or overnight in the refrigerator
Baking Time: 40–45 minutes, depending on baking method
Total Time: Approximately 8–12 hours, plus optional overnight proof
Yield: 1 medium loaf
Course: Bread, Breakfast
Cuisine: Homemade
Method: Sourdough Baking
Ingredients
For the Dough
- 500g bread flour
- 100g active sourdough starter
- 200g whole milk, room temperature
- 50g honey
- 50g unsalted butter, softened
- 8g salt
- 1 teaspoon vanilla extract
For the Strawberry Filling
- 150g fresh strawberries, chopped and dried
- 1 tablespoon flour
- 1 tablespoon sugar, optional
Optional Topping
- 1 tablespoon milk
- 1 tablespoon coarse sugar
Instructions
- Feed your sourdough starter and wait until it is bubbly and active.
- Wash, dry, and chop the strawberries into small pieces. Toss them gently with one tablespoon of flour and optional sugar.
- Mix the milk, starter, honey, and vanilla in a large bowl.
- Add the bread flour and mix until a shaggy dough forms.
- Cover and rest for 30 minutes.
- Add the salt and softened butter. Work them into the dough.
- Perform stretch-and-folds every 30 minutes for two or three rounds.
- Gently stretch the dough and fold in the prepared strawberries.
- Cover and continue bulk fermentation until the dough becomes puffy and shows visible signs of activity.
- Shape the dough into a round loaf or sandwich-style loaf.
- Place it in a floured proofing basket or loaf pan and cover.
- Proof at room temperature until slightly puffy or refrigerate overnight.
- Preheat a Dutch oven and oven to 450°F (230°C), or preheat the oven to 375°F (190°C) for a loaf-pan version.
- Score the loaf if using a Dutch oven.
- Bake covered for 25 minutes, then uncovered for 15–20 minutes. For a loaf pan, bake for approximately 40–50 minutes.
- Check that the center is fully baked.
- Cool completely on a wire rack before slicing.
Recipe Notes
- Use active starter for reliable natural leavening.
- Dry strawberries thoroughly to prevent excess moisture.
- Add the fruit after the dough has developed some strength.
- Fermentation time varies with starter activity and room temperature.
- Frozen strawberries should be thawed, drained, and patted dry.
- Cool the loaf completely before slicing.
- Store for 1–2 days at room temperature or freeze slices for longer storage.