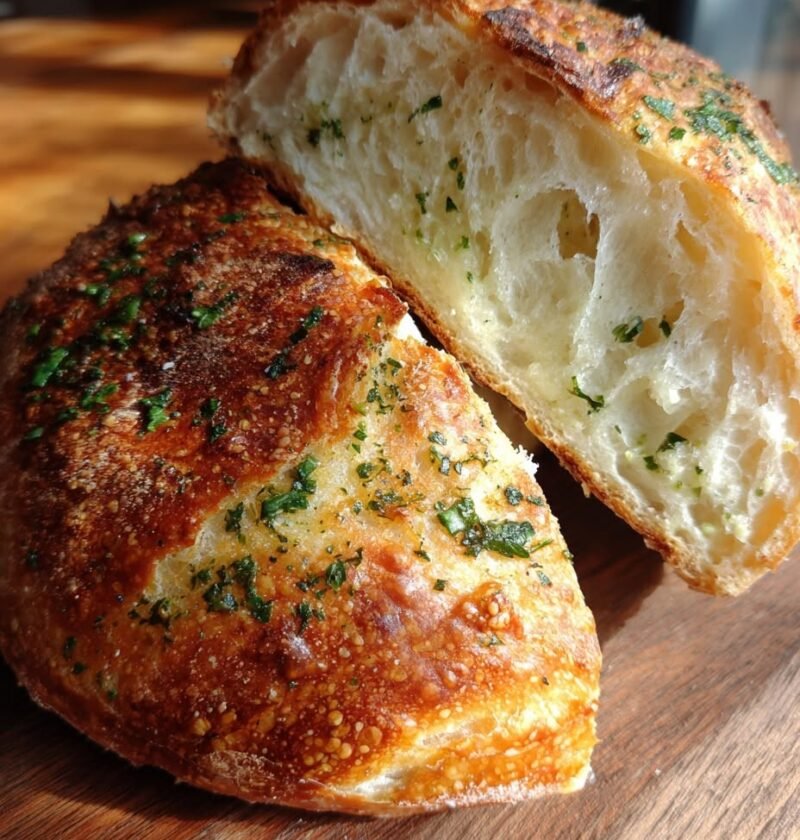

There is something special about the aroma of freshly baked sourdough bread, especially when it is combined with garlic, butter, and fragrant herbs. This Garlic Herb Sourdough Bread takes traditional artisan sourdough to another level with a savory mixture of fresh garlic, parsley, oregano, thyme, and melted butter.
The loaf has a beautifully crisp, golden crust and a soft, airy interior filled with delicious garlic and herb flavor. Its naturally fermented dough develops a pleasant sourdough tang, while the buttery garlic mixture gives every slice a rich, savory taste.
Although this recipe involves several stages of fermentation, most of the time is spent allowing the dough to rest and develop. Stretch-and-fold techniques help strengthen the dough without traditional heavy kneading, and an overnight refrigerator proof adds flavor while making the loaf easier to handle.
Bake it in a preheated Dutch oven for a bakery-style crust and serve it with soup, pasta, roasted chicken, salads, or your favorite meals. It is also wonderful toasted with a little butter or used to make a delicious grilled cheese sandwich.
Why You Will Love This Garlic Herb Sourdough Bread
This homemade sourdough loaf is a wonderful choice when you want something more flavorful than ordinary bread.
- Rich garlic flavor: Fresh minced garlic creates a delicious savory aroma throughout the loaf.
- Fragrant herbs: Parsley, oregano, and thyme give the bread a balanced herbal flavor.
- Naturally fermented: Active sourdough starter helps the dough rise and develops its characteristic tang.
- Crispy artisan crust: Baking in a Dutch oven helps produce a beautifully golden, crisp exterior.
- Soft interior: Proper fermentation and gentle folding help create a tender, airy crumb.
- Perfect for meals: Enjoy it with soups, pasta, salads, grilled meats, or cheese.
- Make-ahead friendly: The overnight cold proof allows you to prepare the dough ahead of baking day.
Ingredients You Need
This recipe uses simple bread-making ingredients along with a flavorful homemade garlic herb butter.
For the Sourdough Dough
500g bread flour: Bread flour provides the gluten structure needed for a strong, chewy loaf. It helps the dough hold its shape and develop an airy interior.
350g warm water: Water hydrates the flour and brings the dough together. Use comfortably warm water rather than hot water.
100g active sourdough starter: Use a bubbly, recently fed starter that is showing good fermentation activity. An active starter is important for helping the dough rise.
10g salt: Salt improves the flavor of the bread and contributes to dough strength.
For the Garlic Herb Butter
4 garlic cloves, finely minced: Fresh garlic gives the bread its distinctive savory flavor. Mince it finely so it can distribute throughout the dough.
3 tablespoons melted butter: Butter adds richness and helps carry the garlic and herb aromas.
1 tablespoon fresh parsley, chopped: Parsley contributes a fresh herbal note and a lovely appearance.
1 teaspoon dried oregano: Oregano gives the loaf a classic savory flavor.
1 teaspoon dried thyme: Thyme adds an earthy, fragrant taste that complements garlic beautifully.
Optional pinch of chili flakes: Add a small amount if you enjoy a gentle spicy finish. Leave it out for a milder loaf.
Equipment Needed
Before beginning, gather the following kitchen equipment:
- Large mixing bowl
- Digital kitchen scale
- Small bowl for garlic herb butter
- Dough scraper
- Clean kitchen towel or proofing basket
- Parchment paper
- Sharp bread blade or lame
- Dutch oven with lid
- Cooling rack
A digital scale is especially helpful for sourdough baking because measuring ingredients by weight provides more consistent results.
How to Make Garlic Herb Sourdough Bread
Follow these steps to prepare your homemade artisan loaf. Remember that sourdough fermentation depends on starter activity and kitchen temperature, so use the appearance and feel of the dough as well as the suggested times.
Step 1: Prepare Your Sourdough Starter
Feed your sourdough starter approximately 4–6 hours before mixing the dough. Allow it to become bubbly, active, and noticeably risen.
A healthy starter should have a pleasant fermented aroma and visible bubbles. The exact time it takes to become ready depends on your starter and room temperature.
Using an active starter gives the dough a better chance of fermenting successfully.
Step 2: Mix the Water and Starter
Pour 350g of warm water into a large mixing bowl. Add 100g of active sourdough starter.
Stir until the starter is dispersed throughout the water. It does not have to dissolve completely, but there should not be large clumps remaining.
Step 3: Add the Bread Flour
Add 500g of bread flour to the bowl.
Mix using a spoon or your hands until the flour is fully moistened. The dough will look rough, sticky, and shaggy at this stage.
Do not worry about making it smooth. The resting period will help the flour absorb the water and begin developing the dough’s structure.
Cover the bowl and let the mixture rest for approximately 30 minutes.
Step 4: Add the Salt
After the initial rest, add 10g of salt.
Work it into the dough using your fingers or a gentle squeezing and folding motion. Continue until the salt is evenly incorporated.
The dough may feel slightly firm or uneven while you work, but it will become more manageable as it rests and develops.
Step 5: Prepare the Garlic Herb Butter
While the dough rests, prepare the flavorful herb mixture.
In a small bowl, combine:
- 4 finely minced garlic cloves
- 3 tablespoons melted butter
- 1 tablespoon chopped fresh parsley
- 1 teaspoon dried oregano
- 1 teaspoon dried thyme
- A pinch of chili flakes, if desired
Stir until the garlic and herbs are evenly coated with butter.
This mixture gives the bread its signature flavor and creates fragrant pockets of garlic and herbs throughout the finished loaf.
Step 6: Incorporate the Garlic Herb Mixture
Pour the prepared garlic herb butter over the dough.
Use gentle folding movements to work the mixture into the dough. At first, the butter may make the dough feel slippery or loose. Continue folding carefully until the garlic and herbs are distributed as evenly as possible.
Avoid aggressive kneading. The dough has already started developing gluten, and gentle handling helps preserve its structure.
Step 7: Perform Stretch-and-Folds
Over the next two hours, complete a series of stretch-and-folds approximately every 30 minutes.
Lightly wet your hands to prevent sticking. Lift one side of the dough, stretch it gently upward, and fold it toward the center.
Rotate the bowl and repeat the movement on the remaining sides until you have folded all four sides.
Cover the bowl between each round.
With every set of folds, the dough should gradually become smoother, stronger, and more elastic. This technique builds structure without requiring extensive kneading.
Step 8: Complete Bulk Fermentation
After the stretch-and-fold period, cover the bowl and allow the dough to continue fermenting at room temperature for approximately 4–6 hours.
The exact fermentation time depends on the strength of your starter and the temperature of your kitchen.
Watch for these signs:
- The dough becomes noticeably puffier.
- Its volume increases.
- Small bubbles appear beneath the surface.
- The dough feels lighter and more elastic.
- The surface looks smoother and more developed.
Do not rely only on the clock. If the dough still looks dense and inactive, it may need additional time. If it becomes excessively loose and over-expanded, it may have fermented too long.
Step 9: Shape the Dough
Lightly flour your work surface and carefully transfer the fermented dough onto it.
Handle the dough gently to preserve as much of the air as possible.
Fold the outer edges toward the center, working around the dough to create a round shape. Turn it over and gently create surface tension so the loaf holds together.
Avoid pressing or flattening the dough aggressively. The goal is to shape a cohesive round loaf while keeping its developing air pockets.
Step 10: Prepare for the Overnight Cold Proof
Place the shaped dough into a generously floured proofing basket. If you do not have one, use a bowl lined with a clean kitchen towel and lightly dusted with flour.
Cover the dough so it does not dry out.
Transfer it to the refrigerator and leave it overnight.
Cold proofing slows fermentation and allows the sourdough flavor to develop gradually. It also firms the dough, making it easier to transfer and score before baking.
Step 11: Preheat the Dutch Oven
The following day, place your Dutch oven inside the oven.
Preheat the oven to 475°F (245°C), allowing the Dutch oven to become thoroughly hot.
A properly heated Dutch oven creates a hot, enclosed baking environment. The moisture released by the dough helps it expand during the early stage of baking, supporting good oven spring and crust development.
Keep the dough refrigerated while the oven heats.
Step 12: Transfer and Score the Loaf
Remove the cold dough from the refrigerator.
Carefully turn it onto a sheet of parchment paper. Use a sharp bread blade or lame to make a confident cut across the top.
Scoring gives the loaf a controlled place to expand as it bakes. You can keep the design simple with one main cut.
Handle the hot Dutch oven carefully. Lift the parchment paper and dough and lower them into the preheated pot.
Step 13: Bake the Garlic Herb Sourdough
Cover the Dutch oven with its lid and bake for approximately 25 minutes at 475°F (245°C).
During this stage, the loaf expands and develops its internal structure.
After 25 minutes, carefully remove the lid. Continue baking uncovered for another 20–25 minutes, or until the crust becomes deep golden brown and crisp.
The total baking time is approximately 45–50 minutes.
Step 14: Cool Before Slicing
Remove the finished loaf from the Dutch oven and transfer it to a cooling rack.
Allow it to cool completely before cutting.
Although the smell of garlic, butter, and herbs makes it tempting to slice immediately, cooling is important. The interior continues to set after baking, and cutting too early can leave the crumb gummy or compressed.
Once cooled, slice with a sharp bread knife and enjoy!
Helpful Tips for the Best Results
Use an active starter. A bubbly, recently fed starter supports better fermentation. A weak starter may result in a loaf that takes much longer to rise.
Measure ingredients by weight. Measuring flour, water, starter, and salt in grams helps keep the dough consistent.
Do not rush fermentation. Temperature and starter strength affect how quickly dough develops. Look for visible expansion and bubbles rather than relying only on the suggested hours.
Fold gently. Stretch-and-folds should strengthen the dough without tearing or flattening it.
Distribute the garlic mixture carefully. Gentle folding helps spread the butter, garlic, and herbs without excessive handling.
Keep the dough covered. Covering the bowl and proofing dough prevents the surface from drying out.
Preheat the Dutch oven fully. A hot baking vessel helps the loaf expand and develop a crisp crust.
Allow the bread to cool. Waiting before slicing improves the final crumb texture.
Delicious Ways to Serve Garlic Herb Sourdough Bread
This savory loaf is versatile and pairs beautifully with many everyday meals.
- Tomato soup: Dip a warm slice into tomato soup for a comforting lunch.
- Creamy pasta: Serve alongside Alfredo, creamy mushroom pasta, or tomato-based pasta dishes.
- Roasted chicken: Garlic and herbs complement roasted or grilled chicken.
- Fresh salads: Add a slice to a green salad or Mediterranean-style meal.
- Cheese boards: Pair with sharp cheddar, soft cheese, olives, and fresh fruit.
- Garlic toast: Toast slices and serve with butter or olive oil.
- Grilled cheese: Use the bread to make a rich, flavorful toasted sandwich.
- Breakfast toast: Warm a slice and enjoy it with butter or your preferred savory topping.
Because the garlic and herbs are incorporated into the dough, even a plain slice has plenty of flavor.
Storage and Freezing Instructions
Allow the bread to cool completely before storing it.
Room temperature: Store the loaf in a bread bag or wrap it in a clean kitchen towel. The supplied recipe recommends keeping it for up to three days.
Freezing: For longer storage, slice the completely cooled loaf and freeze individual portions in a freezer-safe bag or container.
Reheating: Frozen slices can be placed directly into a toaster. Toasting helps restore a crisp exterior while warming the soft interior.
Avoid sealing warm bread because trapped steam can soften the crust and create excess moisture.
Common Questions
Can beginners make garlic herb sourdough bread?
Yes. Beginners can make this loaf by following each stage carefully. The most important skills are using an active starter, recognizing fermentation signs, and handling the dough gently.
Can I use sourdough discard instead of active starter?
This recipe is designed for 100g of active sourdough starter. Unfed discard may not provide the same leavening strength, so substituting it without changing the recipe could affect the rise.
How long does bulk fermentation take?
The suggested bulk fermentation time is approximately 4–6 hours after the stretch-and-fold period. However, temperature and starter activity can change the timing. Look for a puffy dough with visible signs of fermentation.
Why is the overnight cold proof important?
Cold proofing slows fermentation, develops flavor, and firms the dough. A chilled loaf is also easier to transfer and score before baking.
Can I leave out the chili flakes?
Absolutely. Chili flakes are optional and can be omitted without changing the main recipe.
Why should I cool the bread before slicing?
The crumb continues to set as the loaf cools. Cutting too early can compress the interior and make the bread seem gummy.
Can I freeze garlic herb sourdough bread?
Yes. Slice the cooled loaf and freeze individual portions. You can toast frozen slices directly whenever you want to serve them.
Final Thoughts
Garlic Herb Sourdough Bread is a delicious homemade variation of classic artisan sourdough. The combination of naturally fermented dough, fresh garlic, butter, parsley, oregano, and thyme creates a loaf with plenty of savory flavor.
The process takes patience, but each stage contributes to the finished result. Stretch-and-folds strengthen the dough, bulk fermentation develops its structure, and overnight cold proofing adds depth while making the loaf easier to handle.
Baked in a hot Dutch oven, the bread develops a crisp golden crust and a soft interior. Serve it with soup, pasta, roasted meats, salads, or cheese, or simply toast a slice and enjoy its garlic herb aroma.
If you love homemade sourdough and savory baking, this recipe is a wonderful addition to your bread-making collection.
Recipe Card: Garlic Herb Sourdough Bread
Prep and Mixing Time: Approximately 30 minutes, plus preparation
Starter Preparation: 4–6 hours
Initial Dough Rest: 30 minutes
Stretch-and-Fold Period: Approximately 2 hours
Bulk Fermentation: Approximately 4–6 hours
Cold Proof: Overnight
Baking Time: 45–50 minutes
Yield: 1 loaf
Course: Bread, Side Dish
Cuisine: Artisan-inspired
Cooking Method: Dutch Oven Baking
Ingredients
For the Dough
- 500g bread flour
- 350g warm water
- 100g active sourdough starter
- 10g salt
For the Garlic Herb Butter
- 4 garlic cloves, finely minced
- 3 tablespoons melted butter
- 1 tablespoon fresh parsley, chopped
- 1 teaspoon dried oregano
- 1 teaspoon dried thyme
- Optional pinch of chili flakes
Instructions
- Feed the sourdough starter approximately 4–6 hours before mixing and allow it to become bubbly and active.
- Combine the warm water and active starter in a large bowl.
- Add the bread flour and mix until no dry flour remains.
- Cover and rest the dough for 30 minutes.
- Add the salt and work it into the dough.
- Mix the melted butter, minced garlic, parsley, oregano, thyme, and optional chili flakes in a small bowl.
- Gently fold the garlic herb butter into the dough.
- Perform stretch-and-folds approximately every 30 minutes over the next two hours.
- Cover and bulk ferment for approximately 4–6 hours, watching for puffiness and visible bubbles.
- Transfer the dough to a lightly floured surface and shape it into a round loaf.
- Place it in a floured proofing basket or lined bowl, cover, and refrigerate overnight.
- Preheat a Dutch oven inside the oven to 475°F (245°C).
- Turn the chilled dough onto parchment paper and score the top.
- Carefully transfer the dough into the hot Dutch oven.
- Bake covered for 25 minutes.
- Remove the lid and bake for another 20–25 minutes until deep golden brown.
- Transfer to a cooling rack and cool completely before slicing.
Recipe Notes
- Use a lively, active sourdough starter for reliable fermentation.
- Fermentation times vary with kitchen temperature and starter strength.
- Keep the dough covered during resting and proofing.
- Handle the dough gently to preserve its air structure.
- Chili flakes are optional.
- Store the cooled loaf at room temperature for up to three days or freeze sliced portions.