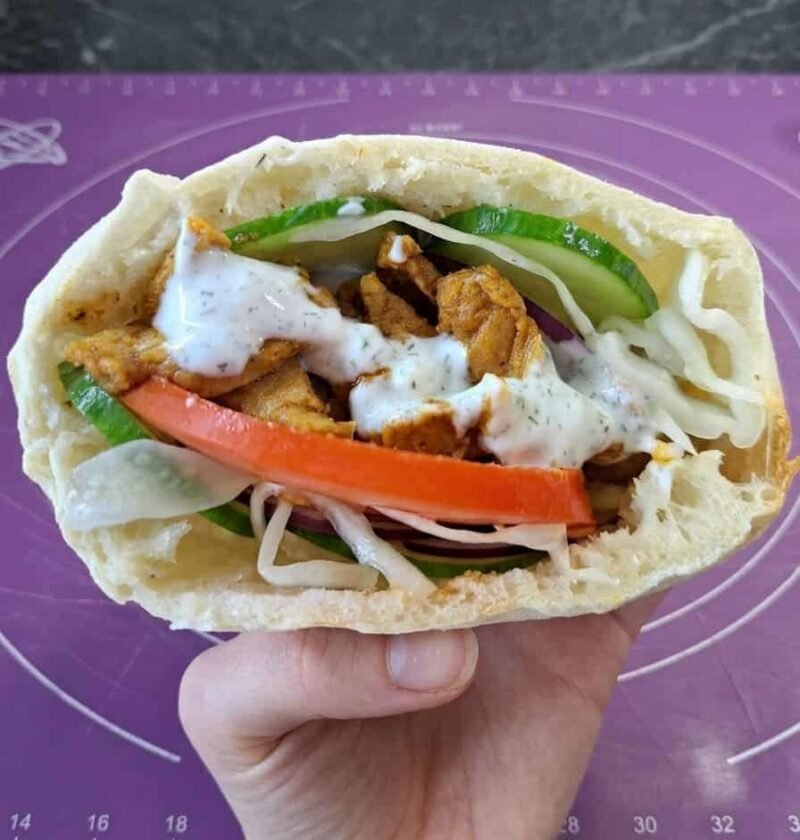

Making homemade bread is always rewarding, and this Overnight Sourdough Pita Bread is a delicious way to enjoy naturally fermented bread with very little complicated shaping. These homemade pita breads are soft, flexible, and perfect for filling with your favorite ingredients.
Made with active sourdough starter, flour, water, olive oil, and salt, this recipe uses a slow overnight fermentation to develop flavor and improve the dough’s texture. The next day, the dough is divided into small portions, rolled into thin rounds, and baked on a thoroughly heated surface.
The best part is watching the pita puff as it bakes. The high heat creates steam inside the dough, separating the layers and forming the familiar hollow pocket. Once baked, the pita can be filled with grilled chicken, falafel, hummus, fresh vegetables, or your favorite sandwich ingredients.
Whether you’re preparing lunch, planning a Mediterranean-inspired dinner, or looking for a new way to use your sourdough starter, this easy overnight pita recipe is a wonderful addition to your homemade bread collection.
Why You’ll Love This Overnight Sourdough Pita Bread
There are plenty of reasons to make pita bread at home. This recipe combines simple ingredients with an overnight fermentation method that makes the process convenient.
- Naturally fermented: Active sourdough starter gives the dough its characteristic flavor.
- Soft and flexible: The dough produces pita bread that is easy to fold, wrap, and fill.
- Simple shaping: You only need to divide the dough into portions and roll them into rounds.
- Overnight preparation: Prepare the dough ahead and bake it the following day.
- Versatile serving options: Enjoy pita with hummus, falafel, chicken, vegetables, or dips.
- Everyday ingredients: Flour, water, starter, olive oil, and salt are all you need.
- Homemade flavor: Freshly baked pita has a delicious texture that makes store-bought bread easy to forget.
What Makes Sourdough Pita Puff?
The signature pocket inside pita bread forms because of steam. When the thin dough round meets an extremely hot baking surface, the moisture inside quickly turns into steam.
As the outside of the dough begins to cook, steam builds pressure between the two layers. This pressure pushes the layers apart, causing the pita to inflate and form a hollow center.
Three important factors help create this pocket:
High baking temperature: The oven and baking surface must be thoroughly heated before the dough is added.
Even rolling: Each pita should have a consistent thickness so steam can build and expand evenly.
Proper dough fermentation: A well-fermented dough has the structure and elasticity needed to expand during baking.
Although not every pita will puff perfectly, even flat pita bread is delicious for dipping, wraps, and sandwiches.
Ingredients for Overnight Sourdough Pita Bread
This recipe makes approximately 15 medium pita breads. The ingredient list is simple, but measuring accurately helps produce consistent results.
1. Active Sourdough Starter – 100g
Use 100 grams of recently fed, active sourdough starter. It should have visible bubbles and should have risen noticeably after feeding.
An active starter provides the natural leavening needed for fermentation and contributes a mild sourdough flavor.
2. Lukewarm Water – 300g
Water hydrates the flour and brings the dough together. Use lukewarm water rather than hot water to avoid damaging the active cultures in your starter.
3. Olive Oil – 25g
Olive oil adds softness and a subtle savory flavor. It also helps make the dough easier to handle and contributes to the flexible texture of the finished pita.
4. Bread Flour or All-Purpose Flour – 500g
You can use either bread flour or all-purpose flour.
Bread flour generally produces a slightly chewier pita because of its higher protein content. All-purpose flour works well too and can produce a softer texture.
For a whole-wheat variation, replace up to 100 grams of the white flour with whole-wheat flour. The dough may absorb water differently and become slightly less flexible.
5. Fine Sea Salt – 10g
Salt improves flavor and helps strengthen the dough. Add it with the flour during mixing so it is evenly distributed.
6. Additional Flour for Dusting
Keep a little extra flour nearby for dusting the work surface and rolling pin. Use it sparingly because too much additional flour can make the dough stiff and dry.
Equipment You’ll Need
You do not need professional baking equipment to prepare sourdough pita. A few basic kitchen tools will make the process easier.
- Large mixing bowl
- Digital kitchen scale
- Dough scraper or bench scraper
- Rolling pin
- Clean kitchen towel
- Parchment paper or lightly floured tray
- Baking steel, pizza stone, cast-iron plate, or heavy baking sheet
- Oven mitts
- Wide spatula or tongs
A digital kitchen scale is especially useful for sourdough baking because measuring ingredients by weight helps maintain the correct dough consistency.
How to Make Overnight Sourdough Pita Bread
Follow these steps to prepare soft, naturally fermented pita bread at home. Remember that sourdough fermentation depends on starter strength and kitchen temperature, so use the dough’s appearance as your guide.
Step 1: Mix the Starter, Water, and Olive Oil
Place 100 grams of active sourdough starter in a large mixing bowl.
Add 300 grams of lukewarm water and 25 grams of olive oil. Stir everything together until the starter is mostly dispersed throughout the liquid.
It does not need to dissolve completely, but breaking up large pieces helps distribute the starter evenly.
Step 2: Add the Flour and Salt
Add 500 grams of bread flour or all-purpose flour to the bowl.
Sprinkle in 10 grams of fine sea salt. Mix with a sturdy spoon or your hands until the flour is fully incorporated and no dry patches remain.
The dough will look rough and slightly uneven. This is normal at the beginning of the process.
Step 3: Rest the Dough
Cover the bowl with a clean kitchen towel or suitable cover.
Let the dough rest for approximately 20–30 minutes. During this time, the flour absorbs the water, making the dough easier to knead.
This short resting period also helps gluten begin developing naturally.
Step 4: Knead Until Smooth
After resting, knead the dough for approximately 5–7 minutes.
You can knead directly inside the bowl or transfer the dough to a lightly floured work surface.
As you knead, the dough should become smoother, more elastic, and easier to handle. It may feel slightly tacky, which is perfectly normal.
Avoid adding too much extra flour. A dough that becomes too stiff may be difficult to roll thinly and may not puff as effectively during baking.
If you prefer not to knead traditionally, use three sets of stretch-and-folds at approximately 20-minute intervals. Stretch one side of the dough upward and fold it toward the center, rotating the bowl until all sides have been folded.
Step 5: Begin Room-Temperature Fermentation
Place the dough in a clean bowl and cover it.
Allow it to ferment at room temperature for approximately 3–5 hours, depending on the strength of your starter and the temperature of your kitchen.
Look for these signs:
- The dough becomes smoother and slightly domed.
- Its volume increases by approximately 40–50%.
- Small bubbles become visible around the sides or bottom.
- The dough feels lighter and more elastic.
The dough does not need to double at this stage. Avoid relying only on a timer because sourdough fermentation can vary from kitchen to kitchen.
Step 6: Refrigerate the Dough Overnight
Once the initial fermentation is complete, cover the bowl tightly and place it in the refrigerator.
Let the dough rest in the refrigerator for approximately 8–16 hours.
This cold fermentation develops a deeper sourdough flavor while slowing down the fermentation process. It also makes the recipe easier to manage because most of the preparation can be completed the evening before.
The dough may rise slightly while refrigerated. This is normal.
Step 7: Bring the Dough Toward Room Temperature
The following day, remove the dough from the refrigerator.
Allow it to sit at room temperature for approximately 20–30 minutes. This makes it easier to divide and shape.
Prepare a lightly floured work surface and keep a clean towel nearby to cover the dough portions while you work.
Step 8: Divide the Dough into 15 Portions
Transfer the dough onto your work surface.
Use a bench scraper to divide it into approximately 15 equal portions. Each piece should weigh around 62 grams.
For consistent pita bread, weighing the portions is helpful. Similar-sized pieces are easier to roll and tend to bake more evenly.
Step 9: Shape Each Portion into a Ball
Take one portion of dough and gently pull its edges toward the center.
Turn it over and roll it lightly against the work surface using a cupped hand until it forms a smooth ball.
Repeat with the remaining portions.
Keep the dough balls covered so they do not develop a dry surface while waiting to be rolled.
Step 10: Roll the Dough into Thin Rounds
Take one dough ball and place it on a lightly floured surface.
Use a rolling pin to roll it into an even circle. Rotate the dough as you work to help maintain a consistent thickness.
The dough should be thin enough to puff during baking but not so thin that it becomes fragile or develops holes.
Pay particular attention to the center and edges. If one area is much thinner than another, steam may escape before the pita has a chance to inflate.
Use only a small amount of flour to prevent sticking.
Step 11: Preheat the Oven and Baking Surface
Place your baking steel, pizza stone, cast-iron plate, or heavy inverted baking sheet inside the oven.
Preheat thoroughly so the baking surface becomes extremely hot.
This step is essential. A hot surface transfers heat quickly to the dough, helping the water inside turn into steam and creating the pressure needed for the pita pocket.
A properly heated baking steel or cast-iron surface can be especially effective, although a pizza stone or heavy baking sheet can also work.
Step 12: Bake the Pita Bread
Carefully place one rolled dough round onto the hot baking surface.
Watch as it begins to cook. The dough should start expanding as steam builds between the layers.
Continue baking until the pita has cooked through and developed the desired texture. The exact baking time will depend on your oven, temperature, and baking surface.
Use oven mitts and suitable tools when handling hot equipment.
Repeat with the remaining dough rounds, allowing the baking surface to recover its heat between batches if needed.
Step 13: Cool and Serve
Remove each pita carefully from the oven and place it on a clean kitchen towel or cooling rack.
It is normal for the pita to puff dramatically during baking and then soften or flatten as it cools.
Once cool enough to handle, serve the pita with your favorite fillings, dips, or Mediterranean dishes.
Tips for Perfect Homemade Sourdough Pita
Use an active starter: A bubbly, recently fed starter helps the dough ferment properly. Weak or inactive starter may result in slow fermentation.
Measure by weight: Use a kitchen scale to measure flour, water, starter, oil, and salt accurately.
Avoid adding too much flour: Slightly tacky dough is easier to stretch and roll than dough that has become too dry.
Watch fermentation carefully: The suggested 3–5 hours is approximate. Temperature and starter activity can change the timing.
Keep the dough covered: Cover unused dough portions while rolling to prevent a dry skin from forming.
Roll evenly: Consistent thickness helps steam separate the pita layers.
Preheat thoroughly: A properly heated baking surface is one of the most important secrets to puffed pita bread.
Do not worry about imperfect pockets: Pita that does not puff completely can still be used as flatbread, wraps, or dipping bread.
Why Didn’t My Sourdough Pita Puff?
If your pita stays flat, do not worry. It can still be enjoyed, but a few adjustments may improve your next batch.
The Baking Surface Was Not Hot Enough
Pita needs a strong burst of heat. If the baking surface is not fully heated, the dough may cook too slowly and dry out before enough steam develops.
Allow the oven and baking surface to preheat thoroughly.
The Dough Was Rolled Unevenly
Thick and thin areas can prevent the layers from separating properly.
Roll each pita carefully, rotating it as you work to maintain even thickness.
The Dough Developed Small Tears
Even a tiny hole can allow steam to escape. Handle the dough gently and avoid rolling it so thin that it becomes fragile.
The Starter Was Not Active
A weak starter can lead to slow or insufficient fermentation. Make sure your starter is bubbly and has risen noticeably after feeding.
The Dough Was Over-Fermented
Excessive fermentation can weaken the gluten structure and make the dough difficult to handle. Watch for the dough becoming overly loose or collapsed rather than relying only on elapsed time.
Easy Ways to Serve Sourdough Pita Bread
Fresh homemade pita is wonderfully versatile. Its soft texture and mild sourdough flavor make it suitable for many meals.
- Hummus and vegetables: Serve warm pita with hummus, cucumber, carrots, and olives.
- Falafel sandwiches: Fill the pockets with falafel, lettuce, tomato, and tahini sauce.
- Grilled chicken wraps: Add grilled chicken, fresh vegetables, and a creamy dressing.
- Mediterranean salad: Serve alongside Greek salad, feta, olives, and roasted vegetables.
- Pita and dips: Cut the bread into wedges and serve with hummus, baba ganoush, or yogurt dip.
- Breakfast pita: Fill with scrambled eggs, cheese, and vegetables.
- Quick lunch: Add tuna, chicken salad, or your favorite sandwich filling.
You can also warm the pita lightly before serving to make it softer and easier to fold.
Storage and Freezing Instructions
Homemade sourdough pita is best enjoyed fresh, but you can store it for later.
Room-temperature storage: Allow the pita to cool completely. Place it in an airtight container or food-safe bag to help retain moisture. Avoid leaving it exposed to air, as it can dry out quickly.
Refrigerator storage: If you need to keep the pita longer than a day or two, refrigeration is possible, but it may make the bread firmer. Warm it gently before serving.
Freezing: Place cooled pita breads in a freezer-safe bag. Separate individual pieces with parchment paper if desired. Freeze for up to 2 months for best quality.
Reheating: Warm the pita briefly in a skillet, oven, or toaster until soft and flexible. Avoid overheating, which can make it dry.
Frequently Asked Questions
Can I make sourdough pita without overnight refrigeration?
This recipe is designed for overnight cold fermentation. The refrigerated rest develops flavor and makes preparation convenient. Skipping it will change the timing and flavor, so it is best to follow the suggested method.
Can I use all-purpose flour instead of bread flour?
Yes. Both bread flour and all-purpose flour work well. Bread flour generally produces a slightly chewier texture, while all-purpose flour can create a softer pita.
Does my sourdough starter need to pass the float test?
No. A float test is not essential for this recipe. Look for a starter that has visible bubbles, has risen noticeably after feeding, and smells pleasantly fermented.
Can I use whole-wheat flour?
Yes. Replace up to 100 grams of the white flour with whole-wheat flour. Whole-wheat flour absorbs more water and can make the dough slightly less flexible.
Why does my pita puff and then flatten?
This is normal. The pita can inflate as steam separates the layers and then soften as it cools. The pocket may still be present inside.
Can I prepare the dough the night before?
Yes. That is exactly what makes this recipe convenient. Allow the dough to ferment at room temperature first, then refrigerate it for 8–16 hours.
What is the best surface for baking pita?
A baking steel, cast-iron plate, or pizza stone works well. A heavy inverted baking sheet can also be used. The most important factor is that the surface is thoroughly preheated.
Can I freeze homemade sourdough pita?
Yes. Cool the pita completely, stack it with parchment between pieces if desired, and freeze in an airtight freezer-safe bag. Reheat gently when ready to serve.
Final Thoughts
This Overnight Sourdough Pita Bread is a simple and rewarding way to make soft, flexible homemade bread with your sourdough starter. The overnight fermentation develops a pleasant flavor, while the high-temperature baking method helps create the familiar pita pocket.
With only a few basic ingredients and straightforward shaping, this recipe is suitable for home bakers who want to try something different from traditional sourdough loaves.
Serve the fresh pita with hummus, falafel, grilled chicken, roasted vegetables, or your favorite fillings. Once you experience the flavor and texture of homemade sourdough pita, it may become a regular part of your weekly baking routine.
Recipe Card: Overnight Sourdough Pita Bread
Prep Time: Approximately 30 minutes
Room-Temperature Fermentation: 3–5 hours
Cold Fermentation: 8–16 hours
Final Rest: 20–30 minutes
Cooking Time: A few minutes per pita, depending on the oven and baking surface
Total Time: Approximately 12–22 hours, including fermentation
Yield: Approximately 15 medium pita breads
Course: Bread, Side Dish
Cuisine: Mediterranean-inspired
Method: Baking
Ingredients
- 100g active sourdough starter
- 300g lukewarm water
- 25g olive oil
- 500g bread flour or all-purpose flour
- 10g fine sea salt
- Additional flour for dusting
Instructions
- Combine the active sourdough starter, lukewarm water, and olive oil in a large bowl.
- Add the flour and salt. Mix until no dry flour remains.
- Cover and rest for 20–30 minutes.
- Knead for 5–7 minutes until smoother and elastic, or use three sets of stretch-and-folds at 20-minute intervals.
- Cover and ferment at room temperature for approximately 3–5 hours, until the dough looks puffy and has increased in volume by about 40–50%.
- Cover tightly and refrigerate for 8–16 hours.
- Remove the dough from the refrigerator and rest at room temperature for 20–30 minutes.
- Divide into approximately 15 equal portions of around 62g each.
- Shape each portion into a ball and keep covered.
- Roll each ball into an evenly thin round.
- Thoroughly preheat a baking steel, pizza stone, cast-iron plate, or heavy baking sheet in the oven.
- Place a rolled pita onto the hot surface and bake until cooked and puffed. Repeat with the remaining rounds.
- Cool briefly and serve with your favorite fillings or dips.
Recipe Notes
- Use an active, recently fed sourdough starter.
- A slightly tacky dough is preferable to one made stiff with excess flour.
- Fermentation times depend on room temperature and starter strength.
- Roll the pita evenly to encourage pocket formation.
- Thoroughly preheat the baking surface before baking.
- If the pita does not puff, it can still be served as flatbread.
- Freeze cooled pita for up to 2 months for best quality.