Olivia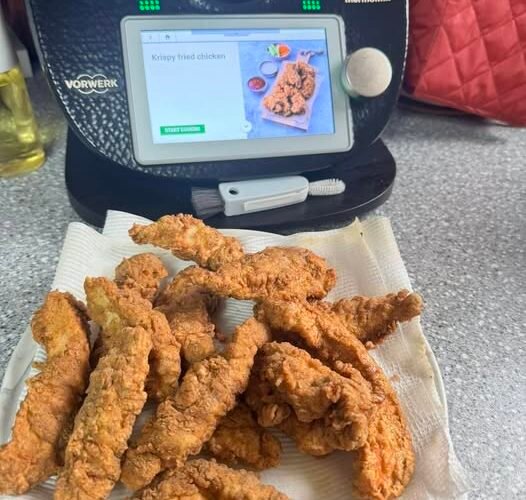
Golden, crunchy, juicy, and packed with flavor, this Thermomix Krispy Fried Chicken recipe brings restaurant-style fried chicken right into your home kitchen. Using the Thermomix to prepare the marinade, seasoning blend, and coating mixture makes the process easier and more consistent while delivering incredibly crispy results.
The chicken is first marinated in a flavorful buttermilk mixture, then coated in a perfectly seasoned flour blend before being fried until golden brown and irresistibly crunchy. The result is tender, juicy chicken beneath a crisp, flavorful crust that stays crunchy with every bite.
Whether you’re preparing a weekend family dinner, game-day feast, picnic meal, or special gathering, this Thermomix Krispy Fried Chicken is guaranteed to impress.
Prep Time: 25 minutes
Marinating Time: 4–12 hours
Cook Time: 20–25 minutes
Total Time: Approximately 5–13 hours
Servings: 6–8
Why You’ll Love This Recipe
- Extra crispy coating
- Juicy, tender chicken
- Packed with flavor
- Easy Thermomix preparation
- Great for gatherings
- Family favorite
- Perfectly seasoned
- Restaurant-quality results
- Customizable spice levels
- Excellent leftovers
What Makes Fried Chicken Crispy?
The secret to outstanding fried chicken is the combination of:
- Proper marination
- Seasoned coating
- Correct oil temperature
- Double-textured flour coating
When these elements work together, the result is crunchy, golden perfection.
Ingredients
Chicken
- 2 kg chicken pieces (drumsticks, thighs, wings, or breast portions)
Marinade
- 2 cups buttermilk
- 2 teaspoons salt
- 1 teaspoon black pepper
- 1 teaspoon paprika
- 1 teaspoon garlic powder
- 1 teaspoon onion powder
Crispy Coating
- 3 cups all-purpose flour
- ½ cup cornstarch
- 2 teaspoons salt
- 2 teaspoons paprika
- 1 teaspoon garlic powder
- 1 teaspoon onion powder
- 1 teaspoon dried oregano
- 1 teaspoon dried thyme
- ½ teaspoon cayenne pepper
- 1 teaspoon black pepper
For Frying
- Vegetable oil
- Canola oil
- Peanut oil
Approximately 2–3 liters, depending on your fryer or pot.
Equipment Needed
- Thermomix
- Large bowl
- Deep heavy pot or fryer
- Wire rack
- Baking tray
- Tongs
- Thermometer
Choosing the Best Chicken
Bone-in, skin-on pieces provide the best results.
Popular options include:
- Drumsticks
- Thighs
- Wings
- Split breasts
Dark meat remains especially juicy after frying.
A mix of cuts offers great variety.
Why Marinate?
Marinating serves several important purposes.
It:
- Tenderizes the chicken
- Adds flavor
- Helps retain moisture
- Improves coating adhesion
Buttermilk is especially effective because its mild acidity gently softens the meat.
Step 1: Prepare the Marinade in the Thermomix
Place into the Thermomix bowl:
- Buttermilk
- Salt
- Black pepper
- Paprika
- Garlic powder
- Onion powder
Mix:
20 seconds / Speed 4
The marinade should be smooth and evenly combined.
Step 2: Marinate the Chicken
Place the chicken pieces into a large bowl or zip-top bag.
Pour the marinade over the chicken.
Ensure every piece is coated thoroughly.
Cover and refrigerate for:
At least 4 hours
For best results:
Overnight
The longer marination produces deeper flavor.
Why Overnight Marination Is Better
Overnight marination allows:
- Better flavor penetration
- Improved tenderness
- More moisture retention
This extra time makes a noticeable difference.
Step 3: Prepare the Crispy Coating
Add to the Thermomix bowl:
- Flour
- Cornstarch
- Salt
- Paprika
- Garlic powder
- Onion powder
- Oregano
- Thyme
- Cayenne
- Black pepper
Mix:
15 seconds / Speed 5
Transfer to a large shallow bowl.
Why Cornstarch Matters
Cornstarch contributes:
- Extra crispiness
- Better crunch
- Lighter texture
Many restaurant-style fried chicken recipes rely on cornstarch for superior results.
Understanding the Seasoning Blend
The seasoning mixture creates layers of flavor.
Paprika
Adds color and mild sweetness.
Garlic Powder
Provides savory depth.
Onion Powder
Enhances richness.
Oregano and Thyme
Create classic fried chicken flavor.
Cayenne
Adds subtle heat.
Step 4: Remove Chicken from Marinade
Remove the chicken from the refrigerator.
Allow excess marinade to drip off.
Do not wipe it away.
The remaining marinade helps the coating adhere.
Step 5: Coat the Chicken
Press each piece firmly into the seasoned flour mixture.
Coat thoroughly.
Pay attention to:
- Folds
- Crevices
- Skin edges
These areas create extra crunchy bits.
Step 6: Double Dredging for Maximum Crunch
For extra crispy chicken:
- Coat in flour.
- Return briefly to marinade.
- Coat again in flour.
This creates thicker craggy layers.
The result is exceptionally crunchy fried chicken.
Why Double Dredging Works
The second coating creates:
- More texture
- Larger crispy flakes
- Superior crunch
This technique is used by many famous fried chicken restaurants.
Step 7: Rest the Coated Chicken
Place coated pieces on a wire rack.
Allow them to rest for:
15–20 minutes
This helps the coating bond to the chicken.
Skipping this step can lead to coating loss during frying.
Step 8: Heat the Oil
Fill a deep pot with oil.
Heat to:
350°F (175°C)
Maintaining proper temperature is essential.
Too hot:
- Burns coating
Too cool:
- Creates greasy chicken
Best Oils for Frying
Choose oils with high smoke points:
- Peanut oil
- Canola oil
- Vegetable oil
- Sunflower oil
Avoid low smoke-point oils like olive oil.
Step 9: Fry the Chicken
Carefully lower several pieces into the hot oil.
Avoid overcrowding.
Cook in batches.
Fry for:
Wings
8–10 minutes
Drumsticks
12–15 minutes
Thighs
14–16 minutes
Breasts
15–18 minutes
Turn occasionally for even browning.
Step 10: Check Internal Temperature
Chicken should reach:
165°F (74°C)
Use a meat thermometer for accuracy.
Proper cooking ensures both safety and juiciness.
Step 11: Drain Properly
Transfer cooked chicken to a wire rack.
Avoid paper towels.
Wire racks help maintain crispness by allowing airflow.
Why Wire Racks Are Better
Paper towels trap steam.
Steam softens the crust.
Wire racks preserve crunch.
Texture and Flavor
Perfect fried chicken should have:
Exterior
- Deep golden color
- Loud crunch
- Crisp texture
Interior
- Juicy meat
- Tender texture
- Rich flavor
Every bite should contrast crispy coating with moist chicken.
Thermomix Honey Butter Fried Chicken
After frying, brush with:
- Melted butter
- Honey
This creates a sweet-savory glaze.
Perfect for special occasions.
Spicy Krispy Chicken
Increase cayenne to:
- 2 teaspoons
Add:
- Hot sauce to the marinade
For extra heat.
Garlic Parmesan Fried Chicken
After frying:
Toss with:
- Melted butter
- Garlic
- Parmesan cheese
An irresistible variation.
Southern-Style Version
Add to the coating:
- Extra black pepper
- Smoked paprika
Classic Southern comfort food flavor.
Korean-Inspired Variation
Prepare a glaze using:
- Gochujang
- Honey
- Soy sauce
- Garlic
Toss fried chicken before serving.
Serving Suggestions
Serve with:
- Coleslaw
- Mashed potatoes
- Cornbread
- Mac and cheese
- French fries
- Biscuits
Classic comfort-food combinations work beautifully.
Fried Chicken Sandwiches
Use boneless chicken portions.
Serve on toasted buns with:
- Pickles
- Lettuce
- Mayo
A restaurant-quality sandwich at home.
Picnic Favorite
Fried chicken is excellent:
- Warm
- Room temperature
- Packed for travel
Perfect for outdoor gatherings.
Storage Instructions
Store leftovers in an airtight container.
Refrigerate for:
Up to 4 days
Reheating Instructions
Oven
Bake at:
375°F (190°C)
for 15 minutes.
Air Fryer
Reheat at:
375°F (190°C)
for 5–7 minutes.
This method best restores crispness.
Can You Freeze Fried Chicken?
Yes.
Cool completely.
Freeze for up to:
3 months
Thaw overnight before reheating.
Common Mistakes to Avoid
Oil Too Hot
Burns the crust before the chicken cooks.
Oil Too Cool
Results in greasy chicken.
Overcrowding
Drops oil temperature dramatically.
Skipping Rest Time
Coating may fall off.
Underseasoning
Season every layer.
Frequently Asked Questions
Can I Use Boneless Chicken?
Yes.
Reduce cooking time accordingly.
Can I Air Fry This Recipe?
Yes.
Spray lightly with oil and cook in an air fryer.
Texture will differ slightly.
Can I Make It Less Spicy?
Absolutely.
Reduce or omit cayenne pepper.
Why Did My Coating Fall Off?
Usually due to:
- Skipping resting time
- Excess moisture
- Rough handling
Can I Use Gluten-Free Flour?
Yes.
Use a quality gluten-free all-purpose blend.
Meal Prep Tips
Marinate chicken the day before.
Prepare coating ahead of time.
This makes frying day much easier.
Entertaining Tips
Serve fried chicken alongside:
- Dipping sauces
- Pickles
- Biscuits
- Potato salad
Guests love interactive platters.
Final Thoughts
This Thermomix Krispy Fried Chicken delivers everything you could want from homemade fried chicken: a crunchy golden crust, juicy and flavorful meat, and the kind of satisfying texture that keeps everyone reaching for another piece. The Thermomix simplifies the preparation of both the marinade and seasoning blend, helping you achieve consistent, delicious results every time.
Whether you’re serving it for a weekend family feast, game-day celebration, picnic, or comfort-food dinner, this recipe is sure to become a favorite. With its perfectly seasoned coating, tender chicken, and endless serving possibilities, this crispy fried chicken proves that homemade can be every bit as delicious as your favorite restaurant version. Enjoy every crunchy, juicy bite!