Olivia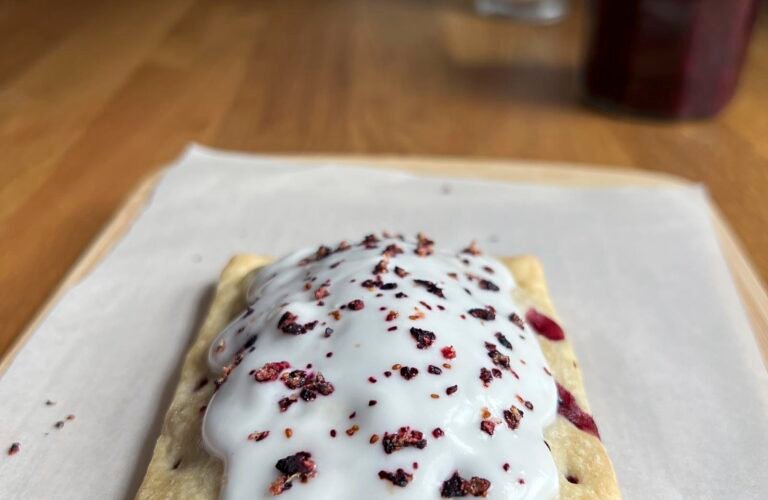
There’s something nostalgic and comforting about biting into a flaky, fruity Pop Tart. But nothing compares to making them from scratch, especially when they’re crafted with sourdough. These Homemade Sourdough Blueberry Pop Tarts feature buttery, tender pastry made with sourdough discard and filled with a sweet homemade blueberry filling. Finished with a simple vanilla glaze and optional sprinkles, they’re perfect for breakfast, brunch, snacks, or dessert.
Unlike store-bought versions, these homemade Pop Tarts are made with real ingredients and have a rich, bakery-style flavor that’s impossible to resist. The sourdough discard adds depth and tenderness without overpowering the sweet blueberry filling.
Prep Time: 45 minutes
Chill Time: 1 hour
Bake Time: 25 minutes
Total Time: About 2 hours
Yield: 8 Pop Tarts
Why You’ll Love These Homemade Pop Tarts
- Great use for sourdough discard
- Buttery, flaky pastry
- Real blueberry filling
- Better than store-bought
- Perfect for breakfast or dessert
- Make-ahead friendly
- Freezer-friendly
- Kid-approved
- Customizable flavors
- Beautiful bakery-style treat
Ingredients
For the Sourdough Pastry
- 2½ cups all-purpose flour
- 1 tablespoon granulated sugar
- 1 teaspoon salt
- 1 cup cold unsalted butter, cubed
- ½ cup sourdough discard
- 1 egg
- 1–2 tablespoons ice water, if needed
For the Blueberry Filling
- 1½ cups fresh or frozen blueberries
- ⅓ cup granulated sugar
- 1 tablespoon cornstarch
- 1 tablespoon lemon juice
- ½ teaspoon vanilla extract
Egg Wash
- 1 egg
- 1 tablespoon milk
Vanilla Glaze
- 1 cup powdered sugar
- 2 tablespoons milk
- ½ teaspoon vanilla extract
Optional
- Colorful sprinkles
Equipment Needed
- Mixing bowls
- Rolling pin
- Saucepan
- Pastry brush
- Baking sheet
- Parchment paper
- Fork
Why Use Sourdough Discard?
Sourdough discard adds:
- Mild tangy flavor
- Tender texture
- Reduced waste
- Richness
The subtle acidity balances the sweetness beautifully.
Step 1: Make the Blueberry Filling
In a saucepan combine:
- Blueberries
- Sugar
- Cornstarch
- Lemon juice
Cook over medium heat.
Stir frequently.
After 5–7 minutes the berries will burst and the mixture will thicken.
Remove from heat.
Stir in vanilla.
Allow the filling to cool completely.
Why Cool the Filling?
Warm filling can melt the pastry and cause leaks during baking.
Cooling ensures cleaner assembly and crisp layers.
Step 2: Prepare the Dough
In a large bowl combine:
- Flour
- Sugar
- Salt
Whisk thoroughly.
Step 3: Add Butter
Cut the cold butter into small cubes.
Add to the flour mixture.
Use a pastry cutter or your fingers to work the butter into pea-sized pieces.
Small butter pieces create flaky layers.
Step 4: Add Wet Ingredients
Mix together:
- Sourdough discard
- Egg
Add to the flour mixture.
Mix gently until the dough starts coming together.
Add ice water if necessary.
Do not overmix.
Step 5: Chill the Dough
Shape into a disk.
Wrap in plastic wrap.
Refrigerate for:
1 hour
This allows the butter to firm up and prevents shrinkage.
The Secret to Flaky Pastry
Cold butter creates steam while baking.
Steam forms beautiful layers that make homemade Pop Tarts irresistible.
Step 6: Roll Out the Dough
Lightly flour your work surface.
Roll dough into a large rectangle about ⅛ inch thick.
Trim edges for clean rectangles.
Step 7: Cut Rectangles
Cut the dough into:
16 equal rectangles
These will form 8 Pop Tarts.
Step 8: Add Filling
Place half the rectangles on a parchment-lined baking sheet.
Add approximately:
1–2 tablespoons blueberry filling
to the center of each.
Leave a border around the edges.
Avoid overfilling.
Step 9: Seal the Pop Tarts
Place the remaining rectangles over the filling.
Press edges firmly.
Seal with a fork.
This prevents filling from escaping.
Step 10: Chill Again
Place assembled Pop Tarts into the refrigerator for:
15–20 minutes
This helps maintain their shape during baking.
Step 11: Prepare Egg Wash
Whisk together:
- Egg
- Milk
Brush tops evenly.
Egg wash promotes a beautiful golden finish.
Step 12: Vent the Tops
Use a fork or knife to poke small holes.
These vents allow steam to escape.
Without vents, the pastries may burst.
Step 13: Bake
Preheat oven to:
350°F (175°C)
Bake for:
22–25 minutes
until lightly golden.
The edges should be crisp and flaky.
Step 14: Cool Completely
Transfer to a wire rack.
Allow to cool completely before glazing.
Warm pastries can melt the icing.
Make the Vanilla Glaze
In a bowl combine:
- Powdered sugar
- Milk
- Vanilla
Whisk until smooth.
Adjust thickness as needed.
Step 15: Glaze the Pop Tarts
Spread glaze evenly over cooled pastries.
Add sprinkles if desired.
Allow glaze to set before serving.
Flavor Profile
These homemade Pop Tarts feature:
Pastry
- Buttery
- Tender
- Slightly tangy
Blueberry Filling
- Sweet
- Fruity
- Bright
Glaze
- Smooth
- Sweet
- Creamy
Together they create a nostalgic yet elevated treat.
Serving Suggestions
Enjoy with:
- Coffee
- Tea
- Milk
- Hot chocolate
Perfect for:
- Breakfast
- Afternoon snacks
- Dessert
- Lunch boxes
Make-Ahead Instructions
Prepare and assemble Pop Tarts.
Freeze unbaked.
Bake directly from frozen, adding 3–5 extra minutes.
Storage
Store in an airtight container at room temperature for:
2 days
Or refrigerate for:
Up to 5 days
Freezing Instructions
Freeze baked or unbaked Pop Tarts for:
Up to 3 months
Thaw and warm before serving.
Delicious Variations
Strawberry Pop Tarts
Replace blueberries with strawberries.
Mixed Berry Pop Tarts
Use:
- Blueberries
- Raspberries
- Blackberries
Lemon Blueberry Pop Tarts
Add lemon zest to the filling.
Cream Cheese Blueberry Pop Tarts
Spread sweetened cream cheese beneath the filling.
Cinnamon Sugar Pop Tarts
Skip glaze and sprinkle with cinnamon sugar.
Why Homemade Is Better
Compared to store-bought versions, homemade Pop Tarts contain:
- Real fruit
- Real butter
- Less artificial flavor
- Better texture
- Fresher taste
And the sourdough discard gives them a unique bakery-quality flavor.
Tips for Perfect Pop Tarts
Keep Everything Cold
Cold butter equals flaky pastry.
Don’t Overfill
Too much filling causes leaks.
Chill Before Baking
Prevents spreading.
Allow Complete Cooling
For smooth glazing.
Use Homemade Filling
It tastes much better than jam.
Common Mistakes to Avoid
Warm Dough
Can become sticky and difficult to handle.
Overworking Dough
Produces tough pastry.
Skipping Vent Holes
May cause bursting.
Using Runny Filling
Leads to leaks.
Glazing Warm Pastries
Makes icing melt off.
Nutritional Benefits
Blueberries provide:
- Antioxidants
- Vitamin C
- Fiber
Sourdough discard contributes flavor while reducing food waste.
Homemade ingredients mean fewer preservatives and additives.
Frequently Asked Questions
Can I Use Frozen Blueberries?
Yes.
No need to thaw before cooking.
Can I Use Sourdough Starter Instead of Discard?
Absolutely.
Active starter works just as well.
Can I Toast Them?
Yes.
They reheat beautifully in a toaster oven.
Can I Use Whole Wheat Flour?
Yes.
Replace up to half of the all-purpose flour.
Can I Make Mini Pop Tarts?
Certainly.
Reduce baking time by several minutes.
Creative Topping Ideas
Try decorating with:
- White chocolate drizzle
- Lemon glaze
- Crushed freeze-dried blueberries
- Rainbow sprinkles
- Powdered sugar
Perfect Occasions
These homemade Sourdough Blueberry Pop Tarts are ideal for:
- Weekend breakfasts
- Birthday brunches
- School snacks
- Afternoon tea
- Holiday mornings
- Bake sales
Their charming appearance and nostalgic flavor make them a favorite for all ages.
Final Thoughts
These Homemade Sourdough Blueberry Pop Tarts combine buttery, flaky pastry with a vibrant blueberry filling and sweet vanilla glaze to create a breakfast treat that’s far superior to anything from a box. The addition of sourdough discard gives the pastry depth and tenderness, while the homemade filling delivers fresh berry flavor in every bite.
Whether enjoyed fresh from the oven, packed into lunch boxes, or shared with family over coffee, these Pop Tarts are sure to become a beloved recipe. Once you taste the crisp pastry and juicy blueberry filling wrapped inside, you’ll never want store-bought Pop Tarts again. Happy baking!