Olivia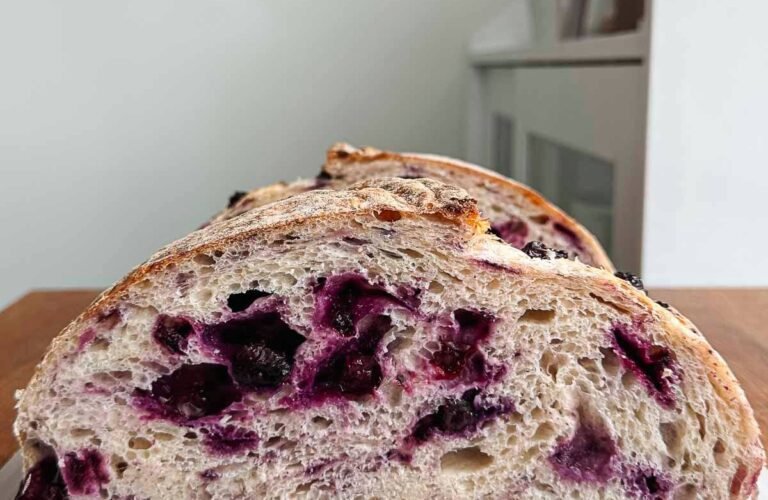
Blueberry Sourdough Bread is a delightful artisan loaf that combines the tangy complexity of traditional sourdough with the natural sweetness of juicy blueberries. Every slice is filled with bursts of berry flavor, surrounded by a soft, chewy crumb and encased in a beautifully crisp golden crust. This bread is perfect for breakfast, brunch, afternoon tea, or even dessert. Toast it and spread it with butter, cream cheese, or honey for an unforgettable treat.
Unlike sweet quick breads, this loaf relies on natural sourdough fermentation to develop flavor and structure. The result is a bread that is not overly sweet but wonderfully balanced, allowing both the sourdough and blueberries to shine. Whether you are an experienced sourdough baker or just beginning your journey, this recipe will guide you through creating a bakery-quality blueberry sourdough loaf at home.
Prep Time: 45 minutes
Bulk Fermentation: 4–6 hours
Cold Proof: 8–12 hours
Bake Time: 40–45 minutes
Yield: 1 Large Loaf
Why You’ll Love This Recipe
- Naturally leavened with sourdough starter
- Filled with fresh blueberries
- Crispy artisan crust
- Soft and chewy crumb
- Beautiful flavor balance
- No commercial yeast
- Perfect for breakfast and brunch
- Excellent toasted
- Great for gifting
- Freezer-friendly
Ingredients
For the Dough
- 500g bread flour
- 350g water
- 100g active sourdough starter
- 10g salt
For the Blueberry Filling
- 200g fresh blueberries
- 1 tablespoon flour
Optional Add-Ins
- 1 tablespoon lemon zest
- 1 teaspoon vanilla extract
- 50g white chocolate chips
- 1 teaspoon cinnamon
Equipment Needed
- Large mixing bowl
- Kitchen scale
- Dough scraper
- Banneton basket
- Dutch oven
- Parchment paper
- Bread lame or sharp knife
- Cooling rack
Understanding Blueberry Sourdough
Adding fruit to sourdough creates a unique baking experience. Blueberries contribute sweetness, moisture, and color, but they can also make dough more delicate. The key is to add them carefully after the dough begins developing strength.
The result is a loaf with:
- Tangy sourdough flavor
- Sweet berry pockets
- Beautiful purple streaks
- Moist crumb
- Crisp crust
Step 1: Feed Your Starter
The foundation of excellent sourdough bread is a healthy starter.
Feed your starter approximately 4–6 hours before mixing.
It should:
- Double in size
- Be bubbly throughout
- Smell pleasantly tangy
- Pass the float test
A strong starter creates better rise and flavor.
Step 2: Mix the Dough
In a large bowl combine:
- Water
- Active sourdough starter
Mix until mostly dissolved.
Add the bread flour.
Mix until no dry flour remains.
The dough will appear shaggy and rough.
Cover and allow to rest for:
30–45 minutes
This stage is called autolyse.
Why Autolyse Is Important
Autolyse allows the flour to fully absorb water before fermentation begins.
Benefits include:
- Better gluten development
- Improved dough elasticity
- Easier handling
- More open crumb
Even a short autolyse makes a noticeable difference.
Step 3: Add Salt
Sprinkle the salt evenly over the dough.
Mix thoroughly by hand until fully incorporated.
The dough should begin feeling smoother and stronger.
Salt strengthens gluten and regulates fermentation.
Step 4: Begin Bulk Fermentation
Cover the dough and allow it to rest for 30 minutes.
After resting, perform your first stretch and fold.
Stretch and Fold Technique
- Wet your hands.
- Lift one edge of the dough.
- Stretch upward gently.
- Fold over the center.
- Rotate the bowl.
- Repeat four times.
This process develops gluten without traditional kneading.
Step 5: Prepare the Blueberries
Wash and dry the blueberries thoroughly.
Toss them gently with one tablespoon of flour.
This helps absorb excess moisture and prevents excessive bleeding into the dough.
Fresh blueberries are preferred because they maintain their shape better during fermentation.
Step 6: Add the Blueberries
Gently stretch the dough into a rough rectangle.
Scatter the blueberries evenly across the surface.
If using optional ingredients such as:
- Lemon zest
- Cinnamon
- White chocolate chips
Add them now.
Fold the dough carefully to enclose the berries.
Avoid crushing them.
Some blueberry streaking is normal and creates beautiful color throughout the loaf.
Step 7: Continue Stretch and Folds
Perform three additional sets of stretch and folds during the next two hours.
Space each set approximately 30 minutes apart.
The dough will gradually become:
- Stronger
- Smoother
- More elastic
You should notice increased structure after each fold.
Step 8: Complete Bulk Fermentation
Allow the dough to continue fermenting until it increases in volume by approximately 50%.
This usually takes:
4–6 hours
The dough should appear:
- Puffy
- Aerated
- Slightly domed
Small bubbles on the surface are a good sign of active fermentation.
How Temperature Affects Fermentation
Warmer kitchens speed fermentation.
Cooler kitchens slow it down.
Ideal dough temperature is approximately:
75°F–78°F (24°C–26°C)
Monitor the dough rather than relying strictly on the clock.
Step 9: Pre-Shape
Lightly flour your work surface.
Turn out the dough carefully.
Shape it into a loose round.
Allow it to rest uncovered for:
20–30 minutes
This bench rest helps relax the gluten before final shaping.
Step 10: Final Shape
Shape the dough into either:
Boule
A classic round artisan loaf.
Batard
An oval-shaped loaf that slices beautifully.
Create surface tension by gently tightening the outer layer.
Place the dough seam-side up into a floured banneton basket.
Step 11: Cold Proof Overnight
Cover the basket.
Refrigerate for:
8–12 hours
Overnight fermentation greatly improves flavor and structure.
Many sourdough bakers consider this step essential.
Benefits of Cold Proofing
Cold proofing:
- Enhances flavor
- Improves crust development
- Creates better oven spring
- Makes scoring easier
The blueberries also have time to infuse the dough with subtle fruit flavor.
Step 12: Preheat the Dutch Oven
Place your Dutch oven in the oven.
Preheat to:
475°F (245°C)
Allow at least 30 minutes of preheating.
A thoroughly heated Dutch oven creates steam and promotes excellent rise.
Step 13: Score the Dough
Remove the dough from the refrigerator.
Turn it onto parchment paper.
Using a bread lame or sharp knife, score the surface.
A single slash approximately half an inch deep works well.
Scoring directs expansion during baking.
Step 14: Bake Covered
Carefully lower the dough into the hot Dutch oven.
Cover with the lid.
Bake for:
25 minutes
The trapped steam encourages maximum oven spring and crust development.
Step 15: Bake Uncovered
Remove the lid.
Reduce temperature to:
450°F (230°C)
Bake for an additional:
15–20 minutes
The loaf should become:
- Deep golden brown
- Crisp
- Slightly caramelized
The crust should sound hollow when tapped.
Step 16: Cool Completely
Transfer the bread to a cooling rack.
Allow it to cool for at least:
2 hours
This step is crucial.
Cutting the loaf too early can result in a gummy crumb.
Texture and Flavor
A successful blueberry sourdough loaf offers:
Crust
- Crisp
- Golden
- Slightly chewy
Crumb
- Moist
- Tender
- Open and airy
Flavor
- Mild sourdough tang
- Sweet blueberry bursts
- Delicate fruit aroma
Every slice showcases the perfect balance of sweet and sour.
Flavor Variations
Lemon Blueberry Sourdough
Add:
- 1 tablespoon lemon zest
The citrus enhances the blueberry flavor.
Blueberry Vanilla Sourdough
Add:
- 1 teaspoon vanilla extract
Creates a subtle bakery-style sweetness.
Blueberry White Chocolate Sourdough
Add:
- 50–75g white chocolate chips
Perfect for dessert lovers.
Cinnamon Blueberry Sourdough
Add:
- 1 teaspoon cinnamon
Adds warmth and depth.
Serving Suggestions
This bread is delicious:
- Toasted with butter
- Spread with cream cheese
- Drizzled with honey
- Served with mascarpone
- Paired with tea or coffee
It also makes an incredible brunch centerpiece.
Blueberry Sourdough French Toast
Transform leftover slices into an unforgettable breakfast.
Custard
- 2 eggs
- ½ cup milk
- 1 teaspoon vanilla
- Pinch of cinnamon
Dip thick slices into the mixture.
Cook until golden brown.
Serve with:
- Maple syrup
- Fresh blueberries
- Whipped cream
The blueberry flavor becomes even more pronounced.
Storage Instructions
Store at room temperature in a bread bag or airtight container.
Best enjoyed within:
2–3 days
Because of the fruit content, it may soften faster than plain sourdough.
Freezing Instructions
Slice before freezing.
Place in freezer-safe bags.
Freeze for up to:
3 months
Toast directly from frozen when needed.
Troubleshooting
Dense Loaf
Possible causes:
- Weak starter
- Under-fermentation
- Poor gluten development
Excessive Purple Streaks
Blueberries may have been overmixed.
Fold more gently next time.
Wet Crumb
Allow more cooling time before slicing.
Poor Rise
Ensure the starter is active and fermentation is complete.
Frequently Asked Questions
Can I Use Frozen Blueberries?
Yes.
Keep them frozen until adding them to the dough.
Can I Add Other Fruits?
Absolutely.
Try:
- Raspberries
- Blackberries
- Cranberries
Can I Use Whole Wheat Flour?
Yes.
Replace up to 20% of the bread flour with whole wheat flour.
Is This Bread Sweet?
Only mildly sweet.
Most sweetness comes naturally from the blueberries.
Can I Add Nuts?
Yes.
Walnuts and pecans pair beautifully with blueberries.
Final Thoughts
Blueberry Sourdough Bread is one of the most rewarding fruit-filled artisan loaves you can bake. The combination of naturally fermented dough and sweet blueberries creates a bread that is both rustic and elegant. With its crisp crust, soft crumb, and juicy bursts of berry flavor, this loaf is perfect for breakfast, brunch, afternoon tea, or even dessert.
Whether enjoyed fresh from the oven, toasted with butter, or transformed into decadent French toast, this blueberry sourdough loaf showcases the incredible versatility of sourdough baking. Once you experience the balance of tangy sourdough and sweet blueberries, you’ll find yourself making this recipe again and again. Happy baking!