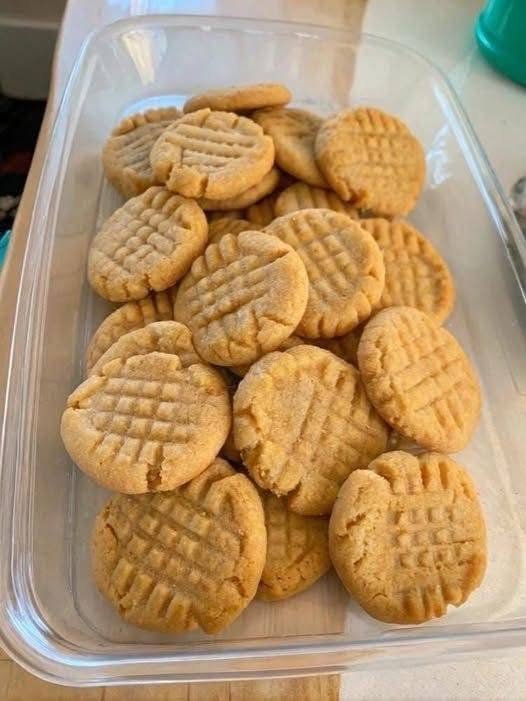

These Sourdough Salted Peanut Butter Cookies are rich, buttery, chewy, and packed with classic peanut butter flavor. Made with sourdough discard, these homemade cookies are an easy and delicious way to use leftover starter while creating a bakery-style treat with wonderfully crisp edges and soft, tender centers.
The combination of creamy peanut butter, brown sugar, vanilla, and sourdough discard creates a cookie that is deeply flavorful without being overly sweet. A final sprinkle of flaky sea salt adds the perfect contrast to the rich peanut butter and makes every bite even more irresistible.
Whether you keep a sourdough starter regularly or simply have some discard waiting in your refrigerator, this is a recipe worth saving. These cookies come together with simple pantry ingredients and require no complicated sourdough fermentation.
Why You’ll Love These Cookies
There is something especially satisfying about turning sourdough discard into cookies. Instead of throwing away extra starter, you can use it to add subtle tang and depth to a familiar favorite.
These cookies have several qualities that make them especially delicious:
- Soft and chewy centers
- Lightly crisp edges
- Rich peanut butter flavor
- Subtle sourdough tang
- Buttery brown-sugar sweetness
- Flaky sea salt on top
- Easy preparation
- No long fermentation required
They are wonderful with a glass of cold milk, a cup of coffee, or a warm cup of tea.
Ingredients
For the Cookies
- 1/2 cup unsalted butter, softened
- 3/4 cup creamy peanut butter
- 3/4 cup packed brown sugar
- 1/4 cup granulated sugar
- 1/2 cup sourdough discard
- 1 large egg
- 1 teaspoon vanilla extract
- 1 1/2 cups all-purpose flour
- 1/2 teaspoon baking soda
- 1/2 teaspoon baking powder
- 1/2 teaspoon salt
For Finishing
- Flaky sea salt, for sprinkling
- Optional: 2–3 tablespoons chopped roasted peanuts
Choosing the Peanut Butter
For the most consistent results, use regular creamy peanut butter rather than natural peanut butter with a large amount of separated oil.
Creamy peanut butter gives the cookies a smooth texture and helps the dough hold together properly.
If you prefer extra peanut flavor, you can use crunchy peanut butter or add chopped roasted peanuts to the dough.
For an especially attractive finish, reserve a few chopped peanuts to sprinkle over the cookies before baking.
Preparing the Cookie Dough
Start by preheating your oven to 350°F (175°C).
Line two baking sheets with parchment paper or silicone baking mats.
In a large mixing bowl, beat the softened butter, peanut butter, brown sugar, and granulated sugar together until creamy and smooth.
This usually takes about 2–3 minutes with an electric mixer.
Properly creaming the butter and sugars helps create a tender cookie while incorporating some air into the mixture.
Add the sourdough discard, egg, and vanilla extract.
Mix until everything is evenly combined.
The mixture may look slightly loose at this stage, which is completely normal.
Combining the Dry Ingredients
In a separate bowl, whisk together the flour, baking soda, baking powder, and salt.
Gradually add the dry ingredients to the peanut butter mixture.
Mix on low speed just until the flour disappears.
Do not overmix the dough. Overworking the flour can develop too much gluten and result in cookies that are tougher rather than soft and chewy.
If you are adding chopped peanuts, gently fold them into the dough at the end.
Chilling the Dough
For the best texture, refrigerate the cookie dough for approximately 30–60 minutes.
Chilling helps firm up the butter and makes the dough easier to shape. It also reduces excessive spreading during baking.
If your kitchen is warm or the dough feels particularly soft, you can chill it for a little longer.
You can also prepare the dough ahead of time and keep it covered in the refrigerator for up to 2 days.
Shaping the Cookies
Use a cookie scoop or tablespoon to portion the dough.
Roll each portion gently between your palms to create a ball.
Place the dough balls on the prepared baking sheets, leaving approximately 2 inches between each cookie.
For the classic peanut butter cookie appearance, gently press each dough ball with a fork to create a crisscross pattern.
You do not need to flatten them too much. A gentle press is enough.
If desired, sprinkle a few chopped roasted peanuts over the tops.
Adding the Salt
The finishing salt is one of the best parts of this recipe.
Before baking, lightly sprinkle each cookie with flaky sea salt.
The salt enhances the peanut butter flavor and balances the sweetness of the brown sugar.
Do not use the same amount of fine table salt that you would use for flaky sea salt. Flaky salt has a larger, lighter texture and provides small bursts of salty flavor.
Baking the Cookies
Place the baking sheets in the preheated oven.
Bake for approximately 10–13 minutes.
The edges should look lightly golden and set, while the centers should still appear slightly soft.
Do not wait until the cookies look completely firm in the center. They will continue cooking from residual heat after they leave the oven.
Overbaking is one of the easiest ways to lose the soft, chewy texture.
Once baked, remove the cookies from the oven and allow them to cool on the baking sheet for about 5 minutes.
Then transfer them to a wire rack to cool completely.
The cookies will become firmer as they cool while maintaining their soft centers.
How to Get Soft and Chewy Cookies
A few simple techniques can make a major difference in the final texture.
First, make sure your butter is softened rather than melted. Melted butter can cause the cookies to spread more quickly.
Second, do not add excessive flour. Measuring flour by scooping directly from the bag can sometimes result in too much flour. For the most accurate results, use a kitchen scale or lightly spoon the flour into a measuring cup and level it.
Third, chill the dough before baking.
Finally, remove the cookies from the oven while the centers still look slightly underbaked.
These steps help produce the soft, chewy middle that makes peanut butter cookies so delicious.
Can I Use Sourdough Starter Instead of Discard?
Yes. You can use either sourdough discard or mature starter.
Discard is particularly convenient because this recipe does not depend on the starter’s fermentation activity. The baking soda and baking powder provide the necessary lift.
The sourdough starter contributes flavor and moisture.
For the most predictable results, use discard with a typical 100% hydration consistency.
Flavor Variations
These cookies are delicious as written, but you can easily customize them.
Chocolate Peanut Butter Cookies
Add 1/2 cup chocolate chips to the dough for a classic peanut butter and chocolate combination.
Peanut Butter Chocolate Chunk
Use chopped dark or milk chocolate instead of chocolate chips for larger pockets of melted chocolate.
Peanut Butter and Jelly Cookies
After shaping the dough balls, make a small indentation in the center and add a tiny spoonful of your favorite jam before baking.
Extra Crunchy Peanut Butter Cookies
Use crunchy peanut butter and add chopped roasted peanuts to the dough.
Chocolate-Dipped Cookies
Once completely cooled, dip half of each cookie into melted chocolate. Allow the chocolate to set before serving.
Cinnamon Peanut Butter Cookies
Add 1/2 teaspoon ground cinnamon to the dry ingredients for a warm, slightly spiced flavor.
Storage
Store completely cooled cookies in an airtight container at room temperature.
They will generally stay soft and delicious for several days.
Place parchment paper between layers if you are stacking the cookies.
If you prefer warm cookies, microwave one for a few seconds before serving.
Freezing Instructions
These cookies freeze beautifully.
You can freeze the baked cookies after they have cooled completely. Place them in a freezer-safe container with parchment between the layers.
For the best quality, use them within a couple of months.
You can also freeze the unbaked dough.
Shape the dough into individual balls and place them on a parchment-lined tray. Freeze until firm, then transfer the dough balls to a freezer-safe bag or container.
When ready to bake, place the frozen dough balls on a baking sheet and allow them to sit for a few minutes while the oven preheats. You may need to add an extra minute or two to the baking time.
Common Mistakes to Avoid
Overmixing the dough
Once the flour is incorporated, stop mixing. Overmixing can make the cookies dense.
Skipping the chill
Although chilling is not always absolutely necessary, it helps control spreading and improves the texture.
Overbaking
Peanut butter cookies can look slightly underdone when they are actually ready. The centers should remain soft when you remove them from the oven.
Using too much flour
Too much flour creates dry, crumbly cookies rather than soft and chewy ones.
Adding too much salt
Remember that peanut butter already contains some salt, especially if you are using salted peanut butter. Adjust the finishing salt accordingly.
Frequently Asked Questions
Can I use salted butter?
Yes. If using salted butter, reduce or omit the additional salt in the dough.
Can I use whole wheat flour?
You can replace a portion of the all-purpose flour with whole wheat flour, but using too much may make the cookies heavier. For the softest texture, keep most or all of the flour as all-purpose flour.
Why did my cookies spread too much?
The butter may have been too warm, the dough may not have been chilled long enough, or the baking sheet may have been warm when the dough was placed on it.
Chill the dough longer and always place the dough onto a cool baking sheet.
Why are my cookies dry?
The most common causes are too much flour or overbaking. Measure the flour carefully and remove the cookies when the centers still look slightly soft.
Can I make smaller cookies?
Absolutely. Use a smaller scoop and reduce the baking time by a few minutes. Keep a close eye on the edges so they do not become overly brown.
Recipe Card
Sourdough Salted Peanut Butter Cookies
Prep Time: 15 minutes
Chill Time: 30–60 minutes
Bake Time: 10–13 minutes
Total Time: About 1 hour
Yield: Approximately 20–24 cookies
Ingredients
Cookies
- 1/2 cup unsalted butter, softened
- 3/4 cup creamy peanut butter
- 3/4 cup brown sugar
- 1/4 cup granulated sugar
- 1/2 cup sourdough discard
- 1 egg
- 1 teaspoon vanilla
- 1 1/2 cups all-purpose flour
- 1/2 teaspoon baking soda
- 1/2 teaspoon baking powder
- 1/2 teaspoon salt
Finishing
- Flaky sea salt
- Optional chopped roasted peanuts
Instructions
- Preheat oven to 350°F (175°C) and line baking sheets with parchment.
- Cream butter, peanut butter, brown sugar, and granulated sugar until smooth.
- Add sourdough discard, egg, and vanilla and mix well.
- Whisk flour, baking soda, baking powder, and salt separately.
- Gradually add the dry ingredients to the wet ingredients.
- Mix just until combined.
- Fold in chopped peanuts if desired.
- Chill the dough for 30–60 minutes.
- Scoop and roll the dough into balls.
- Place on prepared baking sheets.
- Press gently with a fork to create a crisscross pattern.
- Sprinkle lightly with flaky sea salt.
- Bake for 10–13 minutes.
- Cool on the baking sheet for 5 minutes.
- Transfer to a wire rack and cool completely.
Final Thoughts
These Sourdough Salted Peanut Butter Cookies are a simple, comforting, and delicious way to use sourdough discard. They combine everything you love about a classic peanut butter cookie with the subtle complexity of sourdough and the irresistible contrast of flaky sea salt.
The result is a cookie with golden edges, soft centers, rich peanut butter flavor, and just enough salt to keep you reaching for another one.
Keep a batch of dough in the freezer for quick homemade treats, or bake a fresh tray whenever you have sourdough discard to use. Whether served with coffee, milk, tea, or simply enjoyed straight from the cooling rack, these cookies are sure to become a favorite.