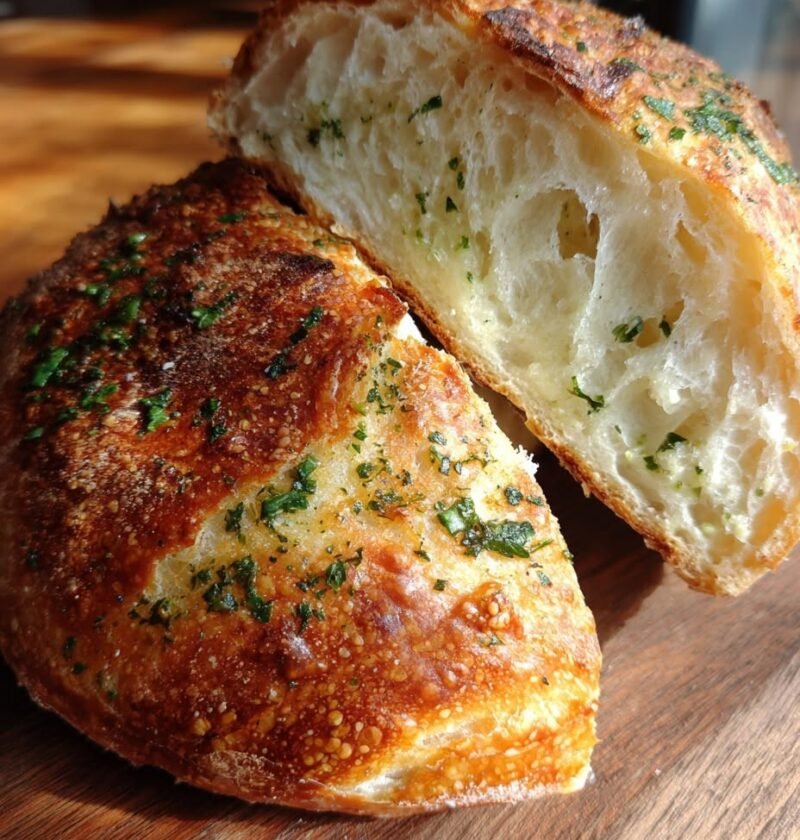

Garlic Herb Sourdough Bread is a delicious homemade loaf that combines the naturally tangy flavor of sourdough with buttery garlic and fragrant herbs. With a crisp, golden crust and a soft, airy center, this savory sourdough bread is perfect for serving alongside soups, pasta, roasted meats, salads, or your favorite comfort foods.
The best part is that the garlic and herbs are incorporated directly into the dough, so every slice is packed with flavor. Melted butter combines with fresh garlic, parsley, oregano, thyme, and optional chili flakes to create a wonderfully aromatic loaf that tastes like bakery-style garlic bread with the added character of naturally fermented sourdough.
This recipe is made with a simple dough of bread flour, water, active sourdough starter, and salt. Instead of traditional kneading, a series of gentle stretch-and-folds develops the gluten and gives the dough strength. A long bulk fermentation followed by an overnight cold proof allows the sourdough to develop its flavor and texture.
Why You’ll Love This Garlic Herb Sourdough
There are plenty of reasons to add this recipe to your sourdough baking rotation.
First, the flavor is incredible. The mild tang of fermented sourdough works beautifully with savory garlic and herbs. Butter adds richness, while parsley, oregano, and thyme provide layers of herbal flavor.
The texture is equally impressive. Baking the loaf in a preheated Dutch oven helps create a crisp, deeply golden crust while keeping the inside soft and airy.
This is also a practical recipe for home bakers because much of the process is hands-off. The dough needs time to ferment and proof, but you do not need to spend hours kneading it.
You can serve this bread fresh, toast it for breakfast, use it for sandwiches, or serve it as a flavorful side dish with dinner.
Ingredients
For the Sourdough Dough
- 500g bread flour
- 350g warm water
- 100g active sourdough starter
- 10g salt
For the Garlic Herb Butter
- 4 garlic cloves, finely minced
- 3 tablespoons melted butter
- 1 tablespoon fresh parsley, chopped
- 1 teaspoon dried oregano
- 1 teaspoon dried thyme
- Optional pinch of chili flakes
How to Make Garlic Herb Sourdough Bread
Step 1: Prepare the Sourdough Starter
About 4–6 hours before you plan to mix the dough, feed your sourdough starter. Allow it to sit at room temperature until it becomes bubbly and active.
Your starter should show clear signs of fermentation and should have risen noticeably after feeding. An active starter is important because it provides the natural leavening needed for the bread.
The exact time required can vary depending on the temperature of your kitchen and the strength of your starter.
Step 2: Mix the Water and Starter
Add the warm water to a large mixing bowl.
Add the active sourdough starter and stir well until the starter is distributed throughout the water.
The mixture does not need to be perfectly smooth, but the starter should be sufficiently dispersed before you add the flour.
Step 3: Add the Bread Flour
Add the bread flour to the bowl.
Mix everything together until the flour has absorbed the water and there are no obvious dry patches remaining.
At this point, the dough will look rough and shaggy. Do not worry about trying to make it smooth. The dough will develop more structure as it rests and undergoes stretch-and-folds.
Cover the bowl and allow the dough to rest for about 30 minutes.
Step 4: Add the Salt
After the initial 30-minute rest, add the salt.
Work the salt thoroughly into the dough using your hands. Pinch and fold the dough gently until the salt is evenly incorporated.
The dough should begin to feel more cohesive as you continue working with it.
Step 5: Make the Garlic Herb Butter
While the dough rests, prepare the flavorful garlic herb mixture.
In a small bowl, combine:
- Melted butter
- Finely minced garlic
- Fresh parsley
- Dried oregano
- Dried thyme
- Chili flakes, if using
Stir until everything is evenly combined.
The mixture should be fragrant and buttery, with the garlic and herbs distributed throughout.
Step 6: Add the Garlic Herb Mixture
Pour the garlic herb butter over the dough.
Gently fold the mixture into the dough. At first, the dough may feel slippery because of the melted butter. Continue folding carefully until the garlic and herbs are reasonably well distributed.
Avoid aggressive kneading. The goal is to incorporate the flavorful mixture while preserving the developing structure of the dough.
Step 7: Perform Stretch-and-Folds
Over the next two hours, perform a series of stretch-and-folds approximately every 30 minutes.
Wet your hands lightly to prevent sticking. Take one side of the dough, gently stretch it upward, and fold it toward the center.
Rotate the bowl and repeat the process on the remaining sides.
Continue until all four sides have been folded.
Cover the dough and let it rest until the next folding session.
With each round of folds, the dough should gradually become smoother, stronger, and more elastic.
Step 8: Bulk Fermentation
After completing the stretch-and-fold process, cover the bowl and allow the dough to ferment at room temperature for approximately 4–6 hours.
Keep in mind that sourdough fermentation is affected by temperature and starter activity, so the dough should be observed rather than judged entirely by the clock.
Look for signs that the dough has become:
- Noticeably puffier
- Larger in volume
- More elastic
- Filled with bubbles
- Lighter and more aerated
If your kitchen is cool, fermentation may take longer. In a warm environment, the dough may ferment more quickly.
Step 9: Shape the Loaf
Once bulk fermentation is complete, lightly flour your work surface.
Gently transfer the dough onto the surface, being careful not to knock out all the air that has developed during fermentation.
Shape the dough into a round boule. Fold the outer edges toward the center and create gentle surface tension.
The finished dough should hold together as a cohesive round loaf without being handled too aggressively.
Step 10: Prepare for the Final Proof
Place the shaped dough into a generously floured proofing basket.
If you do not have a proofing basket, you can use a bowl lined with a clean kitchen towel and lightly dusted with flour.
Cover the dough.
Step 11: Cold Proof Overnight
Transfer the covered dough to the refrigerator and allow it to proof overnight.
This cold fermentation gives the sourdough additional time to develop flavor while slowing down the fermentation process.
Cold proofing also firms up the dough, making it easier to handle and score before baking.
The next day, you can bake the loaf directly from the refrigerator.
Step 12: Preheat the Dutch Oven
The following day, place your Dutch oven inside the oven.
Preheat the oven to 475°F (245°C) and allow the Dutch oven to become thoroughly hot.
A properly heated Dutch oven helps the dough experience strong heat as soon as it enters the oven.
The covered environment also helps retain moisture during the first stage of baking, supporting oven spring and crust development.
Step 13: Score the Dough
Remove the cold dough from the refrigerator.
Carefully turn it onto a piece of parchment paper.
Using a sharp bread lame or razor blade, make a confident score across the top of the loaf.
The score gives the expanding dough a controlled area to open during baking.
You can keep the design simple or create your preferred sourdough scoring pattern.
Step 14: Bake the Garlic Herb Sourdough
Carefully transfer the parchment and dough into the preheated Dutch oven.
Cover with the lid and bake for 25 minutes.
After 25 minutes, carefully remove the lid.
Continue baking uncovered for another 20–25 minutes, or until the loaf develops a deep golden-brown crust.
The exterior should be crisp and well browned.
As the bread bakes, the combination of garlic, butter, parsley, oregano, and thyme creates an incredible aroma throughout the kitchen.
Step 15: Cool Completely
Once the bread has finished baking, carefully remove it from the Dutch oven.
Place the loaf on a wire cooling rack and allow it to cool completely before slicing.
Although it may be tempting to cut into the bread immediately, allowing it to cool gives the interior time to finish setting.
Cutting too soon can compress the crumb and make the center seem gummy.
Once completely cool, use a sharp bread knife to slice the loaf.
Tips for the Best Garlic Herb Sourdough
Use an Active Starter
Your sourdough starter should be bubbly and active before you begin. A weak starter can result in slow fermentation and a dense loaf.
Watch the Dough, Not Just the Clock
The suggested fermentation times are useful guidelines, but sourdough behaves differently depending on temperature and starter strength.
Look for a dough that has expanded, become puffy, and developed bubbles.
Avoid Adding Too Much Flour
Sourdough dough can feel sticky or soft, especially during the early stages. Avoid adding large amounts of extra flour simply to make the dough easier to handle.
Instead, lightly wet your hands during folding.
Handle the Dough Gently
The air developed during fermentation contributes to the texture of the finished bread. Gentle shaping helps preserve those fermentation bubbles.
Preheat the Dutch Oven Thoroughly
A hot Dutch oven helps create strong oven spring and a crisp crust. Give the oven and baking vessel enough time to preheat completely.
Let the Bread Cool
Cooling is part of the baking process. Allow the loaf to cool completely before slicing for the best crumb texture.
How to Serve Garlic Herb Sourdough
This bread is incredibly versatile.
Serve thick slices with tomato soup, creamy vegetable soup, or another favorite soup for an easy and comforting meal.
It is also excellent alongside pasta. The crisp crust is perfect for soaking up flavorful sauces.
For dinner, serve it with roasted chicken, grilled meats, or roasted vegetables.
You can also slice the bread and serve it with olive oil, butter, or a cheese board.
For breakfast, toast a slice and serve it with butter or use it as the base for an open-faced savory sandwich.
It also makes an excellent grilled cheese sandwich because the garlic and herbs add flavor without requiring additional seasoning.
Storage Instructions
Once completely cooled, store the bread at room temperature in a bread bag or wrap it in a clean kitchen towel.
The bread is best enjoyed within about three days.
For longer storage, slice the loaf before freezing. Place the slices in a freezer-safe container or bag and freeze them individually.
When needed, take a slice directly from the freezer and toast it.
This is a convenient way to enjoy homemade garlic herb sourdough even after baking day.
Frequently Asked Questions
Can I make this recipe as a beginner?
Yes. Although sourdough requires some attention to fermentation, the process becomes much easier once you learn to recognize the appearance and texture of properly fermented dough.
How long should bulk fermentation take?
The recipe recommends approximately 4–6 hours, but the actual time depends on your kitchen temperature and sourdough starter activity.
The dough should become noticeably puffier and show signs of fermentation before shaping.
Can I skip the overnight cold proof?
The overnight cold proof is an important part of the recipe because it gives the dough additional time to develop flavor and makes the chilled dough easier to score and handle.
Why bake sourdough in a Dutch oven?
A Dutch oven creates a humid, enclosed baking environment during the first part of baking. This helps the dough expand and contributes to the crisp crust associated with artisan sourdough.
When should I slice the bread?
Allow the loaf to cool completely before slicing. This gives the crumb enough time to set and helps produce cleaner slices.
Recipe Card
Garlic Herb Sourdough Bread
Description:
A flavorful artisan sourdough loaf made with active sourdough starter, garlic, butter, parsley, oregano, thyme, and optional chili flakes. The bread develops a crisp golden crust and soft, airy interior and is perfect with soups, pasta, meats, salads, sandwiches, and cheese.
Yield: 1 loaf
Preparation & Fermentation: Approximately 7–9 hours, plus overnight cold proof
Baking Time: 45–50 minutes
Oven Temperature: 475°F (245°C)
Ingredients
Dough
- 500g bread flour
- 350g warm water
- 100g active sourdough starter
- 10g salt
Garlic Herb Butter
- 4 garlic cloves, finely minced
- 3 tablespoons melted butter
- 1 tablespoon fresh parsley, chopped
- 1 teaspoon dried oregano
- 1 teaspoon dried thyme
- Optional pinch of chili flakes
Instructions
- Feed the sourdough starter 4–6 hours before making the dough and allow it to become active and bubbly.
- Mix warm water and active starter in a large bowl.
- Add bread flour and mix until no dry flour remains.
- Cover and rest for 30 minutes.
- Add salt and incorporate it thoroughly.
- Mix melted butter, garlic, parsley, oregano, thyme, and optional chili flakes in a small bowl.
- Gently fold the garlic herb butter into the dough.
- Perform stretch-and-folds approximately every 30 minutes for 2 hours.
- Cover and bulk ferment at room temperature for approximately 4–6 hours, watching for puffiness and bubbles.
- Transfer the dough to a lightly floured work surface and shape it into a round loaf.
- Place in a floured proofing basket or lined bowl.
- Cover and refrigerate overnight.
- Preheat a Dutch oven and oven to 475°F (245°C).
- Turn the chilled dough onto parchment paper.
- Score the surface with a sharp blade.
- Carefully transfer the dough to the hot Dutch oven.
- Cover and bake for 25 minutes.
- Remove the lid and bake another 20–25 minutes until deep golden brown and crisp.
- Transfer the loaf to a cooling rack.
- Cool completely before slicing and serving.
Storage
Store the cooled bread at room temperature for up to 3 days. For longer storage, slice and freeze individual portions. Toast frozen slices whenever you are ready to enjoy them.
Nutritional Information:
Exact nutritional values are not provided because they depend on serving size and the specific brands of ingredients used.
Final Thoughts
Garlic Herb Sourdough Bread is a wonderful way to turn a classic sourdough loaf into something extra special. The naturally fermented dough provides a pleasantly tangy foundation, while garlic, butter, parsley, oregano, and thyme create a rich savory flavor in every bite.
Although the recipe requires patience, most of the time is spent allowing the dough to ferment and develop naturally. The stretch-and-fold technique builds strength without intensive kneading, while overnight refrigeration improves both flavor and handling.
Once baked, the loaf has everything you want from homemade artisan bread: a crisp golden crust, soft interior, fragrant garlic and herbs, and plenty of sourdough character.
Serve it beside soup or pasta, toast it for breakfast, use it for sandwiches, or simply enjoy a warm slice with butter. This Garlic Herb Sourdough Bread is a flavorful homemade loaf that is well worth adding to your baking routine.