Olivia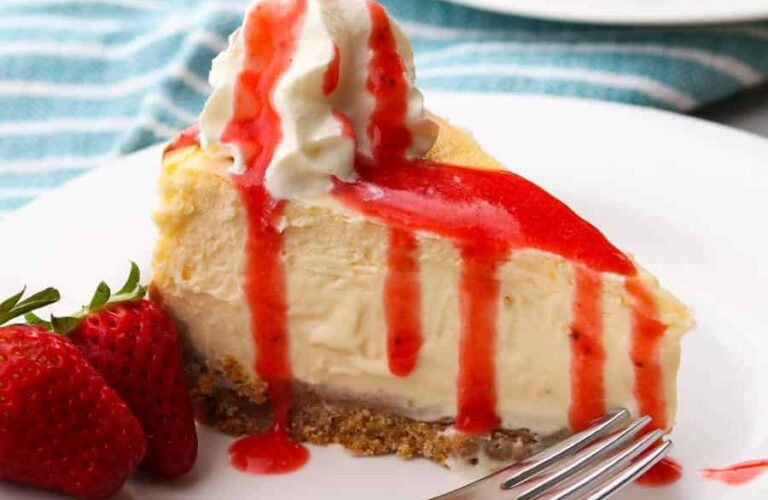
There’s nothing quite like a rich, creamy cheesecake topped with a vibrant homemade strawberry sauce. This Thermomix Cheesecake with Strawberry Sauce combines a buttery biscuit base, silky smooth cheesecake filling, and a sweet-tart strawberry topping that makes every bite irresistible. Using a Thermomix simplifies the process, ensuring a perfectly smooth filling and a luscious fruit sauce with minimal effort.
Whether you’re preparing a dessert for a family gathering, holiday celebration, birthday party, or simply treating yourself, this cheesecake is guaranteed to impress. The balance of creamy cheesecake and fresh strawberry flavor creates a classic dessert that never goes out of style.
Prep Time: 30 minutes
Bake Time: 55–65 minutes
Chilling Time: 6 hours or overnight
Servings: 10–12 slices
Why You’ll Love This Recipe
This Thermomix cheesecake is:
- Smooth and creamy
- Easy to prepare
- Perfectly balanced in sweetness
- Made with simple ingredients
- Ideal for special occasions
- Great for making ahead
- Topped with fresh strawberry sauce
- Beautifully presented
The Thermomix helps eliminate lumps and creates a professional-quality filling every time.
Ingredients
For the Biscuit Base
- 250g digestive biscuits or graham crackers
- 120g unsalted butter, melted
For the Cheesecake Filling
- 750g full-fat cream cheese, softened
- 200g sour cream
- 180g caster sugar
- 3 large eggs
- 1 egg yolk
- 2 teaspoons vanilla extract
- 20g cornflour (cornstarch)
- 1 tablespoon lemon juice
For the Strawberry Sauce
- 400g fresh strawberries, hulled
- 80g caster sugar
- 1 tablespoon lemon juice
- 1 teaspoon vanilla extract
Optional Garnishes
- Fresh strawberries
- Whipped cream
- Mint leaves
- White chocolate shavings
Equipment Needed
- Thermomix
- 9-inch (23cm) springform pan
- Baking tray
- Mixing bowl
- Cooling rack
- Offset spatula
Why Use a Thermomix?
A Thermomix makes cheesecake preparation easier because it:
- Crushes biscuits evenly
- Mixes filling smoothly
- Eliminates lumps
- Cooks fruit sauces perfectly
- Reduces preparation time
The result is a consistently smooth cheesecake with minimal effort.
Step 1: Prepare the Pan
Grease a 9-inch springform pan lightly.
Line the base with baking paper.
This helps the cheesecake release easily after chilling.
Preheat your oven to:
160°C (320°F)
Step 2: Make the Biscuit Base
Place biscuits into the Thermomix bowl.
Crush:
10 seconds / Speed 8
The biscuits should resemble fine crumbs.
Add melted butter.
Mix:
15 seconds / Speed 4
The mixture should resemble wet sand.
Transfer to the prepared pan.
Press firmly into the base using the back of a spoon or the bottom of a measuring cup.
Create an even layer.
Place in the refrigerator while preparing the filling.
Why a Chilled Base Matters
Chilling helps the crust firm up before the filling is added.
This creates:
- Better structure
- Cleaner slices
- Improved texture
Even 15–20 minutes makes a difference.
Step 3: Prepare the Cheesecake Filling
Place cream cheese into the Thermomix bowl.
Mix:
30 seconds / Speed 5
Scrape down the sides.
Add:
- Sour cream
- Sugar
- Vanilla extract
- Lemon juice
Mix:
40 seconds / Speed 5
The mixture should be completely smooth.
Step 4: Add Eggs
With the Thermomix running on:
Speed 4
Add eggs one at a time through the lid opening.
Add the egg yolk.
Mix for another:
20 seconds / Speed 4
Avoid overmixing once eggs are added, as excessive air can contribute to cracking.
Step 5: Add Cornflour
Add cornflour.
Mix:
15 seconds / Speed 3
The filling should be silky, creamy, and lump-free.
Step 6: Fill the Pan
Remove the chilled crust from the refrigerator.
Pour the cheesecake mixture over the biscuit base.
Smooth the surface with a spatula.
Tap the pan gently on the counter several times to release any trapped air bubbles.
Step 7: Bake the Cheesecake
Place the cheesecake in the center of the oven.
Bake for:
55–65 minutes
The edges should appear set while the center still has a slight wobble.
Avoid opening the oven door frequently.
Temperature fluctuations can encourage cracking.
Step 8: Cool Slowly
Once baked:
- Turn off the oven.
- Leave the cheesecake inside.
- Crack the oven door slightly.
- Cool for 1 hour.
Gradual cooling helps reduce the chance of cracks.
Afterward, remove from the oven and cool completely at room temperature.
Step 9: Chill the Cheesecake
Cover the cheesecake.
Refrigerate for at least:
6 hours
For best results:
Overnight
The flavor and texture improve significantly after chilling.
Making the Strawberry Sauce
While the cheesecake chills, prepare the topping.
Step 10: Add Ingredients to Thermomix
Place into the bowl:
- Strawberries
- Sugar
- Lemon juice
- Vanilla
Blend:
5 seconds / Speed 5
Step 11: Cook the Sauce
Cook:
10 minutes / 100°C / Speed 2
The strawberries will soften and release their juices.
The sauce will thicken slightly.
Step 12: Blend Smooth
For a smooth sauce:
Blend:
20 seconds / Speed 7
For a chunkier topping, blend less.
Allow the sauce to cool completely.
Refrigerate until needed.
Why Homemade Strawberry Sauce Is Better
Fresh strawberry sauce offers:
- Brighter flavor
- Better texture
- Natural fruit sweetness
- Beautiful color
It complements the rich cheesecake perfectly.
Step 13: Assemble the Cheesecake
Remove the chilled cheesecake from the springform pan.
Transfer to a serving platter.
Spoon the cooled strawberry sauce over the top.
Allow some sauce to drip naturally down the sides for an elegant presentation.
Optional Decorations
Enhance the appearance with:
- Fresh strawberry halves
- Whipped cream rosettes
- Mint leaves
- White chocolate curls
These simple additions create a bakery-quality finish.
Texture and Flavor
This cheesecake offers:
Crust
- Buttery
- Slightly crunchy
- Rich biscuit flavor
Filling
- Creamy
- Dense yet smooth
- Light vanilla notes
Strawberry Sauce
- Sweet
- Fruity
- Slightly tart
- Vibrant and fresh
Together they create a perfectly balanced dessert.
Tips for Success
Use Room Temperature Ingredients
Softened cream cheese mixes more easily and prevents lumps.
Don’t Overmix
Especially after adding eggs.
Overmixing introduces excess air.
Chill Thoroughly
Proper chilling creates the ideal cheesecake texture.
Use Full-Fat Cream Cheese
Full-fat versions provide the richest flavor and consistency.
Allow Gradual Cooling
This minimizes cracking.
Common Cheesecake Problems
Cracked Surface
Possible causes:
- Rapid cooling
- Overbaking
- Overmixing
Lumpy Filling
Usually caused by cold cream cheese.
Always soften before mixing.
Runny Center
Typically indicates underbaking or insufficient chilling.
Flavor Variations
Once you’ve mastered the classic version, try these alternatives.
Mixed Berry Cheesecake
Replace strawberries with:
- Blueberries
- Raspberries
- Blackberries
Lemon Cheesecake
Add:
- Extra lemon zest
- Additional lemon juice
Chocolate Cheesecake
Mix melted chocolate into the filling.
White Chocolate Strawberry Cheesecake
Add melted white chocolate for extra richness.
Strawberry Swirl Cheesecake
Swirl some strawberry sauce into the filling before baking.
Make-Ahead Instructions
This dessert is perfect for entertaining.
You can:
- Bake the cheesecake 2 days ahead
- Make the sauce 3 days ahead
- Assemble shortly before serving
The flavor actually improves after resting overnight.
Storage Instructions
Store covered in the refrigerator.
Best enjoyed within:
4–5 days
The strawberry sauce can be stored separately for freshness.
Freezing Instructions
Freeze cheesecake without the sauce.
Wrap tightly.
Freeze for up to:
2 months
Thaw overnight in the refrigerator before serving.
Serving Suggestions
This cheesecake pairs beautifully with:
- Coffee
- Espresso
- Tea
- Sparkling wine
- Fresh fruit
Serve chilled for the best texture and flavor.
Frequently Asked Questions
Can I Use Frozen Strawberries?
Yes.
Thaw and drain excess liquid before making the sauce.
Can I Make It Without Sour Cream?
Greek yogurt can be substituted.
Why Is My Cheesecake Dense?
Cheesecake is naturally rich and dense.
Overbaking can make it even firmer.
Can I Use a Different Crust?
Absolutely.
Try:
- Oreo crumbs
- Shortbread biscuits
- Vanilla wafers
Final Thoughts
This Thermomix Cheesecake with Strawberry Sauce is the perfect combination of elegance and comfort. The buttery biscuit base, rich cream cheese filling, and vibrant homemade strawberry topping come together to create a dessert that is both visually stunning and incredibly delicious. Using a Thermomix streamlines every step, from crushing the biscuits to creating a silky smooth filling and perfectly cooked strawberry sauce.
Whether you’re serving it at a holiday celebration, birthday party, afternoon tea, or family gathering, this cheesecake is guaranteed to impress. The creamy texture, balanced sweetness, and fresh berry flavor make it a timeless dessert that everyone will love. Once you’ve tried this homemade version, it may quickly become your go-to cheesecake recipe for every special occasion