Olivia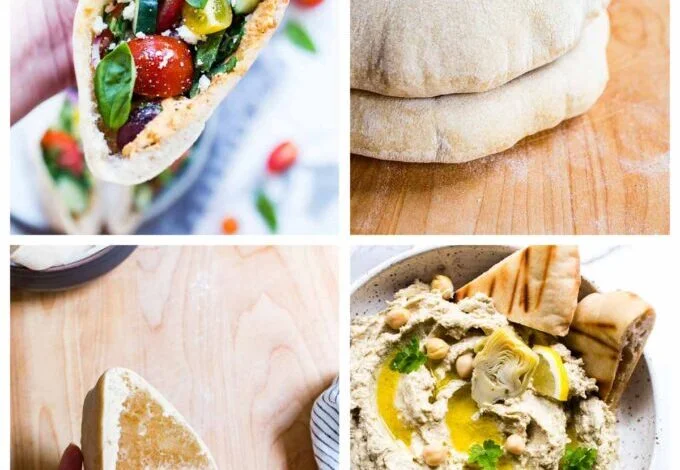
Soft, fluffy, and wonderfully versatile, Sourdough Discard Pita Bread is one of the easiest and most rewarding ways to use up extra sourdough discard. These homemade pita breads puff beautifully during cooking, creating the signature pocket that’s perfect for stuffing with your favorite fillings. Even if they don’t fully puff, you’ll still end up with delicious flatbreads that are perfect for wraps, dipping, or serving alongside soups and salads.
Unlike store-bought pita bread, homemade sourdough discard pita has a richer flavor, softer texture, and no unnecessary preservatives. The sourdough discard adds a subtle tang while helping create tender, chewy bread that’s ideal for sandwiches, gyros, falafel, hummus, and more.
Whether you’re a seasoned sourdough baker or simply looking for creative ways to reduce food waste, this recipe is a must-try.
Why You’ll Love This Recipe
- A great way to use sourdough discard
- Soft, fluffy, and chewy texture
- Simple pantry ingredients
- No commercial preservatives
- Freezer-friendly
- Perfect for meal prep
- Ready in just a few hours
- Versatile for countless meals
What Is Sourdough Discard?
Sourdough discard is the portion of starter removed before feeding your sourdough culture. While it’s no longer at peak rising strength, it still contains beneficial wild yeast and develops a wonderful tangy flavor in baked goods.
Using discard in pita bread:
- Reduces waste
- Adds flavor
- Creates a tender crumb
- Improves texture
Ingredients
Makes 8 pita breads
- 1 cup (240g) sourdough discard
- 2½ cups (300g) bread flour
- ¾ cup (180ml) warm water
- 2 tablespoons olive oil
- 1 tablespoon honey or sugar
- 1 teaspoon instant yeast
- 1½ teaspoons salt
Optional Toppings
- Olive oil
- Za’atar seasoning
- Sesame seeds
- Garlic butter
- Fresh herbs
Equipment
- Large mixing bowl
- Rolling pin
- Cast iron skillet or baking stone
- Kitchen towel
- Dough scraper
- Measuring cups
Why Add Commercial Yeast?
Although the discard contains wild yeast, adding a small amount of instant yeast helps ensure:
- Reliable rise
- Softer texture
- Faster preparation
- Better puffing
If you prefer a fully naturally leavened version, you can omit the instant yeast and allow a much longer fermentation.
Step 1: Mix the Dough
In a large bowl combine:
- Warm water
- Honey
- Instant yeast
Let sit for about 5 minutes until slightly foamy.
Add:
- Sourdough discard
- Olive oil
Mix well.
Step 2: Add the Dry Ingredients
Add:
- Bread flour
- Salt
Mix until a shaggy dough forms.
Continue kneading for 8–10 minutes by hand or 6–7 minutes in a stand mixer until the dough is smooth and elastic.
Step 3: First Rise
Place the dough in a lightly oiled bowl.
Cover with a clean towel or plastic wrap.
Let rise in a warm place for:
- 1½ to 2 hours
or until doubled in size.
Step 4: Divide the Dough
Turn the dough onto a lightly floured surface.
Divide into:
- 8 equal pieces
Shape each piece into a smooth ball.
Cover and let rest for:
- 20 minutes
This allows the gluten to relax, making rolling easier.
Step 5: Roll the Pitas
Roll each dough ball into a circle approximately:
- 6–7 inches in diameter
- ¼ inch thick
Try to keep the thickness even so the pita puffs uniformly.
Cover the rolled pitas with a towel while you prepare the cooking surface.
Step 6: Heat the Skillet or Oven
Skillet Method
Heat a cast iron skillet over medium-high heat until very hot.
No additional oil is needed.
Oven Method
Place a baking stone or inverted baking sheet in the oven and preheat to:
475°F (245°C)
for at least 30 minutes.
Step 7: Cook the Pitas
Skillet
Place one pita onto the hot skillet.
Cook for:
- 1–2 minutes
until bubbles appear.
Flip and cook for another:
- 1–2 minutes
The pita should puff dramatically.
Flip once more for about 30 seconds if needed.
Oven
Place rolled pitas directly on the hot baking stone.
Bake for:
- 3–5 minutes
until fully puffed and lightly golden.
Step 8: Keep Them Soft
As each pita finishes cooking, wrap it in a clean kitchen towel.
The trapped steam keeps the bread soft and pliable.
Tips for Perfect Pita Pockets
Use High Heat
A very hot cooking surface is essential for creating steam inside the dough, which causes the pita to puff.
Roll Evenly
Uneven thickness can prevent proper pocket formation.
Don’t Over-Flour
Too much flour can dry the dough and interfere with puffing.
Rest the Dough
Allowing the dough to relax before rolling makes shaping easier and improves texture.
Cover Cooked Pitas
This prevents them from drying out.
Flavor Variations
Garlic Herb Pita
Mix dried oregano, parsley, and garlic powder into the dough.
Whole Wheat Pita
Replace up to half of the bread flour with whole wheat flour.
Za’atar Pita
Brush with olive oil and sprinkle with za’atar immediately after cooking.
Cheesy Pita
Sprinkle grated Parmesan over the warm pita.
Spicy Pita
Add a pinch of crushed red pepper flakes to the dough.
Serving Ideas
These homemade pitas are incredibly versatile.
Fill them with:
- Grilled chicken
- Falafel
- Gyro meat
- Shawarma
- Hummus and vegetables
- Tuna salad
- Egg salad
- Chicken salad
They also pair beautifully with:
- Baba ganoush
- Tzatziki
- Spinach dip
- Roasted vegetables
- Soups
- Salads
Meal Prep
Sourdough discard pita bread is excellent for meal prep.
Cook a batch over the weekend and enjoy throughout the week for quick lunches and dinners.
Storage
Store cooled pita bread in an airtight bag or container at room temperature for:
- Up to 3 days
For longer freshness, refrigerate for up to 1 week.
Freezing
Stack cooled pitas with parchment paper between each one.
Store in a freezer-safe bag for:
- Up to 3 months
Thaw at room temperature and warm briefly before serving.
Reheating
To refresh pita bread:
- Warm in a dry skillet for 30–60 seconds per side
- Microwave for 10–15 seconds wrapped in a damp paper towel
- Heat in a 350°F (175°C) oven for 5 minutes
Common Mistakes to Avoid
Cooking on a Cool Surface
The skillet or baking stone must be very hot.
Rolling Too Thick
Thicker dough may not puff properly.
Rolling Too Thin
Very thin dough can become crisp instead of soft.
Skipping the Rest Period
Relaxed dough rolls much more evenly.
Leaving Pitas Uncovered
They will dry out quickly if not wrapped after cooking.
Frequently Asked Questions
Can I Use Active Sourdough Starter Instead of Discard?
Yes. Active starter works equally well and may provide a little more rise.
Why Didn’t My Pitas Puff?
Possible reasons include:
- Cooking surface wasn’t hot enough
- Dough wasn’t rolled evenly
- Dough was under-proofed
Even if they don’t puff, they’ll still be delicious flatbreads.
Can I Freeze the Dough?
Yes. After the first rise, divide and freeze the dough balls. Thaw overnight in the refrigerator before rolling and cooking.
Can I Make Them Vegan?
Absolutely. Simply use sugar instead of honey if desired.
Can I Cook Them on the Grill?
Yes! A hot grill creates beautifully charred pita bread with excellent flavor.
Nutritional Benefits
Sourdough discard pita bread offers:
- Complex carbohydrates for energy
- Small amounts of protein
- Healthy fats from olive oil
- Better flavor through fermentation
- A homemade alternative with fewer additives than many store-bought options
Final Thoughts
Sourdough Discard Pita Bread is an easy, economical, and delicious way to transform extra sourdough discard into soft, fluffy homemade bread. With its tender texture, subtle tang, and signature pocket, it’s perfect for sandwiches, wraps, dipping, or serving with your favorite Mediterranean dishes.
Once you’ve tasted fresh homemade pita bread, you’ll see just how much better it is than store-bought versions. Keep a batch in your freezer, and you’ll always have a versatile bread ready for quick meals, snacks, or entertaining. Happy baking!