Olivia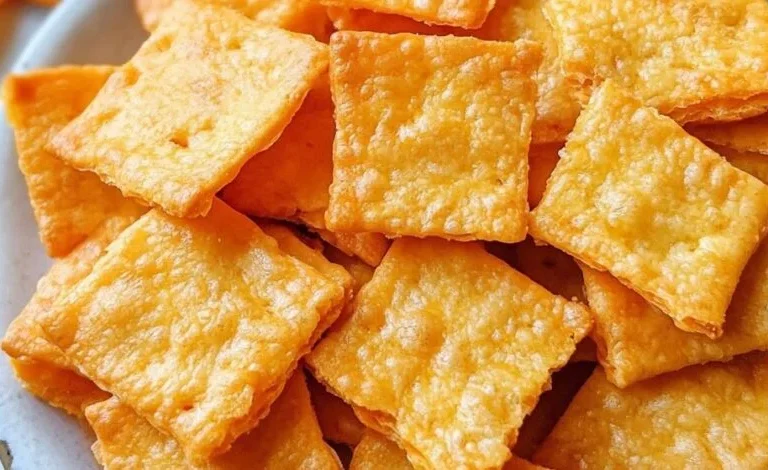
If you’re looking for a delicious way to use extra sourdough discard, these Sourdough Discard Cheese Crackers are the perfect solution. Crispy, cheesy, buttery, and packed with savory flavor, they’re an irresistible homemade snack that’s surprisingly easy to make. Whether you’re serving them on a charcuterie board, packing them into lunchboxes, or enjoying them straight from the container, these crackers are guaranteed to become a household favorite.
One of the best things about this recipe is that it transforms something that might otherwise be discarded into a flavorful, crunchy snack. The sourdough discard adds a subtle tang that pairs beautifully with sharp cheddar cheese, creating crackers that taste far more sophisticated than store-bought versions.
These crackers are highly customizable too. You can add herbs, spices, seeds, or different cheeses to create your own signature version. Once you make a batch, you’ll find yourself looking forward to sourdough feeding day just so you can make more crackers.
Prep Time: 20 minutes
Chill Time: 30 minutes
Bake Time: 15–20 minutes
Total Time: 1 hour 10 minutes
Yield: Approximately 120 crackers
Why You’ll Love These Crackers
- Excellent use of sourdough discard
- Crispy and crunchy
- Rich cheesy flavor
- Easy to make
- Great for meal prep
- Kid-friendly
- Perfect for entertaining
- Customizable seasonings
- Freezer-friendly dough
- No special equipment required
What Is Sourdough Discard?
Sourdough discard is the portion of starter removed before feeding.
While it may not be strong enough to leaven bread on its own, it still contains:
- Beneficial fermentation byproducts
- Flavor compounds
- Natural acidity
This makes it perfect for crackers, pancakes, waffles, muffins, and other baked goods.
The slight tang of discard adds complexity and depth to these crackers.
Ingredients
Base Dough
- 1 cup (240g) sourdough discard
- 1½ cups (170g) sharp cheddar cheese, finely shredded
- 4 tablespoons unsalted butter, softened
- 1 cup (125g) all-purpose flour
- ½ teaspoon salt
- ¼ teaspoon black pepper
Optional Flavor Additions
- 1 teaspoon garlic powder
- ½ teaspoon smoked paprika
- 1 teaspoon dried rosemary
- 1 teaspoon dried thyme
- 1 tablespoon sesame seeds
- 1 tablespoon everything bagel seasoning
- ¼ teaspoon cayenne pepper
Equipment Needed
- Mixing bowl
- Rolling pin
- Parchment paper
- Baking sheets
- Pizza cutter or sharp knife
- Fork
- Cooling rack
Choosing the Best Cheese
Sharp cheddar is the most popular option because its bold flavor stands out after baking.
Other excellent choices include:
- Extra sharp cheddar
- Parmesan
- Gruyère
- Gouda
- Pepper Jack
- Asiago
For the best flavor, grate your own cheese rather than using pre-shredded cheese.
Freshly grated cheese melts more smoothly and contains fewer additives.
Why Homemade Crackers Are Worth Making
Homemade crackers offer several advantages:
- Better flavor
- Fresh ingredients
- No preservatives
- Custom seasoning options
- Less packaging waste
They also fill your kitchen with the irresistible aroma of baked cheese.
Step 1: Combine the Ingredients
In a large mixing bowl combine:
- Sourdough discard
- Softened butter
- Shredded cheddar cheese
Mix until evenly combined.
Add:
- Flour
- Salt
- Black pepper
Mix until a soft dough forms.
The dough should be slightly tacky but not sticky.
Step 2: Add Optional Seasonings
This is the perfect time to customize your crackers.
Popular additions include:
Garlic Cheddar
Add:
- 1 teaspoon garlic powder
Smoky Cheddar
Add:
- ½ teaspoon smoked paprika
Herb Crackers
Add:
- Rosemary
- Thyme
Spicy Crackers
Add:
- Cayenne pepper
Mix thoroughly so the seasonings are evenly distributed.
Step 3: Form the Dough
Gather the dough into a ball.
If it feels overly sticky, add a tablespoon of flour.
If it feels dry, add a teaspoon of discard.
The dough should be smooth and easy to handle.
Step 4: Chill the Dough
Wrap the dough tightly in plastic wrap.
Refrigerate for:
30 minutes
Chilling helps:
- Firm the butter
- Relax the gluten
- Improve rolling
- Enhance flavor
Skipping this step can make the dough difficult to work with.
Why Chilling Matters
Cold dough rolls more evenly and helps create crisp crackers.
It also prevents excessive spreading during baking.
Step 5: Preheat the Oven
Preheat your oven to:
350°F (175°C)
Line baking sheets with parchment paper.
This prevents sticking and promotes even baking.
Step 6: Roll Out the Dough
Remove the chilled dough from the refrigerator.
Place it between two sheets of parchment paper.
Roll to approximately:
⅛ inch thickness
For extra crispy crackers, roll slightly thinner.
Uniform thickness ensures even baking.
Step 7: Cut the Crackers
Using a pizza cutter or sharp knife, cut into squares.
You can make:
- Traditional squares
- Rectangles
- Diamonds
- Decorative shapes
Smaller crackers tend to become crispier.
Step 8: Dock the Crackers
Use a fork to poke small holes in each cracker.
This process, known as docking, prevents excessive puffing during baking.
It also gives crackers a classic appearance.
Step 9: Add Toppings
For additional flavor, sprinkle with:
- Flaky sea salt
- Sesame seeds
- Everything bagel seasoning
- Extra Parmesan cheese
Press lightly so toppings adhere.
Step 10: Bake
Transfer the parchment paper to the baking sheets.
Bake for:
15–20 minutes
The crackers should become:
- Golden brown
- Crisp
- Fragrant
The edges may darken slightly.
Step 11: Watch Carefully
The difference between perfectly baked and overbaked crackers can be just a few minutes.
Check frequently during the final minutes.
Remove when:
- Firm
- Golden
- Crisp around the edges
Step 12: Cool Completely
Transfer the crackers to a cooling rack.
Allow them to cool completely.
They continue crisping as they cool.
Resist the temptation to store them while warm.
Texture and Flavor
Perfect sourdough cheese crackers should have:
Texture
- Crisp
- Crunchy
- Lightly flaky
Flavor
- Sharp cheddar richness
- Subtle sourdough tang
- Savory buttery notes
Every bite should be deeply satisfying.
Flavor Variations
Parmesan Herb Crackers
Replace half the cheddar with Parmesan.
Add:
- Rosemary
- Thyme
Perfect for charcuterie boards.
Everything Bagel Crackers
Add:
- Everything bagel seasoning
These pair wonderfully with cream cheese.
Spicy Jalapeño Crackers
Add:
- Finely chopped jalapeños
- Pepper Jack cheese
Ideal for spice lovers.
Smoked Gouda Crackers
Substitute Gouda for cheddar.
Add smoked paprika for extra depth.
Italian Herb Crackers
Add:
- Basil
- Oregano
- Parmesan
Excellent with soups and salads.
Serving Suggestions
These crackers are delicious:
- On their own
- With cheese boards
- Alongside soups
- With dips
- With hummus
- With spinach dip
- With guacamole
Their versatility makes them ideal for entertaining.
Building a Charcuterie Board
Pair these crackers with:
Cheeses
- Brie
- Gouda
- Cheddar
- Goat cheese
Meats
- Salami
- Prosciutto
- Turkey
Extras
- Grapes
- Apples
- Nuts
- Olives
The homemade crackers elevate the entire board.
Lunchbox Friendly
Kids and adults alike enjoy these crackers in packed lunches.
Pair with:
- Cheese cubes
- Fruit
- Yogurt
- Sliced vegetables
They stay crisp for days when stored properly.
Storage Instructions
Store cooled crackers in an airtight container.
They remain fresh for:
1–2 weeks
Proper storage is essential for maintaining crispness.
How to Restore Crispness
If crackers soften:
Bake at:
300°F (150°C)
for 3–5 minutes.
Allow them to cool completely again.
They’ll regain their crunch.
Freezing the Dough
The dough freezes beautifully.
Wrap tightly and freeze for up to:
3 months
Thaw overnight in the refrigerator before rolling and baking.
Freezing Baked Crackers
You can also freeze baked crackers.
Store in airtight containers.
Freeze for up to:
2 months
Re-crisp briefly in the oven after thawing.
Common Mistakes to Avoid
Rolling Too Thick
Thick crackers may remain soft.
Aim for uniform thinness.
Overbaking
Cheese can darken quickly.
Watch carefully.
Underbaking
Underbaked crackers become chewy.
Bake until golden and crisp.
Storing Before Cooling
Warm crackers create condensation.
Always cool completely first.
Frequently Asked Questions
Can I Use Active Starter Instead of Discard?
Yes.
Either works well in this recipe.
Can I Use Whole Wheat Flour?
Yes.
Replace up to half the flour.
The crackers will have a nuttier flavor.
Can I Make Them Gluten-Free?
Use a gluten-free flour blend suitable for baking.
Results may vary slightly.
Can I Use Different Cheeses?
Absolutely.
Experiment with:
- Asiago
- Gruyère
- Parmesan
- Gouda
Why Are My Crackers Soft?
Most likely:
- Rolled too thick
- Underbaked
- Stored before cooling
Nutritional Highlights
Compared to many commercial crackers, homemade versions offer:
- Real cheese
- No preservatives
- Customizable sodium levels
- Better ingredient quality
They’re also a wonderful way to reduce food waste by using sourdough discard.
Final Thoughts
These Sourdough Discard Cheese Crackers are one of the most rewarding ways to use extra sourdough discard. Crispy, cheesy, buttery, and packed with flavor, they’re simple enough for everyday snacking yet impressive enough for entertaining guests. The sharp cheddar pairs beautifully with the subtle tang of sourdough, creating a cracker that’s far more flavorful than anything you’ll find in a box.
Whether you enjoy them with soup, dips, charcuterie boards, or straight from the container, these crackers are sure to become a staple in your baking routine. Once you experience how easy and delicious homemade sourdough cheese crackers can be, you’ll never look at sourdough discard the same way again. Happy baking!