Olivia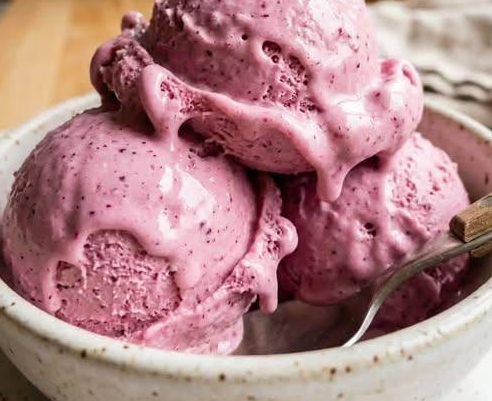
If you’re looking for a refreshing, dairy-free dessert that tastes like summer in every bite, this Creamy Berry Frozen Coconut Ice Cream is the perfect recipe. Made with rich coconut milk and a blend of sweet, juicy berries, this homemade frozen treat is creamy, fruity, and naturally delicious. Whether you’re serving it on a hot afternoon, at a family gathering, or as a healthier alternative to traditional ice cream, this recipe is guaranteed to become a favorite.
The combination of coconut and berries creates a beautiful balance of flavors. The coconut milk provides a smooth, velvety texture while the berries add natural sweetness, vibrant color, and a refreshing tartness. Best of all, this recipe can be made with fresh or frozen berries, making it a year-round dessert option.
Why You’ll Love This Recipe
This frozen coconut ice cream is:
- Dairy-free
- Naturally gluten-free
- Rich and creamy
- Packed with berry flavor
- Easy to customize
- Perfect for summer
- Made with simple ingredients
- Family-friendly
- Beautifully colorful
- Great for meal prep
Unlike many store-bought dairy-free ice creams, this homemade version contains wholesome ingredients and lets you control the sweetness level.
Ingredients
For the Ice Cream Base
- 2 cans (13.5 oz each) full-fat coconut milk
- 1 cup mixed berries (strawberries, blueberries, raspberries, and blackberries)
- ½ cup maple syrup or honey
- 1 teaspoon vanilla extract
- 1 tablespoon lemon juice
- Pinch of salt
Optional Add-Ins
- Extra berry swirl
- Toasted coconut flakes
- White chocolate chips
- Dark chocolate chunks
- Chopped almonds
- Chopped pistachios
- Fresh mint
Choosing the Best Berries
One of the wonderful things about this recipe is its flexibility.
You can use:
Strawberries
Sweet and juicy with classic berry flavor.
Blueberries
Provide deep color and natural sweetness.
Raspberries
Add a bright tartness that balances the coconut.
Blackberries
Bring complexity and richness.
For the best flavor, use a combination of berries rather than relying on a single type.
Why Coconut Milk Works So Well
Full-fat coconut milk is the secret to creating creamy dairy-free ice cream.
It contains healthy fats that mimic the richness of traditional cream.
When frozen and churned, coconut milk creates a smooth texture that feels indulgent without using dairy products.
Avoid light coconut milk, as it contains too much water and may result in an icy texture.
Equipment Needed
- Blender or food processor
- Medium saucepan
- Fine mesh strainer (optional)
- Ice cream maker
- Freezer-safe container
- Rubber spatula
No ice cream maker? Don’t worry. A no-churn method is included later in the recipe.
Step 1: Prepare the Berry Mixture
Wash and dry your berries if using fresh fruit.
Place berries into a blender.
Add:
- Lemon juice
- Half of the maple syrup
Blend until smooth.
For a smoother ice cream texture, strain the mixture through a fine mesh sieve to remove seeds.
This step is especially helpful when using raspberries or blackberries.
Set aside.
Step 2: Make the Coconut Base
In a medium saucepan combine:
- Coconut milk
- Remaining maple syrup
- Vanilla extract
- Salt
Warm over medium heat.
Do not boil.
Simply heat until the ingredients are fully combined.
Stir frequently to create a smooth mixture.
Heating helps the sweetener dissolve evenly throughout the base.
Step 3: Combine the Mixtures
Remove the coconut mixture from the heat.
Allow it to cool slightly.
Slowly stir in the berry puree.
Whisk until fully combined.
The mixture should become a beautiful pink-purple color depending on the berries used.
Taste and adjust sweetness if desired.
Some berries are naturally sweeter than others.
Step 4: Chill the Base
Transfer the mixture to a bowl.
Cover and refrigerate for at least 4 hours.
For best results, chill overnight.
A thoroughly chilled base freezes more efficiently and produces a creamier texture.
This step is important and should not be rushed.
Step 5: Churn the Ice Cream
Pour the chilled mixture into your ice cream maker.
Churn according to the manufacturer’s instructions.
Most machines require approximately 20–30 minutes.
As the mixture churns, it incorporates air and develops a smooth, creamy consistency.
You’ll notice the texture gradually thicken into soft-serve ice cream.
Step 6: Add Optional Mix-Ins
During the final few minutes of churning, add any desired mix-ins.
Popular choices include:
- Toasted coconut flakes
- Chocolate chunks
- Chopped nuts
- Extra berries
These additions create exciting texture and flavor contrasts.
Step 7: Freeze Until Firm
Transfer the churned ice cream into a freezer-safe container.
Smooth the top with a spatula.
Cover tightly.
Freeze for 3–4 hours until scoopable.
The longer it freezes, the firmer it becomes.
Creating a Berry Swirl
For an attractive berry swirl:
Reserve ¼ cup of berry puree before mixing it into the base.
When transferring the churned ice cream to the storage container:
- Add a layer of ice cream
- Drizzle berry puree
- Repeat layers
Use a knife to gently swirl.
This creates beautiful ribbons of berry flavor throughout the ice cream.
No-Churn Version
Don’t have an ice cream maker?
You can still make this recipe.
After chilling the mixture:
- Pour into a freezer-safe container.
- Freeze for 45 minutes.
- Remove and stir vigorously.
- Return to freezer.
- Repeat every 30–45 minutes for 3–4 hours.
This process helps reduce ice crystal formation and creates a smoother texture.
Tips for Extra Creaminess
Use Full-Fat Coconut Milk
Fat equals creaminess.
Always choose full-fat canned coconut milk.
Chill Thoroughly
The colder the mixture, the smoother the final result.
Avoid Excess Water
Frozen berries can release extra moisture.
Drain excess liquid if necessary.
Don’t Overfreeze
Homemade ice cream becomes very firm after extended freezing.
Allow it to soften before scooping.
Flavor Variations
Once you’ve mastered the basic recipe, try these delicious twists.
Strawberry Coconut Ice Cream
Use only strawberries for a classic flavor.
Blueberry Coconut Ice Cream
Rich color and intense berry sweetness.
Raspberry Coconut Ice Cream
Bright and tangy with beautiful pink tones.
Tropical Berry Coconut Ice Cream
Add pineapple and mango to the berry mixture.
Chocolate Berry Coconut Ice Cream
Mix in dark chocolate chunks.
Serving Suggestions
This ice cream is wonderful on its own but can also be paired with:
- Fresh berries
- Coconut flakes
- Chocolate sauce
- Fruit compote
- Granola
- Waffle cones
- Homemade cookies
Its vibrant appearance makes it ideal for entertaining guests.
Making It Refined Sugar-Free
To keep the recipe naturally sweetened:
Use:
- Maple syrup
- Honey
- Date syrup
Avoid refined white sugar if desired.
Natural sweeteners complement the fruit beautifully.
Nutritional Benefits
While still a dessert, this ice cream offers several nutritional advantages.
Berries Provide
- Vitamin C
- Fiber
- Antioxidants
- Potassium
Coconut Milk Provides
- Healthy fats
- Minerals
- Rich texture without dairy
Homemade ice cream also avoids many artificial additives commonly found in commercial products.
Storage Instructions
Store in an airtight freezer-safe container.
Freeze for up to 2 weeks for best quality.
Because homemade ice cream lacks commercial stabilizers, it is best enjoyed relatively fresh.
Preventing Ice Crystals
To maintain smooth texture:
- Use an airtight container
- Press parchment paper directly onto the surface
- Minimize air exposure
- Keep freezer temperature consistent
These steps help preserve creaminess.
Frequently Asked Questions
Can I Use Frozen Berries?
Yes.
Frozen berries work wonderfully and are available year-round.
Thaw slightly before blending.
Can I Use Light Coconut Milk?
It’s possible, but the texture will be less creamy.
Full-fat coconut milk is highly recommended.
Can I Make It Vegan?
Yes.
Simply use maple syrup instead of honey.
Can I Reduce the Sweetener?
Absolutely.
Taste the mixture before freezing and adjust according to your preference.
Why Is My Ice Cream Hard?
Homemade ice cream often freezes harder than commercial versions.
Allow it to sit at room temperature for 10–15 minutes before scooping.
Perfect Occasions for Serving
This dessert is ideal for:
- Summer parties
- Backyard barbecues
- Family gatherings
- Birthday celebrations
- Holiday meals
- Poolside snacks
- Healthy dessert options
Its bright color and refreshing taste make it especially popular during warm weather.
Expert Tips for Success
- Use ripe berries for maximum flavor.
- Chill ingredients thoroughly.
- Don’t skip the salt—it enhances sweetness.
- Blend berries until completely smooth.
- Freeze in shallow containers for easier scooping.
- Let soften slightly before serving.
- Experiment with berry combinations.
Small details make a big difference in homemade ice cream.
Final Thoughts
This Creamy Berry Frozen Coconut Ice Cream combines the luscious richness of coconut milk with the natural sweetness and vibrant flavor of mixed berries. The result is a smooth, refreshing frozen dessert that feels indulgent while remaining simple to prepare. Whether you’re dairy-free, vegan, or simply looking for a homemade treat packed with real fruit flavor, this recipe delivers delicious results every time.
With its beautiful color, creamy texture, and endless customization options, this berry coconut ice cream is a dessert you’ll want to make again and again. Serve it in bowls, cones, or alongside your favorite baked goods, and enjoy a cool, fruity escape in every spoonful