Olivia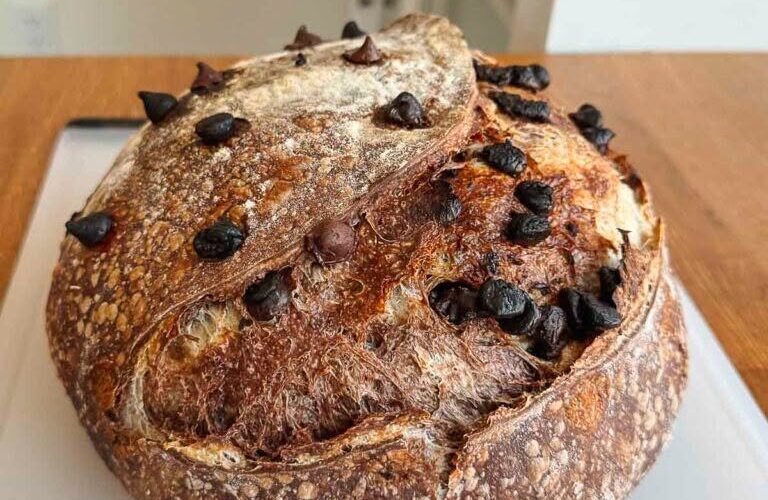
There’s something magical about slicing into a loaf of homemade sourdough and discovering beautiful swirls of chocolate woven throughout the crumb. This Chocolate Marbled Sourdough Bread combines the tangy complexity of naturally fermented sourdough with rich cocoa flavor, creating a stunning artisan loaf that tastes as impressive as it looks.
Perfect for breakfast, brunch, dessert, or an afternoon treat, this bread features two doughs—a classic sourdough dough and a chocolate-infused sourdough dough—that are layered and twisted together before baking. The result is a striking marbled effect with a soft, chewy interior and a crisp golden crust.
Serve it toasted with butter, spread with cream cheese, or simply enjoy a slice on its own. Every bite offers a delightful contrast between traditional sourdough flavor and deep chocolate notes.
Prep Time: 45 minutes
Fermentation Time: 10–14 hours
Bake Time: 45 minutes
Total Time: Approximately 15 hours
Yield: 1 large artisan loaf
Why You’ll Love This Recipe
- Beautiful marbled appearance
- Rich chocolate flavor
- Naturally fermented
- Artisan bakery quality
- Perfect for special occasions
- Excellent toasted
- No commercial yeast required
- Wonderful texture
- Unique and impressive
- Great for gifting
What Is Chocolate Marbled Sourdough?
Chocolate marbled sourdough is created by preparing two doughs:
- Traditional sourdough dough
- Chocolate cocoa sourdough dough
The two doughs are layered and folded together before shaping, creating stunning swirls throughout the finished loaf.
The result is both visually appealing and deliciously flavorful.
Ingredients
Main Dough
- 500g bread flour
- 350g water
- 100g active sourdough starter
- 10g salt
Chocolate Dough Portion
- 15g unsweetened cocoa powder
- 10g warm water
Optional Add-Ins
- 50g dark chocolate chips
- 30g chopped chocolate
- 1 tablespoon espresso powder
- 1 tablespoon honey
Equipment Needed
- Large mixing bowl
- Kitchen scale
- Dough scraper
- Banneton basket
- Dutch oven
- Sharp bread lame or razor
- Clean kitchen towel
Understanding the Ingredients
Bread Flour
Bread flour provides:
- Strong gluten structure
- Excellent chew
- Better rise
High-protein flour is ideal for artisan sourdough baking.
Active Sourdough Starter
A healthy starter should:
- Double in size after feeding
- Be bubbly
- Smell pleasantly tangy
The starter serves as the sole leavening agent.
Cocoa Powder
Use:
- Unsweetened cocoa powder
- Dutch-process cocoa (optional)
The cocoa creates deep chocolate flavor and rich color.
Preparing Your Starter
For best results:
Feed your starter approximately 4–6 hours before mixing the dough.
It should be:
- Active
- Bubbly
- At peak rise
This ensures strong fermentation and good oven spring.
Step 1: Mix the Main Dough
In a large bowl combine:
- Water
- Active starter
Stir until the starter dissolves.
Add:
- Bread flour
Mix until no dry flour remains.
The dough will appear shaggy.
Cover and rest for:
30 minutes
This stage is called autolyse.
Why Autolyse Matters
Autolyse helps:
- Hydrate flour
- Improve gluten development
- Enhance dough extensibility
The dough becomes easier to work with later.
Step 2: Add Salt
Sprinkle salt over the dough.
Mix thoroughly using your hands.
Continue until the salt is fully incorporated.
The dough will begin feeling stronger.
Step 3: Divide the Dough
Separate approximately:
- One-third of the dough
into a second bowl.
Leave the remaining two-thirds in the original bowl.
You now have:
- Plain dough
- Chocolate dough portion
Step 4: Create the Chocolate Dough
Mix together:
- Cocoa powder
- Warm water
until smooth.
Add this cocoa mixture to the smaller dough portion.
Knead gently until fully incorporated.
The dough should become evenly chocolate-colored.
Why Mix Cocoa Separately?
Combining cocoa with water first prevents:
- Clumping
- Uneven streaks
- Dry pockets
This creates a smoother chocolate dough.
Step 5: Begin Bulk Fermentation
Cover both doughs.
Allow them to rest for:
30 minutes
at room temperature.
Step 6: First Stretch and Fold
Perform stretch-and-folds on both doughs.
Lift one side of the dough.
Stretch upward.
Fold toward the center.
Rotate and repeat.
Complete four folds per dough.
What Stretch and Folds Do
Stretch-and-fold techniques help:
- Build gluten
- Improve strength
- Create structure
Without intensive kneading.
Step 7: Continue Bulk Fermentation
Perform additional stretch-and-fold sessions every:
30 minutes
for approximately:
2 hours
Complete a total of 4 sets.
The dough should become smooth and elastic.
Optional Chocolate Additions
After the second fold, you may add:
- Dark chocolate chips
- Chopped chocolate
for pockets of melted chocolate throughout the loaf.
Fold gently to distribute evenly.
Step 8: Allow Final Bulk Rise
After completing stretch-and-folds:
Cover both doughs.
Allow them to ferment until increased in volume by approximately:
50–75%
This may take:
4–6 hours
depending on room temperature.
Signs Bulk Fermentation Is Complete
The dough should:
- Feel airy
- Show bubbles
- Jiggle slightly
- Hold its shape
These signs indicate readiness.
Step 9: Shape the Marble Pattern
Lightly flour your work surface.
Gently flatten both doughs into rectangles.
Place the chocolate dough over the plain dough.
Creating Beautiful Swirls
For dramatic marbling:
Fold the layered dough like a letter.
Rotate.
Flatten gently.
Repeat the folding process two or three times.
Avoid overworking.
Distinct layers create the best marble effect.
Step 10: Final Shaping
Shape the dough into:
- Boule (round loaf)
or
- Batard (oval loaf)
Tight shaping improves oven spring.
Step 11: Place in Banneton
Dust a banneton generously with flour.
Transfer shaped dough seam-side up.
Cover with plastic wrap or a towel.
Step 12: Cold Proof
Refrigerate overnight for:
8–12 hours
This extended proof develops:
- Flavor
- Structure
- Easier scoring
Why Cold Proofing Helps
Cold fermentation creates:
- Better flavor complexity
- Improved scoring
- Stronger crust
Many artisan bakers rely on overnight proofing.
Step 13: Preheat the Oven
Place a Dutch oven inside your oven.
Preheat to:
475°F (245°C)
for at least:
45 minutes
A thoroughly heated Dutch oven is essential.
Step 14: Score the Dough
Turn the dough onto parchment paper.
Using a sharp lame:
Create one deep slash.
Or create decorative scoring patterns.
Scoring controls expansion during baking.
Step 15: Bake Covered
Transfer the dough into the hot Dutch oven.
Cover immediately.
Bake for:
25 minutes
The steam helps create maximum oven spring.
Step 16: Bake Uncovered
Remove the lid.
Reduce temperature to:
450°F (230°C)
Bake another:
20 minutes
until deeply golden.
What Makes a Great Crust?
A perfect crust should be:
- Crisp
- Deeply colored
- Slightly blistered
The Dutch oven helps achieve bakery-quality results.
Step 17: Cool Completely
Transfer bread to a cooling rack.
Allow it to cool for:
At least 2 hours
before slicing.
This is one of the most important steps.
Why Cooling Is Essential
Fresh bread continues cooking internally.
Cutting too soon may result in:
- Gummy crumb
- Compressed texture
Patience rewards you with the best slice.
Flavor Profile
This bread offers:
Traditional Dough
- Tangy
- Chewy
- Complex
Chocolate Dough
- Rich
- Deep
- Slightly bittersweet
Together they create a unique artisan loaf.
Serving Suggestions
Enjoy with:
- Salted butter
- Cream cheese
- Nut butter
- Fruit preserves
- Honey
The chocolate notes pair beautifully with sweet and savory toppings.
Breakfast Ideas
Toast slices and serve with:
- Fresh berries
- Greek yogurt
- Espresso
An elegant breakfast option.
Dessert Version
Transform the loaf into:
- Bread pudding
- French toast
- Chocolate toast
for a special dessert.
Chocolate Orange Variation
Add:
- 1 tablespoon orange zest
to the chocolate dough.
Chocolate and orange are a classic pairing.
Mocha Sourdough Version
Add:
- 1 teaspoon espresso powder
to the cocoa mixture.
The coffee enhances chocolate flavor.
Cinnamon Chocolate Sourdough
Add:
- 1 teaspoon cinnamon
to the chocolate dough.
This creates a warm, bakery-style aroma.
Hazelnut Chocolate Sourdough
Fold in:
- Chopped toasted hazelnuts
for extra crunch.
Storage Instructions
Store at room temperature in a bread bag.
Best consumed within:
3–4 days
Freezing Instructions
Wrap tightly.
Freeze for:
Up to 3 months
Slice before freezing for easier use.
Common Mistakes to Avoid
Weak Starter
May produce dense bread.
Overmixing Layers
Can blur the marble pattern.
Underproofing
Results in tight crumb.
Overproofing
Can reduce oven spring.
Cutting Too Soon
Creates a gummy interior.
Frequently Asked Questions
Can I Use All-Purpose Flour?
Yes, though bread flour provides better structure.
Can I Add Chocolate Chips?
Absolutely.
Dark chocolate chips work especially well.
Will the Bread Taste Very Sweet?
No.
The cocoa contributes flavor without excessive sweetness.
Can I Add Sugar?
Yes.
A small amount enhances chocolate flavor.
Can I Make Two Loaves?
Simply double all ingredients.
Final Thoughts
This Chocolate Marbled Sourdough Bread combines the artistry of traditional sourdough baking with the rich allure of chocolate. The dramatic swirls, chewy crumb, crisp crust, and subtle cocoa flavor make it a truly special loaf that’s perfect for breakfast, brunch, dessert, or gifting.
Whether you’re an experienced sourdough baker or looking for a creative new project, this recipe offers a beautiful way to elevate your baking skills. Once you slice into the gorgeous chocolate marbling and taste the balance of tangy sourdough and rich cocoa, you’ll understand why this loaf is such a memorable favorite. Happy baking!