
Double Loaf Pan Sourdough Bread Recipe – Easy Dutch Oven Alternative
Making beautiful sourdough bread at home does not require an expensive Dutch oven. If you have two metal loaf pans, you can create a simple covered baking environment that traps steam around the dough during the first stage of baking. This clever double loaf pan method helps encourage oven spring, keeps the crust flexible while the bread expands, and produces a tall, beautifully opened loaf.
The result is a practical sandwich-style sourdough loaf with a golden, crisp crust and a soft, flavorful interior. It is especially useful if you prefer evenly shaped slices for sandwiches, toast, grilled cheese, French toast, or breakfast.
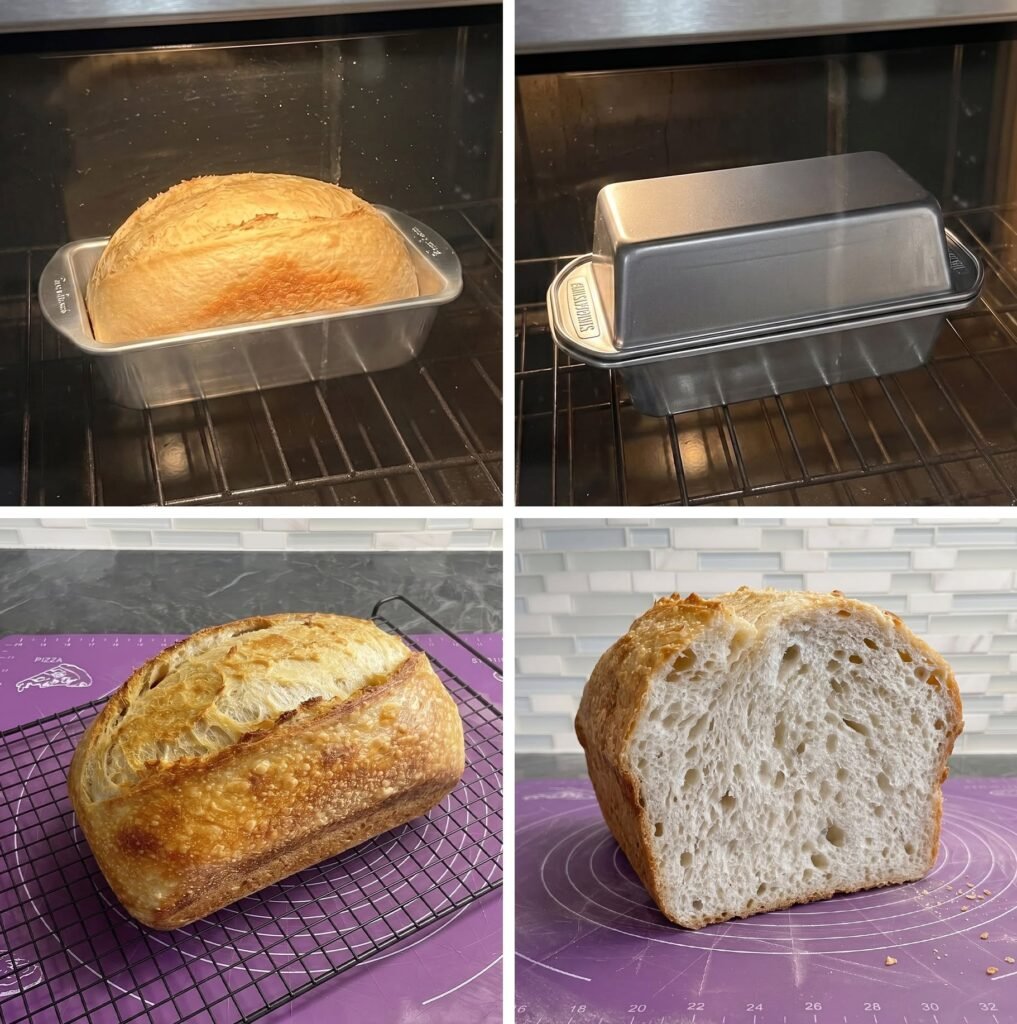
The secret is simple: one loaf pan holds the dough while a second loaf pan is turned upside down and placed over it like a lid. The enclosed space traps moisture released from the dough, creating a steamy environment similar to the main purpose of a Dutch oven.
This recipe is designed for a large 9-by-5-inch loaf pan and makes one substantial loaf.
Why Use Two Loaf Pans for Sourdough?
Sourdough dough expands rapidly during the beginning of baking. This dramatic rise is called oven spring. If the surface of the dough dries too quickly, the crust can become firm before the loaf has finished expanding.
A temporary cover helps prevent that from happening.
When the second loaf pan is placed over the dough, moisture from the bread becomes trapped inside the small chamber. The humid environment keeps the dough surface flexible, giving the loaf more time to rise through the score.
Once the majority of the oven spring has happened, the upper pan is removed. The loaf then continues baking uncovered, allowing the crust to become deeply golden and crisp.
The method does not reproduce a heavy cast-iron Dutch oven perfectly because metal loaf pans have much less thermal mass. However, they can still create an effective steaming environment without requiring specialized equipment.
Why This Method Is Great for Sandwich Bread
Round sourdough boules are beautiful, but a loaf-pan sourdough is often more convenient for everyday eating.
The rectangular shape gives you evenly sized slices that fit easily into a toaster. It is also ideal for:
- Breakfast toast
- Sandwiches
- Grilled cheese
- French toast
- Avocado toast
- Eggs and toast
- Lunchbox sandwiches
- Dipping into soups and stews
The lower loaf pan also supports the sides of the dough, helping it maintain a tall shape as it rises.
Choosing the Right Loaf Pans
For the most reliable results, use two metal 9-by-5-inch loaf pans.
Aluminum and aluminized-steel pans work well because they heat relatively quickly. Dark nonstick pans can brown the bread more aggressively, so you may need to adjust the temperature or shield the bottom with another baking sheet.
Before making the bread, place the empty pans together and check the amount of space inside. The upper pan needs enough height to cover the proofed dough without touching it.
The pans do not need to create an airtight seal. They simply need to sit securely together and trap most of the steam.
For this technique, metal pans are preferable to glass because they are easier to handle at high temperatures and respond more quickly to temperature changes.
Ingredients
For the Sourdough
- 90 grams active sourdough starter
- 315 grams lukewarm water
- 450 grams bread flour
- 9 grams fine sea salt
For Preparing the Pan
- Neutral oil or softened butter, as needed
- Parchment paper, optional
For the Steam
- A small amount of clean water for misting the dough
For best results, weigh your ingredients with a digital kitchen scale. Measuring flour by volume can produce inconsistent results because flour becomes compacted in a measuring cup.
Your sourdough starter should be active, bubbly, and close to its peak. A healthy starter should rise noticeably after feeding and have a fresh, mildly tangy aroma.
Equipment
You will need:
- Two 9-by-5-inch metal loaf pans
- Large mixing bowl
- Digital kitchen scale
- Dough scraper or flexible spatula
- Parchment paper or oil
- Clean towel or bowl cover
- Small spray bottle
- Bread lame or very sharp knife
- Oven mitts
- Wire cooling rack
- Instant-read thermometer, optional
How to Make Double Loaf Pan Sourdough Bread
Step 1: Combine the Starter and Water
Add 315 grams of lukewarm water to a large mixing bowl.
Add 90 grams of active sourdough starter and stir until the starter is mostly dispersed throughout the water.
The water should feel comfortably warm rather than hot. Very hot water can negatively affect the natural microorganisms in your starter.
The mixture does not have to be completely smooth.
Step 2: Add the Flour
Add 450 grams of bread flour.
Mix with a dough scraper, sturdy spoon, or clean hand until all of the dry flour has been incorporated.
At this stage, the dough will look rough and sticky. That is completely normal.
Cover the bowl and let the dough rest for about 30 minutes.
This resting period allows the flour to absorb the water and makes the dough easier to develop later.
Step 3: Add the Salt
Sprinkle 9 grams of fine sea salt over the dough.
Using damp fingers, pinch and fold the dough repeatedly to distribute the salt throughout.
The dough may initially feel loose or slippery. Continue working gently until the salt is incorporated.
Cover the bowl and let the dough rest for another 30 minutes.
Step 4: Build Strength With Stretch-and-Folds
Now strengthen the dough with four sets of stretch-and-folds.
Perform one set approximately every 30 minutes.
To stretch and fold, dampen your hand and grab one side of the dough. Gently stretch it upward without tearing it, then fold it toward the center.
Rotate the bowl and repeat with the remaining sides.
By the third or fourth set, the dough should feel smoother, stronger, and more elastic.
Do not pull aggressively. Gentle, consistent folds are enough to develop structure while allowing fermentation to continue.
After the final fold, cover the bowl and leave the dough undisturbed.
Step 5: Complete Bulk Fermentation
Allow the dough to ferment at room temperature until it becomes noticeably puffy and aerated.
The dough should increase in volume by approximately 50–75 percent.
At a room temperature around 74–76°F (23–24°C), bulk fermentation may take approximately 5–7 hours from the time the starter was added. Your actual timing may be shorter or longer depending on starter strength, flour, and room temperature.
Do not rely on the clock alone.
Look for these signs:
- Smoother surface
- Slightly domed appearance
- Bubbles along the sides
- Soft, airy texture
- Noticeable wobble when the bowl is moved
- Increased volume without necessarily doubling
A weakly fermented dough may produce a dense loaf, while over-fermentation can leave the dough weak and difficult to shape.
Step 6: Prepare the Loaf Pan
Lightly grease one 9-by-5-inch metal loaf pan with neutral oil or softened butter.
For easier removal, line the pan with parchment paper. Leave some parchment extending above the long sides so you can use it as handles after baking.
A parchment sling is particularly helpful for a tall sourdough loaf.
Step 7: Shape the Dough
Lightly flour your work surface.
Gently turn the fermented dough onto the surface. Avoid pressing out all the air.
Shape the dough into a loose rectangle. The short side should be approximately the same width as the loaf pan.
Fold one side toward the center and then fold the opposite side over it.
Starting from the top, roll the dough toward yourself to create a firm but gentle log.
Pinch the seam closed.
Place the shaped dough into the prepared loaf pan with the seam facing downward.
Make sure the dough sits evenly from one end of the pan to the other.
Step 8: Final Proof
Cover the pan loosely and allow the dough to proof at room temperature.
Depending on the temperature and activity of your dough, this may take approximately 1–3 hours.
The dough should become visibly puffy and may rise close to or slightly above the rim of the pan.
A gentle fingertip test can help determine when it is ready. Lightly dampen your finger and press the dough.
If it springs back immediately, give it more time.
If it slowly springs back and leaves a slight impression, it is generally ready to bake.
If the indentation remains deeply sunken and the dough feels fragile, it may be overproofed and should be baked promptly.
Overnight Proof Option
For added flexibility, cover the shaped dough and refrigerate it for 8–14 hours.
Cold dough can be easier to score and can develop additional flavor. The loaf can be baked directly from the refrigerator.
Step 9: Preheat the Oven
Place an oven rack in the lower-middle portion of the oven.
Preheat the oven to 450°F (232°C) for at least 30 minutes.
The loaf pans do not need to be preheated. The dough remains inside the lower loaf pan while the oven heats.
Make sure there is enough vertical space above the rack for the second loaf pan. The covered setup will be considerably taller than a standard loaf pan.
Step 10: Score the Dough
Remove the cover from the proofed dough.
Using a bread lame or very sharp knife, make one long score slightly off-center along the length of the loaf.
Cut approximately ¼–½ inch deep.
A quick, confident cut is better than repeatedly sawing through the surface.
The score provides a controlled opening where the loaf can expand during baking.
If the dough is particularly soft, refrigerate it for 20–30 minutes before scoring.
Step 11: Lightly Mist the Dough
Use a clean spray bottle to lightly mist the surface of the dough.
About 3–5 fine sprays are generally enough.
Do not soak the dough.
The goal is simply to add a small amount of surface moisture. The dough will also release its own moisture as it heats, while the upper loaf pan helps keep that steam trapped around the bread.
Step 12: Add the Second Loaf Pan
Turn the second 9-by-5-inch loaf pan upside down.
Carefully place it over the lower pan.
The rims should rest securely together.
Do not press down on the upper pan. It should sit naturally above the dough without touching it.
Use both hands when transferring the covered pans to the oven.
Be especially careful because the covered setup will become hot and awkward to handle.
Step 13: Bake Covered
Place the covered loaf in the preheated oven.
Bake at 450°F (232°C) for 25 minutes.
Try not to open the oven during this stage.
The enclosed environment is helping retain steam while the bread undergoes its most significant oven spring.
During these first 25 minutes, the score should open and the loaf should rise substantially.
Step 14: Remove the Upper Pan
After 25 minutes, carefully slide the oven rack forward while wearing sturdy oven mitts.
Lift the upper loaf pan away from the bread.
Be cautious when removing the cover because hot steam may escape.
The loaf should now look expanded and pale to lightly golden. The score should have opened noticeably.
If the bread has risen very close to the upper pan, remove the cover carefully so you do not scrape the top of the loaf.
Step 15: Finish Baking Uncovered
Reduce the oven temperature to 425°F (218°C).
Continue baking uncovered for another 20–25 minutes, or until the crust is deeply golden brown.
If the top becomes too dark before the center is finished, loosely tent the loaf with foil.
For additional bottom browning, you can remove the bread from the pan during the final few minutes and place it directly on the oven rack.
The internal temperature should reach approximately 205–210°F (96–99°C).
Step 16: Cool Completely
Remove the bread from the pan as soon as it is safe to handle.
Transfer it to a wire rack.
Do not leave the loaf sitting in the hot pan for an extended period because trapped moisture can soften the bottom and sides.
Allow the loaf to cool for at least 2 hours before slicing.
This step is important. The crumb continues setting as the bread cools, and slicing too early can make a perfectly baked loaf appear gummy or compressed.
How to Tell When Sourdough Is Fully Baked
A deeply golden crust is one of the easiest visual indicators.
The sides should have some color as well. If they are very pale, return the loaf to the oven without the pan for several additional minutes.
For the most reliable result, use an instant-read thermometer.
The center should reach approximately 205–210°F (96–99°C).
The bread should also feel relatively light for its size.
Although tapping the bottom can provide a clue, temperature and crust color are more dependable indicators of doneness.
How Much Water Should You Spray?
Only a light mist is necessary.
You do not need to pour water into the loaf pan or add ice beside the bread.
A few fine sprays directly over the dough provide some additional moisture, while the bread itself naturally releases steam as it heats.
Too much water can collect around the loaf and interfere with browning.
The second loaf pan is doing most of the work by trapping the moisture around the dough.
What Kind of Crust Can You Expect?
The double loaf pan method can produce a tall loaf with a pronounced opening along the score.
The crust may develop small blisters, particularly if the dough has undergone an overnight refrigerator proof.
Once the upper pan is removed, the uncovered baking stage allows the crust to become crisp and deeply colored.
The crust may be somewhat thinner than the crust produced by a heavy cast-iron Dutch oven because loaf pans do not retain as much heat.
Inside, the bread should be soft, moist, and moderately open.
The exact crumb structure will depend heavily on fermentation, flour strength, hydration, and shaping. The covered baking method improves the baking environment, but it cannot compensate for dough that is significantly underproofed or overproofed.
Double Loaf Pan vs. Dutch Oven
A Dutch oven has substantial thermal mass and can provide intense heat around the dough while trapping steam.
Two loaf pans are lighter and do not retain heat in the same way. However, the upper pan can still perform one of the Dutch oven’s most important functions: creating a humid environment during the early part of baking.
The loaf-pan method may be ideal if you:
- Already own two loaf pans
- Want sandwich-friendly slices
- Prefer lighter baking equipment
- Do not have room for a Dutch oven
- Want a simple covered-baking technique
- Prefer rectangular sourdough loaves
A Dutch oven remains a great option if you want a rustic round loaf with a particularly thick crust.
The two methods are different, but both can create excellent sourdough bread.
Common Problems and Solutions
The Loaf Did Not Rise Enough
A weak starter is one possible reason for poor oven spring.
Use a starter that is active, bubbly, and predictably rises after feeding.
Underproofed dough may also be dense and spring back quickly when pressed.
Overproofed dough can look extremely airy but feel weak and fragile. It may collapse when scored or fail to rise in the oven.
Insufficient gluten development can also limit the height of the loaf. Make sure you complete the stretch-and-folds during bulk fermentation.
The Upper Pan Touched the Dough
This usually means there was not enough clearance.
The dough may have been proofed too far, or the upper pan may not have provided enough interior height.
Before baking, always test the empty pans together.
The dough needs enough room to expand during oven spring without touching the cover.
The Crust Is Too Pale
The bread may simply need more uncovered baking time.
After removing the upper pan, continue baking until the crust develops a rich golden-brown color.
If your oven runs cooler than its displayed temperature, an oven thermometer can help identify the problem.
The Bottom Is Too Dark
Dark metal pans can absorb and transfer heat quickly.
Try placing an empty baking sheet on the rack below the bread to reduce intense bottom heat.
If your pan is particularly dark, you can also lower the uncovered baking temperature slightly.
The Crust Is Too Hard
The loaf may have baked uncovered for too long.
Reduce the final uncovered baking time slightly while making sure the center still reaches the proper internal temperature.
For a softer crust, lightly brush the warm loaf with melted butter after baking.
The Bread Is Gummy Inside
Avoid slicing the bread while it is still hot.
Fresh sourdough needs time to finish setting.
Underbaking and fermentation problems can also contribute to a gummy crumb.
Use a thermometer to confirm the center reaches at least 205°F and allow the loaf to cool for at least two hours before slicing.
The Dough Stuck to the Pan
Grease the pan thoroughly or use parchment paper.
Pay special attention to the corners.
A parchment sling extending above the long sides of the pan makes removal much easier.
Remove the bread from the pan shortly after baking so moisture does not make sticking worse.
Overnight Double Loaf Pan Sourdough
An overnight cold proof is an excellent option when you want to divide the baking process between two days.
After shaping, place the dough in the prepared loaf pan and cover it well.
Refrigerate for 8–14 hours.
The dough will slowly continue fermenting while chilled.
The next morning, preheat the oven while keeping the dough refrigerated.
Cold dough is generally easier to score.
Score the loaf, lightly mist the surface, place the second loaf pan over it, and bake immediately.
Because the dough is cold, it may need a few additional minutes of covered baking depending on your refrigerator temperature and loaf size.
Storage and Freezing
Allow the bread to cool completely before storing.
Keep the loaf at room temperature in a bread box, paper bag, or loosely closed food-storage bag for up to 3 days.
A sealed plastic bag will help retain softness but can also soften the crust.
For longer storage, slice the cooled loaf and place the slices in an airtight freezer bag.
Separate slices with parchment paper if desired.
Frozen slices can go directly into the toaster.
For a whole or partial loaf, thaw at room temperature and refresh it in a 350°F (175°C) oven for about 10 minutes.
Refrigerating sourdough bread is generally not recommended because refrigeration can speed up staling.
Helpful Tips for Success
- Use an active, healthy sourdough starter.
- Weigh ingredients for consistent results.
- Watch the dough rather than relying only on fermentation times.
- Use two secure metal loaf pans.
- Test the pan arrangement before baking.
- Leave sufficient room for oven spring.
- Mist the dough lightly rather than soaking it.
- Handle the hot upper pan carefully.
- Watch crust color during the uncovered stage.
- Use an instant-read thermometer when possible.
- Remove the loaf from the pan after baking.
- Let the bread cool for at least two hours before slicing.
Frequently Asked Questions
Do the Two Loaf Pans Need to Be Identical?
They do not have to be perfectly identical, although matching pans are usually easiest.
A slightly larger upper pan can work as long as it rests securely over the lower pan and provides enough interior space for the rising dough.
Do I Need to Preheat the Loaf Pans?
No.
The dough remains in the lower pan throughout proofing and baking.
Only the oven needs to be preheated.
Can I Use Glass Loaf Pans?
Metal pans are preferable for this method.
Glass is heavier and behaves differently during rapid temperature changes. It can also be more difficult to handle safely when used as the upper cover.
Can I Use Ice Instead of Spraying Water?
A light mist is easier to control.
Ice can introduce more water than necessary into the covered space and may collect around the dough.
Does the Upper Pan Need to Be Airtight?
No.
The pans simply need to create a mostly enclosed space.
A small amount of steam escaping around the edges is normal.
Never attempt to seal the pans with materials that are not specifically designed for oven use.
When Should I Remove the Upper Pan?
For this recipe, remove the cover after approximately 25 minutes.
At that point, most of the oven spring should have occurred, and the loaf can finish baking uncovered to develop its crust.
Will This Taste Exactly Like Dutch Oven Sourdough?
Not exactly.
A Dutch oven has greater thermal mass and can produce a particularly thick, robust crust.
The double loaf pan method can still produce excellent oven spring, a crisp golden crust, and a soft interior while giving you the convenience of a loaf-pan shape.
Can I Make This Same-Day?
Yes.
The recipe can be completed without refrigeration as long as the dough has properly fermented and proofed.
Remember that sourdough timing depends heavily on starter activity and room temperature.
Printable Recipe Card
Double Loaf Pan Sourdough Bread
A tall, flavorful sourdough loaf baked in a metal loaf pan and covered with a second loaf pan to trap steam during the first stage of baking.
Prep Time: 30 minutes active
Fermentation & Proofing: Approximately 7–10 hours
Bake Time: 45–55 minutes
Cooling Time: 2 hours
Total Time: Approximately 10–13 hours
Yield: 1 large loaf, about 12–14 slices
Ingredients
- 90 g active sourdough starter
- 315 g lukewarm water
- 450 g bread flour
- 9 g fine sea salt
- Oil, butter, or parchment for the pan
- Water for misting
Instructions
- Mix the active sourdough starter with the lukewarm water.
- Add the bread flour and mix until no dry flour remains.
- Cover and rest for 30 minutes.
- Add the salt and work it thoroughly into the dough.
- Rest for another 30 minutes.
- Perform four sets of stretch-and-folds, approximately 30 minutes apart.
- Continue bulk fermentation until the dough is puffy and approximately 50–75% larger.
- Grease or line a 9-by-5-inch metal loaf pan.
- Shape the dough into a log and place it seam-side down in the pan.
- Cover and proof until the dough is puffy and close to or slightly above the rim.
- Preheat the oven to 450°F (232°C).
- Score the loaf and lightly mist the surface with water.
- Place the second loaf pan upside down over the lower pan.
- Bake covered for 25 minutes.
- Carefully remove the upper pan and reduce the oven temperature to 425°F (218°C).
- Bake uncovered for another 20–25 minutes.
- Check that the center reaches approximately 205–210°F (96–99°C).
- Remove the bread from the pan and cool on a wire rack for at least 2 hours before slicing.
Recipe Notes
Fermentation times vary according to starter strength, flour, and room temperature.
Always make sure the upper loaf pan provides enough clearance for the dough to rise.
Only lightly mist the dough before covering.
Use oven mitts when removing the upper pan because hot steam can escape.
For an overnight version, refrigerate the shaped dough for 8–14 hours and bake directly from the refrigerator.
The bread is fully baked when the crust is deeply golden and the center reaches approximately 205–210°F.
Final Thoughts
The double loaf pan method is a wonderfully practical way to bake sourdough when you do not own a Dutch oven. With two ordinary metal loaf pans, you can create a covered baking environment that holds moisture around the dough during the crucial early stage of baking.
The lower pan supports the shape, while the upper pan helps retain steam and gives the dough more time to expand. After the cover is removed, the loaf finishes baking uncovered until the crust becomes golden and crisp.
If you love sourdough but want an easy sandwich-friendly shape without investing in heavy baking equipment, this technique is well worth trying.