Olivia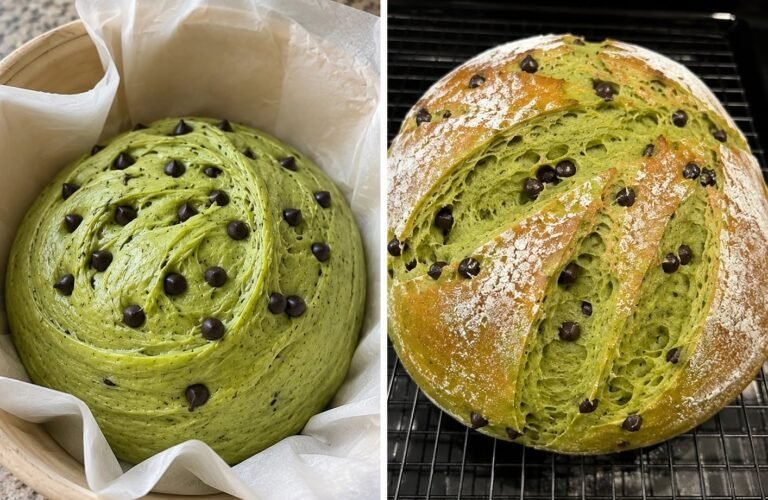
Sourdough Green Bread Loaf is a vibrant, naturally colored artisan bread that combines the tangy flavor of sourdough with nutrient-rich greens such as spinach, kale, parsley, or herbs. The result is a stunning loaf with a beautiful green crumb, a crisp golden crust, and a flavor that’s both earthy and delicious.
Perfect for sandwiches, toast, brunch boards, or special occasions like St. Patrick’s Day, this bread is a creative way to incorporate extra vegetables into your baking while maintaining all the wonderful characteristics of traditional sourdough bread.
The natural green color comes entirely from fresh greens, making this loaf both visually impressive and wholesome. Whether you’re an experienced sourdough baker or trying something new, this recipe is a fun and rewarding project.
Why You’ll Love This Recipe
This sourdough loaf is:
- Naturally green
- Made with fresh ingredients
- Full of sourdough flavor
- Rich in nutrients
- Beautiful for entertaining
- Perfect for sandwiches
- Free from artificial coloring
- Great for special occasions
What Makes Green Bread Special?
Unlike traditional sourdough, this loaf incorporates blended greens directly into the dough.
Benefits include:
- Natural color
- Extra nutrients
- Unique flavor
- Beautiful presentation
- Increased moisture
The greens add subtle earthiness without overpowering the classic sourdough taste.
Ingredients
For the Levain
- 50 grams active sourdough starter
- 50 grams bread flour
- 50 grams water
For the Dough
- 500 grams bread flour
- 300 grams water
- 100 grams spinach leaves
- 25 grams parsley
- 10 grams fresh basil
- 100 grams active levain
- 10 grams sea salt
Equipment Needed
- Dutch oven
- Kitchen scale
- Large mixing bowl
- Dough scraper
- Banneton basket
- Blender
- Sharp bread lame or knife
Choosing Your Greens
The best greens for this recipe include:
Spinach
Provides:
- Bright color
- Mild flavor
- Soft texture
Kale
Provides:
- Deep green color
- Earthy flavor
Parsley
Provides:
- Freshness
- Herbaceous notes
Basil
Provides:
- Aromatic flavor
Combining several greens creates the most vibrant loaf.
Preparing the Levain
The night before baking, combine:
- Starter
- Flour
- Water
Mix thoroughly.
Cover loosely.
Allow to ferment for:
- 8–12 hours
at room temperature.
The levain is ready when:
- Doubled in size
- Bubbly
- Pleasantly sour
Preparing the Green Mixture
Wash all greens thoroughly.
Place in a blender with the water.
Blend until completely smooth.
The mixture should be bright green and free from large pieces.
This puree will provide the loaf’s natural color.
Step 1: Mix the Dough
In a large bowl combine:
- Bread flour
- Green puree
Mix until no dry flour remains.
The dough will appear green and shaggy.
Cover and let rest for:
- 30 minutes
This process is called autolyse.
Why Autolyse Matters
Autolyse helps:
- Hydrate flour
- Improve gluten development
- Enhance dough strength
- Improve texture
Skipping this step can reduce dough quality.
Step 2: Add Levain and Salt
Add:
- Active levain
- Salt
Mix thoroughly using your hands.
Pinch and fold until fully incorporated.
The dough should become smoother and more cohesive.
Step 3: Begin Bulk Fermentation
Cover the bowl.
Allow the dough to rest at room temperature.
Total bulk fermentation time:
- 4–6 hours
depending on room temperature.
Stretch and Fold Schedule
Perform stretch and folds every:
- 30 minutes
for the first 2 hours.
Complete:
- 4 sets total
This strengthens the gluten structure.
How to Stretch and Fold
Grab one side of the dough.
Stretch upward.
Fold toward the center.
Rotate the bowl and repeat.
Perform four folds during each set.
The dough becomes smoother with each round.
Signs Bulk Fermentation Is Complete
The dough should:
- Increase by about 50%
- Feel airy
- Show bubbles
- Jiggle slightly
Avoid over-fermentation.
Step 4: Pre-Shaping
Lightly flour your work surface.
Turn the dough out gently.
Shape into a loose round.
Allow it to rest for:
- 20 minutes
This helps relax the gluten.
Step 5: Final Shaping
Shape the dough into a tight boule or batard.
Create surface tension by pulling the dough toward you.
Proper shaping supports oven spring.
Step 6: Cold Proof
Place the dough seam-side up into a floured banneton.
Cover.
Refrigerate for:
- 12–16 hours
This develops flavor and makes scoring easier.
Why Cold Fermentation Helps
Cold proofing:
- Improves flavor
- Enhances texture
- Creates better crust
- Makes dough easier to handle
Many bakers consider this step essential.
Step 7: Preheat the Oven
Place a Dutch oven inside your oven.
Preheat to:
- 475°F (245°C)
for at least:
- 45 minutes
A fully heated Dutch oven creates excellent oven spring.
Step 8: Score the Dough
Remove the dough from the refrigerator.
Turn it onto parchment paper.
Use a lame or sharp knife to score the surface.
Scoring controls expansion during baking.
Step 9: Bake with Steam
Carefully place the dough into the hot Dutch oven.
Cover with the lid.
Bake for:
- 25 minutes
The lid traps steam and helps create a beautiful crust.
Step 10: Bake Uncovered
Remove the lid.
Reduce oven temperature to:
- 450°F (230°C)
Bake for:
- 20–25 minutes
until deeply golden brown.
Step 11: Cool Completely
Transfer bread to a cooling rack.
Allow it to cool for:
- At least 2 hours
before slicing.
Cutting too early can result in a gummy crumb.
The Perfect Texture
A properly baked Sourdough Green Bread Loaf should have:
- Crisp crust
- Chewy texture
- Open crumb
- Moist interior
- Vibrant green color
The flavor should be mildly tangy with subtle herb notes.
Flavor Variations
Spinach Parmesan Loaf
Add:
- ½ cup grated Parmesan
during mixing.
Herb Garden Loaf
Add:
- Dill
- Chives
- Rosemary
for extra flavor.
Garlic Green Bread
Add:
- 2 teaspoons roasted garlic paste
to the dough.
Kale and Cheddar Bread
Add:
- Sharp cheddar cheese
during folding.
Jalapeño Green Loaf
Add:
- Finely diced jalapeños
for mild heat.
Serving Suggestions
This bread is excellent served with:
- Butter
- Cream cheese
- Avocado
- Soups
- Salads
- Sandwiches
Its striking color also makes it perfect for entertaining.
Nutritional Benefits
Spinach
Provides:
- Iron
- Vitamin A
- Vitamin K
Parsley
Provides:
- Antioxidants
- Vitamin C
Sourdough Fermentation
May help:
- Improve digestibility
- Enhance flavor
- Extend shelf life
Storage Instructions
Store at room temperature in a bread bag or container for:
- 3–4 days
Avoid refrigeration, which can dry out bread.
Freezing Instructions
Slice before freezing.
Store in freezer bags for:
- Up to 3 months
Toast directly from frozen.
Common Mistakes to Avoid
Under-Fermenting
This can produce dense bread.
Over-Fermenting
Can weaken dough structure.
Using Too Many Greens
Excess greens may affect texture.
Cutting Too Soon
Always cool completely.
Skipping Stretch and Folds
These build dough strength.
Frequently Asked Questions
Can I Use Frozen Spinach?
Yes.
Thaw and squeeze out excess moisture before blending.
Will the Bread Taste Like Spinach?
Not strongly.
The flavor remains mild and balanced.
Can I Use Whole Wheat Flour?
Yes.
Replace up to 25% of the bread flour.
Why Isn’t My Bread Bright Green?
Long baking naturally darkens some pigments.
Using fresh spinach helps preserve color.
Can I Add Seeds?
Absolutely.
Sunflower, pumpkin, or sesame seeds work well.
Perfect Occasions for Green Bread
This loaf is ideal for:
- St. Patrick’s Day
- Brunch gatherings
- Holiday tables
- Sandwiches
- Artisan bread boards
- Special occasions
Its vibrant appearance always attracts attention.
Final Thoughts
Sourdough Green Bread Loaf is a beautiful twist on classic artisan sourdough. With its naturally vibrant color, crisp crust, chewy crumb, and subtle herbal flavor, it’s both visually stunning and delicious. Made with wholesome greens and traditional sourdough fermentation, this loaf combines nutrition, creativity, and incredible flavor in every slice.
Whether you’re baking it for a special occasion or simply exploring new sourdough ideas, this unique green bread is sure to impress family, friends, and fellow bread lovers alike.