Olivia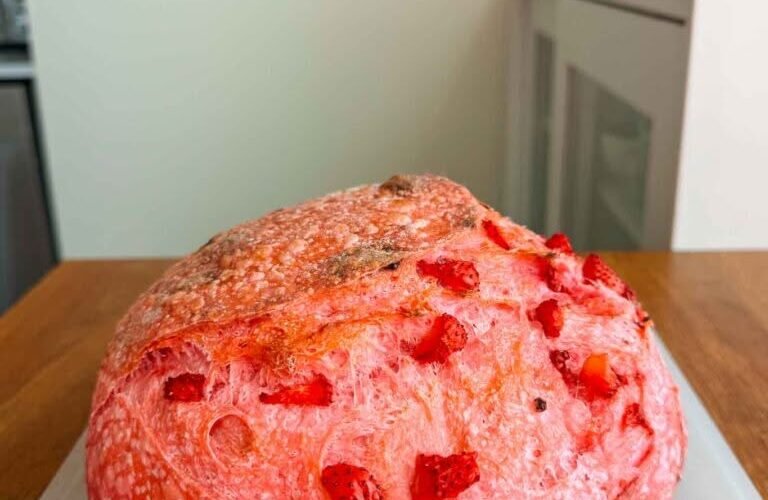
Strawberry Sourdough Bread is a beautiful fusion of artisan sourdough baking and sweet, juicy strawberries. This loaf combines the tangy complexity of natural sourdough fermentation with bursts of strawberry flavor, creating a bread that is both unique and delicious. Perfect for breakfast, brunch, afternoon tea, or dessert, this bread has a soft, tender crumb and a lightly crisp crust that showcases the natural sweetness of strawberries in every slice.
Whether served toasted with butter, topped with cream cheese, or enjoyed on its own, Strawberry Sourdough Bread is a wonderful way to elevate your sourdough baking. While it requires patience for fermentation, the results are well worth the effort.
Prep Time: 45 minutes
Bulk Fermentation: 4–6 hours
Cold Proof: 8–12 hours
Bake Time: 40–45 minutes
Yield: 1 large loaf
Why You’ll Love This Recipe
This strawberry sourdough bread is:
- Naturally leavened
- Packed with fresh strawberry flavor
- Beautifully aromatic
- Perfect for breakfast or snacks
- Free from commercial yeast
- Great for special occasions
- Excellent toasted
- A unique twist on traditional sourdough
The combination of sourdough and fruit creates a loaf that feels both rustic and elegant.
Ingredients
For the Dough
- 500g bread flour
- 350g water
- 100g active sourdough starter
- 10g salt
For the Strawberry Filling
- 200g fresh strawberries, diced
- 30g granulated sugar
- 1 teaspoon lemon juice
Optional Additions
- 1 teaspoon vanilla extract
- 50g white chocolate chips
- 1 teaspoon lemon zest
- 1 teaspoon cinnamon
Equipment Needed
- Large mixing bowl
- Banneton basket or proofing bowl
- Dutch oven
- Bench scraper
- Kitchen scale
- Parchment paper
- Cooling rack
Choosing the Best Strawberries
Fresh strawberries provide the best flavor.
Look for berries that are:
- Bright red
- Fragrant
- Firm
- Fully ripe
Avoid overly soft berries because they release excessive moisture.
If strawberries are not in season, frozen strawberries may be used, but they should be thawed and drained thoroughly before incorporating into the dough.
Understanding Strawberry Sourdough
Fruit can be challenging in sourdough because it introduces:
- Extra moisture
- Natural sugars
- Delicate texture
To maintain a well-structured loaf, strawberries are added carefully after gluten development has begun.
This prevents the dough from becoming overly wet.
Step 1: Prepare the Strawberries
Wash and dry the strawberries thoroughly.
Dice them into small pieces.
Place them in a bowl.
Add:
- Sugar
- Lemon juice
Stir gently.
Allow the berries to sit for approximately 20 minutes.
This process draws out excess moisture.
Afterward, drain the strawberries lightly.
Reserve any liquid for another use.
This step helps prevent a soggy loaf.
Step 2: Feed Your Starter
Your sourdough starter should be active and bubbly.
Feed it approximately 4–6 hours before mixing.
The starter should:
- Double in size
- Show visible bubbles
- Smell pleasantly tangy
A strong starter ensures proper fermentation.
Step 3: Mix the Dough
In a large bowl combine:
- Water
- Active starter
Mix until dissolved.
Add:
- Bread flour
Mix until no dry flour remains.
The dough will appear rough and shaggy.
Cover and allow to rest for:
30–45 minutes
This period is known as the autolyse.
Why Autolyse Matters
Autolyse improves:
- Hydration
- Dough extensibility
- Gluten development
The dough becomes easier to handle and stronger overall.
Step 4: Add Salt
Sprinkle the salt over the dough.
Mix thoroughly using your hands.
The dough should feel smooth and cohesive.
Continue mixing until the salt is fully incorporated.
Step 5: Begin Bulk Fermentation
Cover the bowl.
Allow the dough to rest for 30 minutes.
Perform the first set of stretch and folds.
To do this:
- Lift one side of the dough.
- Stretch upward.
- Fold over the center.
- Rotate the bowl.
- Repeat four times.
This strengthens the dough naturally.
Step 6: Add the Strawberries
After the first fold, gently spread the dough.
Scatter the prepared strawberries across the surface.
Fold the dough carefully to enclose the fruit.
Avoid squeezing the berries excessively.
Some streaking is normal.
The dough may become slightly wetter.
This is expected.
Step 7: Continue Stretch and Folds
Over the next 2 hours perform:
- 3 additional sets of stretch and folds
Space each set approximately 30 minutes apart.
As fermentation progresses, the dough becomes:
- Stronger
- Smoother
- More elastic
The strawberries should become evenly distributed.
Step 8: Complete Bulk Fermentation
Allow the dough to continue fermenting until it increases by approximately 50%.
Depending on temperature, this usually takes:
4–6 hours
The dough should appear:
- Puffy
- Aerated
- Active
Visible bubbles may form beneath the surface.
Step 9: Pre-Shape
Lightly flour your work surface.
Turn out the dough carefully.
Shape it into a loose round.
Allow it to rest uncovered for:
20–30 minutes
This rest period helps the gluten relax.
Step 10: Final Shaping
Shape the dough into a tight boule or batard.
Handle gently to preserve air pockets.
Place the dough seam-side up into a floured banneton.
The surface should feel taut and smooth.
Step 11: Cold Proof
Cover the banneton.
Refrigerate for:
8–12 hours
Overnight proofing provides:
- Better flavor
- Improved structure
- Easier scoring
This step is highly recommended.
Why Cold Fermentation Improves Flavor
Slow fermentation allows:
- Deeper sourdough complexity
- Enhanced aroma
- Better gluten development
The strawberries also have time to infuse the dough with flavor.
Step 12: Preheat the Oven
Place a Dutch oven into the oven.
Preheat to:
475°F (245°C)
Allow the Dutch oven to heat for at least 30 minutes.
A thoroughly heated Dutch oven helps create excellent oven spring.
Step 13: Score the Dough
Remove the dough from the refrigerator.
Turn it onto parchment paper.
Using a bread lame or sharp knife, score the top.
A single long slash works well.
Scoring directs expansion during baking.
Step 14: Bake Covered
Carefully place the dough into the hot Dutch oven.
Cover with the lid.
Bake for:
25 minutes
The trapped steam encourages maximum rise.
Step 15: Bake Uncovered
Remove the lid.
Reduce temperature to:
450°F (230°C)
Bake for an additional:
15–20 minutes
The loaf should become deeply golden brown.
Step 16: Cool Completely
Transfer the bread to a cooling rack.
Allow it to cool for at least:
2 hours
Although tempting, avoid slicing too soon.
The crumb continues setting as it cools.
Texture and Flavor
A successful strawberry sourdough loaf features:
Crust
- Crisp
- Golden
- Lightly caramelized
Crumb
- Soft
- Moist
- Open yet tender
Flavor
- Mild sourdough tang
- Sweet strawberry bursts
- Delicate fruit aroma
Every slice offers a beautiful balance of sweet and tangy notes.
Optional Flavor Variations
Strawberry Lemon Sourdough
Add:
- 1 tablespoon lemon zest
The citrus enhances the strawberry flavor.
Strawberry Vanilla Sourdough
Add:
- 1 teaspoon vanilla extract
Creates a dessert-like aroma.
Strawberry White Chocolate Sourdough
Add:
- 50–75g white chocolate chips
A rich and indulgent variation.
Strawberry Cinnamon Sourdough
Add:
- 1 teaspoon cinnamon
Provides warmth and complexity.
Serving Suggestions
This bread is delicious:
- Toasted with butter
- With cream cheese
- Drizzled with honey
- Served with mascarpone
- Alongside tea or coffee
It also makes exceptional French toast.
Making Strawberry French Toast
Thick slices of strawberry sourdough create an extraordinary breakfast.
Dip slices into:
- Eggs
- Milk
- Vanilla
Cook until golden.
Top with:
- Fresh strawberries
- Maple syrup
- Whipped cream
The strawberry flavor becomes even more pronounced.
Storage Instructions
Store at room temperature in a bread bag or airtight container.
Best enjoyed within:
2–3 days
Because of the fruit content, this bread may become moist over time.
Freezing Instructions
Slice before freezing.
Store in freezer-safe bags.
Freeze for up to:
3 months
Toast directly from frozen.
Troubleshooting
Dense Loaf
Possible causes:
- Weak starter
- Under-fermentation
- Excess moisture
Soggy Crumb
Possible causes:
- Overripe strawberries
- Insufficient cooling
Fruit Leakage
Some leakage is normal.
Try cutting strawberries smaller and draining thoroughly.
Poor Oven Spring
Possible causes:
- Over-proofing
- Weak gluten development
Frequently Asked Questions
Can I Use Frozen Strawberries?
Yes.
Thaw completely and drain excess liquid first.
Can I Add Other Fruits?
Absolutely.
Try:
- Blueberries
- Raspberries
- Blackberries
Is This Bread Sweet?
It is mildly sweet.
The natural sweetness comes primarily from the strawberries.
Can I Use Whole Wheat Flour?
Yes.
Replace up to 20% of the bread flour with whole wheat flour.
Can I Add Nuts?
Yes.
Pecans or almonds pair beautifully with strawberries.
Health Benefits of Homemade Sourdough
Sourdough fermentation offers several advantages:
- Improved flavor
- Better texture
- Natural preservation
- Traditional baking methods
Combined with fresh strawberries, this loaf provides a delightful homemade alternative to commercial sweet breads.
Final Thoughts
Strawberry Sourdough Bread is a beautiful celebration of artisan baking and fresh fruit. The naturally fermented dough develops incredible flavor and texture, while juicy strawberries add sweetness, color, and aroma that make every slice memorable. Whether enjoyed for breakfast, brunch, dessert, or an afternoon snack, this loaf brings a unique and delicious twist to traditional sourdough.
The combination of crisp crust, tender crumb, and bursts of strawberry flavor creates a bread that feels both comforting and special. Once you’ve baked this loaf and tasted the balance of tangy sourdough and sweet berries, it may become one of your favorite seasonal sourdough creations. Perfect for sharing with family and friends, this bread showcases the endless possibilities of creative sourdough baking.