Olivia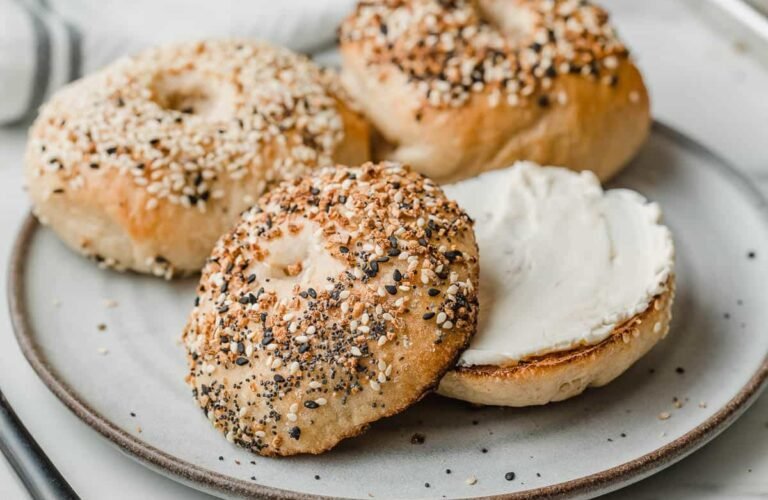
There’s something incredibly satisfying about making homemade sourdough bagels from scratch. With their chewy texture, golden crust, and rich flavor developed through natural fermentation, sourdough bagels are a step above store-bought versions. Whether you enjoy them toasted with cream cheese, piled high with sandwich fillings, or simply spread with butter, these bagels are worth every minute of preparation.
Unlike traditional yeast bagels, sourdough bagels rely on an active sourdough starter for leavening and flavor. The long fermentation process creates a deeper taste, improves texture, and gives the bagels their signature chew. While the process takes time, most of it is hands-off, making this recipe perfect for weekend baking.
This recipe yields 8 large bagels and is suitable for beginner and experienced sourdough bakers alike.
Why You’ll Love These Sourdough Bagels
These homemade sourdough bagels are:
- Naturally leavened
- Wonderfully chewy
- Rich in flavor
- Easy to customize
- Great for meal prep
- Perfect for freezing
- Excellent for breakfast and sandwiches
- Made with simple pantry ingredients
Once you taste a fresh sourdough bagel warm from the oven, it’s hard to go back to store-bought.
What Makes Sourdough Bagels Special?
Bagels are unique because they are boiled before baking. This extra step creates their characteristic chewy crust and dense interior.
The addition of sourdough starter provides:
- More complex flavor
- Improved texture
- Better keeping quality
- Natural fermentation benefits
The result is a bagel with a slight tang, crisp exterior, and chewy crumb.
Ingredients
For the Dough
- 500g bread flour
- 100g active sourdough starter
- 250g water, room temperature
- 20g honey or maple syrup
- 10g salt
For Boiling
- 2 liters water
- 1 tablespoon honey or brown sugar
Optional Toppings
- Sesame seeds
- Poppy seeds
- Everything bagel seasoning
- Dried onion flakes
- Dried garlic flakes
- Coarse salt
Equipment Needed
- Large mixing bowl
- Kitchen scale
- Dough scraper
- Baking sheet
- Parchment paper
- Large pot
- Slotted spoon
- Cooling rack
Understanding the Dough
Bagel dough differs from bread dough.
It is:
- Lower in hydration
- Firmer
- Easier to shape
- Designed for chewiness
Do not be tempted to add excessive water.
A stiff dough is exactly what creates a traditional bagel texture.
Step 1: Feed Your Starter
Start with a healthy active sourdough starter.
Feed your starter approximately 4–6 hours before mixing the dough.
The starter should:
- Double in size
- Be bubbly
- Smell pleasantly tangy
A strong starter produces the best rise and flavor.
Step 2: Mix the Dough
In a large bowl combine:
- Active sourdough starter
- Water
- Honey
Mix until the starter is mostly dissolved.
Add:
- Bread flour
- Salt
Mix until a shaggy dough forms.
Because bagel dough is relatively stiff, it may seem difficult to mix at first.
Keep working until all flour is incorporated.
Step 3: Knead the Dough
Transfer the dough to a clean work surface.
Knead for approximately:
10–12 minutes
The dough should become:
- Smooth
- Elastic
- Firm
You can also use a stand mixer with a dough hook for about 8 minutes.
A properly kneaded dough will feel strong and springy.
Step 4: Bulk Fermentation
Place the dough in a lightly greased bowl.
Cover tightly.
Allow to ferment at room temperature for approximately:
6–8 hours
The exact timing depends on:
- Room temperature
- Starter strength
The dough may not fully double in size.
This is normal for bagels.
Look for slight puffiness and visible fermentation.
Step 5: Divide the Dough
Turn the dough onto a work surface.
Using a scale, divide into:
8 equal pieces
Each piece should weigh approximately 105–110 grams.
Uniform portions ensure even baking.
Step 6: Shape Into Balls
Shape each portion into a tight ball.
To do this:
- Pull the edges toward the center.
- Turn seam-side down.
- Roll gently against the counter.
Allow the dough balls to rest for:
15–20 minutes
This relaxes the gluten and makes shaping easier.
Step 7: Shape the Bagels
There are two popular shaping methods.
Method 1: Poke-and-Stretch
- Press your thumb through the center.
- Create a hole.
- Stretch gently until the opening is about 2 inches wide.
Method 2: Rope Method
- Roll dough into a rope.
- Wrap into a circle.
- Seal the ends together.
Both methods work well.
The poke-and-stretch method is usually easier for beginners.
Step 8: Overnight Cold Proof
Place shaped bagels on a parchment-lined baking sheet.
Cover loosely.
Refrigerate overnight for:
8–16 hours
This cold fermentation develops flavor and improves texture.
The bagels should appear slightly puffier by morning.
Why the Overnight Proof Matters
The cold proof:
- Enhances sourdough flavor
- Improves chewiness
- Makes the dough easier to handle
- Creates better crust development
Many experienced bakers consider this step essential.
Step 9: Test for Readiness
Before boiling, perform a simple float test.
Fill a bowl with cool water.
Place one bagel in the water.
If it floats within 10–15 seconds, it is ready.
If not, allow the bagels to sit at room temperature for another 30–60 minutes.
Step 10: Prepare the Boiling Water
Bring a large pot of water to a gentle boil.
Add:
- 1 tablespoon honey or brown sugar
The sweetener promotes browning and enhances flavor.
Avoid a vigorous boil.
Gentle boiling produces better-shaped bagels.
Step 11: Boil the Bagels
Carefully place 2–3 bagels into the water.
Boil:
- 30 seconds on the first side
- 30 seconds on the second side
For extra chewiness:
Boil 60 seconds per side.
Longer boiling creates a thicker crust.
Use a slotted spoon to remove the bagels.
Place them back on the baking sheet.
Step 12: Add Toppings
While the bagels are still damp from boiling, sprinkle with desired toppings.
Popular choices include:
- Sesame seeds
- Everything seasoning
- Poppy seeds
- Garlic flakes
The moisture helps toppings adhere naturally.
Step 13: Bake
Preheat oven to:
425°F (220°C)
Bake for:
20–25 minutes
The bagels should become:
- Deep golden brown
- Firm
- Slightly crisp on the exterior
Rotate the baking sheet halfway through baking if necessary.
Step 14: Cool
Transfer the bagels to a cooling rack.
Allow them to cool for at least:
20–30 minutes
Although tempting, cutting too early may affect texture.
Cooling helps the interior finish setting.
Texture and Flavor
A properly made sourdough bagel should have:
Exterior
- Golden brown
- Slightly crisp
- Shiny
Interior
- Dense but tender
- Chewy
- Even crumb
Flavor
- Mild sourdough tang
- Rich wheat flavor
- Slight sweetness
Popular Topping Variations
Everything Bagel
Combine:
- Sesame seeds
- Poppy seeds
- Garlic flakes
- Onion flakes
- Salt
The most popular bagel topping.
Cinnamon Raisin
Add:
- 1 teaspoon cinnamon
- 100g raisins
Mix directly into the dough.
Cheddar Jalapeño
Add:
- Shredded cheddar
- Finely diced jalapeños
Perfect for savory breakfasts.
Asiago Cheese
Top with shredded Asiago before baking.
Creates a rich cheesy crust.
Sesame Seed
A classic option with nutty flavor.
Serving Ideas
These sourdough bagels are incredibly versatile.
Serve with:
- Cream cheese
- Butter
- Jam
- Peanut butter
- Smoked salmon
- Avocado
- Egg sandwiches
They are equally delicious toasted or fresh.
Storage Instructions
Store in an airtight container for:
2–3 days at room temperature
For longer storage:
Freeze for up to 3 months.
Slice before freezing for easier reheating.
Reheating
To refresh bagels:
Toaster
Toast until warm and crisp.
Oven
Bake at 350°F (175°C) for 5–7 minutes.
Frozen
Toast directly from frozen.
Troubleshooting
Dense Bagels
Possible causes:
- Weak starter
- Underproofing
- Insufficient kneading
Flat Bagels
Possible causes:
- Overproofing
- Excess water
- Weak shaping
Pale Bagels
Possible causes:
- Short baking time
- No sweetener in boiling water
Tough Bagels
Possible causes:
- Excessive boiling
- Overbaking
Frequently Asked Questions
Can I Use All-Purpose Flour?
Yes, but bread flour provides better chewiness.
Can I Skip the Overnight Proof?
Technically yes, but flavor and texture will be noticeably better with an overnight fermentation.
Why Do Bagels Need Boiling?
Boiling gelatinizes the surface starches, creating the signature chewy crust.
Can I Make Smaller Bagels?
Absolutely.
Simply divide the dough into 10–12 portions instead of 8.
Adjust baking time slightly.
Can I Freeze Them?
Yes.
Sourdough bagels freeze exceptionally well.
Final Thoughts
Homemade sourdough bagels are one of the most rewarding projects for any baker. The combination of a naturally fermented dough, overnight cold proof, boiling step, and hot bake creates a bagel with outstanding flavor and texture. Crisp on the outside, chewy on the inside, and rich with sourdough character, these bagels are far superior to most store-bought varieties.
Whether topped with cream cheese, transformed into breakfast sandwiches, or enjoyed warm with butter, these sourdough bagels are sure to become a staple in your baking routine. Once you’ve mastered the process, you’ll discover that making bagels at home is not only achievable but incredibly enjoyable. The result is a bakery-quality breakfast treat that fills your kitchen with irresistible aroma and flavor every time.