Olivia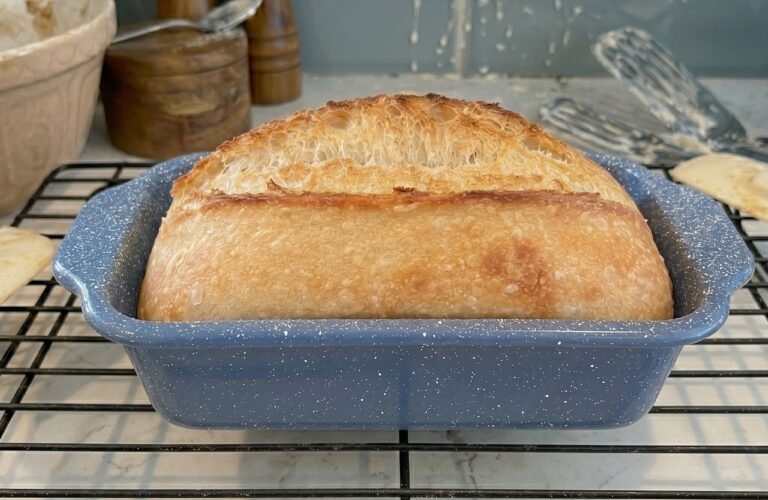
Making sourdough bread at home can feel overwhelming at first. Sticky dough, complicated shaping, unpredictable spreading, and trying to transfer delicate loaves into hot Dutch ovens can make baking seem stressful instead of relaxing. That’s exactly why the Two Loaf Pan Sourdough Method is such a game changer.
This method simplifies the sourdough process by using loaf pans instead of free-form artisan shaping. The result is soft, structured, beautiful sourdough loaves that are easier to handle, easier to slice, and perfect for everyday sandwiches and toast.
Even better, baking two loaves at once saves time, reduces effort, and gives you extra bread for freezing or sharing. If traditional sourdough baking has ever felt chaotic or intimidating, this method creates a calmer, more manageable experience while still producing flavorful homemade bread with that signature sourdough tang.
The loaves come out golden, slightly crisp on the outside, and wonderfully soft and chewy inside. They are perfect for beginners, busy families, or experienced bakers who simply want a more practical sourdough routine.
Why You’ll Love This Method
- Easier than free-form sourdough
- No Dutch oven required
- More structured and predictable loaves
- Perfect for sandwiches and toast
- Less messy dough handling
- Great for meal prep and freezing
- Makes two beautiful loaves at once
Why Loaf Pans Make Sourdough Easier
Traditional artisan sourdough often requires:
- Banneton baskets
- Careful shaping
- Dough scoring
- Dutch ovens
- Delicate transferring
Using loaf pans removes much of that stress.
The pans support the dough as it rises and bakes, making it easier to handle softer doughs without worrying about spreading or flattening.
The result is reliable, consistent bread that still tastes wonderfully homemade.
Ingredients
For Two Loaves
- 1000g bread flour
- 700g warm water
- 200g active sourdough starter
- 20g salt
Optional additions:
- 2 tablespoons honey
- 2 tablespoons olive oil
- Seeds or oats for topping
Equipment Needed
- Two loaf pans
- Large mixing bowl
- Dough scraper
- Kitchen towel or plastic wrap
- Wire cooling rack
Step 1: Feed Your Starter
A healthy active sourdough starter is the key to successful bread.
Feed your starter about 4–6 hours before mixing the dough until bubbly and doubled in size.
A strong starter helps the bread rise properly and creates excellent flavor.
Step 2: Mix the Dough
In a large bowl, combine:
- Warm water
- Active sourdough starter
Mix until mostly dissolved.
Add the bread flour and stir until a shaggy dough forms.
Cover the bowl and let the dough rest for 30 minutes.
This resting stage is called autolyse and helps hydrate the flour while improving gluten development.
Step 3: Add Salt
Sprinkle the salt over the dough.
Use wet hands to pinch and fold the dough until the salt is fully incorporated.
The dough may feel rough initially but will smooth out as gluten develops.
Step 4: Stretch and Fold
Instead of traditional kneading, perform stretch-and-folds every 30 minutes for about 2 hours.
To do this:
- Grab one side of the dough
- Stretch it upward
- Fold it over itself
- Rotate the bowl
- Repeat several times
These folds strengthen the dough gently without heavy kneading.
You’ll notice the dough becoming smoother and more elastic after each round.
Why This Step Feels Less Stressful
One reason this method feels calmer is because perfection is unnecessary.
The loaf pans provide structure later, so you don’t need to obsess over flawless shaping or dough tension.
The dough simply needs enough strength to rise well.
That relaxed approach makes sourdough feel much more approachable.
Step 5: Bulk Fermentation
After the final fold, cover the dough and allow it to rise at room temperature for about 4–6 hours.
The dough should look puffier and slightly airy.
Bulk fermentation times vary depending on room temperature and starter activity.
The dough does not need to double perfectly.
Step 6: Divide the Dough
Lightly flour your work surface.
Turn the dough out gently and divide it into two equal portions.
Because this method uses loaf pans, shaping is very simple.
No complicated tension-building techniques are required.
Step 7: Shape the Loaves
Flatten each dough portion gently into a rough rectangle.
Fold the sides inward, then roll the dough tightly into a loaf shape.
Place each loaf seam-side down into a greased loaf pan.
That’s it.
No bannetons, complicated stitching, or worrying about dough spreading across the counter.
Step 8: Final Proof
Cover the loaf pans loosely with plastic wrap or towels.
Allow the dough to rise again for about 2–4 hours at room temperature until puffy.
Alternatively, refrigerate overnight for deeper flavor.
Cold fermentation develops more complex sourdough flavor while making the schedule more flexible.
Why Two Loaves Make Life Easier
Making two loaves at once saves:
- Time
- Effort
- Energy
- Cleanup
One loaf can be enjoyed fresh while the second can be frozen for later.
It also prevents the disappointment of finishing one loaf too quickly.
Homemade sourdough tends to disappear fast.
Step 9: Preheat the Oven
Preheat the oven to 425°F (220°C).
Unlike artisan sourdough, you do not need heavy Dutch ovens.
That alone makes this process feel much simpler and less intimidating.
If desired, place a shallow tray of hot water in the oven to create steam during the first part of baking.
Steam helps create a better crust.
Step 10: Score the Loaves
Use a sharp knife or bread lame to slash the tops of the loaves.
A simple long slash works perfectly.
Scoring allows the bread to expand properly during baking.
With loaf pans, even scoring feels less stressful because the dough is already supported.
Step 11: Bake the Bread
Bake the loaves for about 35–45 minutes until deeply golden brown.
The tops should sound hollow when tapped.
If you prefer softer crusts, brush the tops lightly with butter after baking.
The aroma of fresh sourdough filling the kitchen is one of the best parts of the entire process.
Step 12: Cool Completely
Remove the bread from the pans and transfer to a wire rack.
Allow the loaves to cool completely before slicing.
Although warm bread is tempting, cooling helps the crumb set properly and prevents gummy texture.
The Texture of Loaf Pan Sourdough
This style of sourdough creates:
- Softer crumb
- Even slices
- Slight chewiness
- Gentle crust
- Sandwich-friendly structure
It may not have the giant open holes of artisan boules, but it is far more practical for everyday use.
Perfect Uses for This Bread
These loaves are ideal for:
- Sandwiches
- Toast
- French toast
- Garlic bread
- Grilled cheese
- Meal prep
- Breakfast toast
The square slices also fit perfectly into toasters and lunch containers.
Flavor Variations
Honey Oat Sourdough
Add honey and oats for softer sweeter bread.
Seeded Sandwich Loaf
Add sunflower, sesame, or flax seeds.
Garlic Herb Loaf
Mix in roasted garlic and dried herbs.
Whole Wheat Version
Replace part of the bread flour with whole wheat flour.
Cheese Sourdough
Add shredded cheddar or parmesan.
Why Beginners Love This Method
Traditional sourdough can sometimes feel overly technical.
This loaf pan method removes many stressful parts while still teaching important sourdough skills like:
- Fermentation
- Dough handling
- Stretch-and-folds
- Scoring
- Baking timing
It builds confidence without overwhelming the baker.
Common Mistakes to Avoid
Weak Starter
Inactive starter leads to dense bread.
Underproofing
Underproofed dough may split unevenly.
Overproofing
Overproofed dough may collapse slightly.
Slicing Too Early
Warm bread may become gummy.
Using Too Much Flour
Extra flour can dry out the dough.
Storage Instructions
Store bread wrapped at room temperature for up to 3 days.
For longer freshness, use airtight storage.
Avoid refrigeration because it can dry out the bread faster.
Freezing Instructions
These loaves freeze beautifully.
Slice before freezing for convenience.
Place slices into freezer-safe bags and freeze for up to 2 months.
Toast directly from frozen when needed.
Why This Method Feels More Relaxed
The loaf pan method reduces many common stress points:
- No transferring wet dough into hot pots
- No worrying about dough spreading
- Easier shaping
- More predictable baking
- Simpler cleanup
Instead of chasing perfect artisan loaves, this method focuses on practical, delicious homemade bread.
That makes sourdough feel enjoyable again.
Meal Prep Friendly
Two loaves make weekly meal prep easier.
Use the bread for:
- Sandwiches
- Breakfast toast
- Avocado toast
- Lunch prep
- Freezer meals
Homemade bread on hand makes everyday meals feel more comforting and satisfying.
Why Homemade Sourdough Is Worth It
Even simplified sourdough offers incredible benefits:
- Rich flavor
- Natural fermentation
- Better freshness
- No preservatives
- More control over ingredients
Plus, the process itself can become calming and rewarding once it feels manageable.
Perfect for Busy Bakers
Not everyone has time for elaborate artisan bread routines.
This method works beautifully for:
- Busy parents
- Beginners
- Meal preppers
- Everyday home bakers
- People wanting reliable bread
It keeps sourdough practical rather than stressful.
Final Thoughts
The Two Loaf Pan Sourdough Method makes homemade sourdough feel simpler, calmer, and far less chaotic without sacrificing flavor or texture. The loaf pans provide structure and reliability while still delivering the rich tangy flavor and chewy crumb that make sourdough so special.
Perfect for sandwiches, toast, meal prep, and everyday baking, this method helps turn sourdough from an intimidating project into a cozy kitchen routine. Once you experience how easy and rewarding loaf pan sourdough can be, you may never go back to stressful free-form baking again.